Power Query
![]()
Overview
Microsoft Power Query is a data preparation and transformation ETL engine that lets you connect to various data sources. Power Query is available in Microsoft Excel, Power BI, Power BI dataflows, Azure Data Factory wrangling dataflows, SQL Server Analysis Services, and much more. A great number of disparate data sources is available thanks to its support for third-party "plugins" (i.e. Connectors).
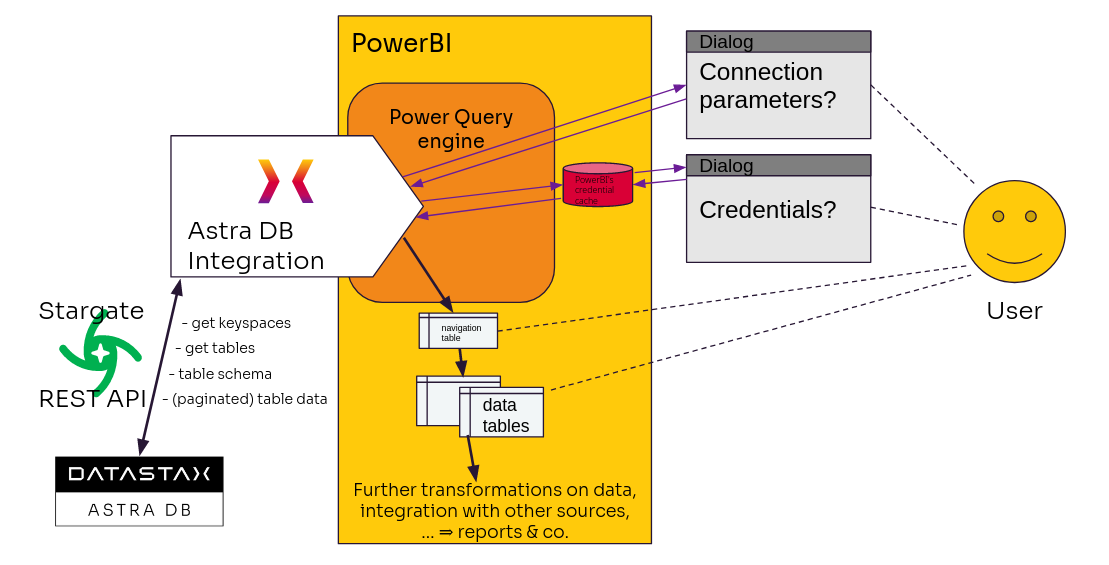
You have two options to connect Power Query to Astra: 1. either through a standard Power Query ODBC connector, paired with the DataStax ODBC Driver for Apache Cassandra; 2. or directly through our Power Query custom connector. Keep reading to find out which one is best suited to your needs.
Note
Power Query and the related data products run only on Microsoft Windows. In the following, out of several products and services, usage with Microsoft Power BI (Desktop and Service) is assumed. Depending on the product/service you are using, the appearance will vary; also, some of the features might also differ.
The Power Query engine, which operates the Connector, can run in three different modes: with reference to Power BI, the possible setups are:
- Local, where the engine is contained in Power BI Desktop, hence the connector runs on-premises;
- Data Gateway, where the cloud product Power BI Service is used, which receives the connector data through an installed On-Premises Data Gateway (whether in "personal mode" or not);
- Cloud, where the whole stack runs in Azure's cloud. This requires a connector certified by Microsoft; moreover, for security reasons, it cannot make use of any external dependency (such as a custom ODBC driver).
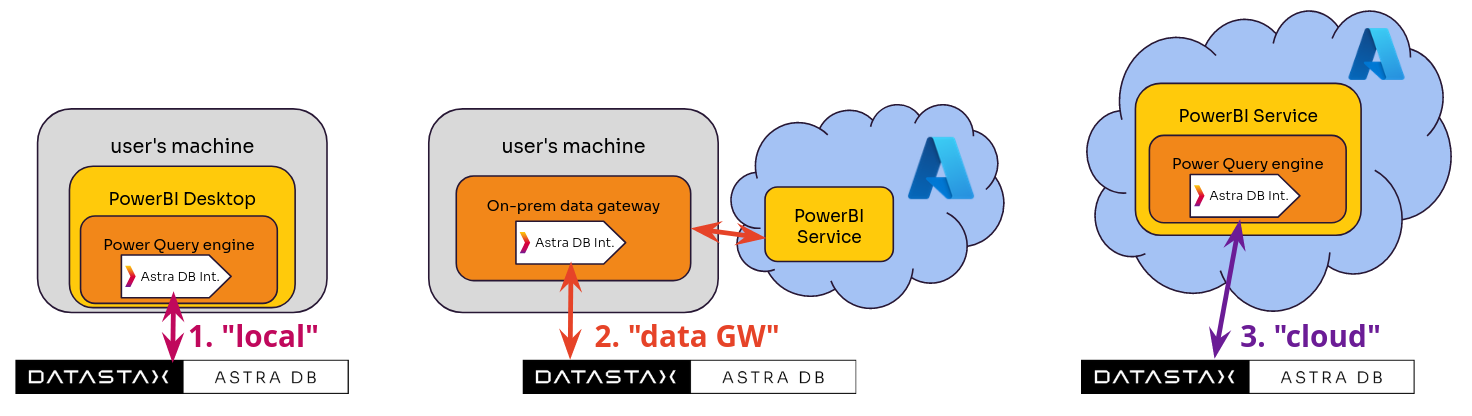
Here is the support matrix for these options:
| Mode | ODBC Connector | Custom Connector |
|---|---|---|
| Local | OK (requires Simba ODBC driver) | OK (currently self-signed) |
| Data Gateway | OK (requires Simba ODBC driver) | OK (currently self-signed) |
| Cloud | NO (security limitations from Azure) | pending (certification in progress) |
In the following, the various ways to connect with data from Astra DB are outlined: keep in mind that, reagardless whether through ODBC or the Custom connector, you will need to successfully create a report locally before publishing it to Power BI Service.
Precautions about very large tables
Regardless of whether you use the ODBC or the Custom connector, reading indiscriminately from a very large table is a process that can last a long time.
It is discouraged to fully import huge tables through Power Query.
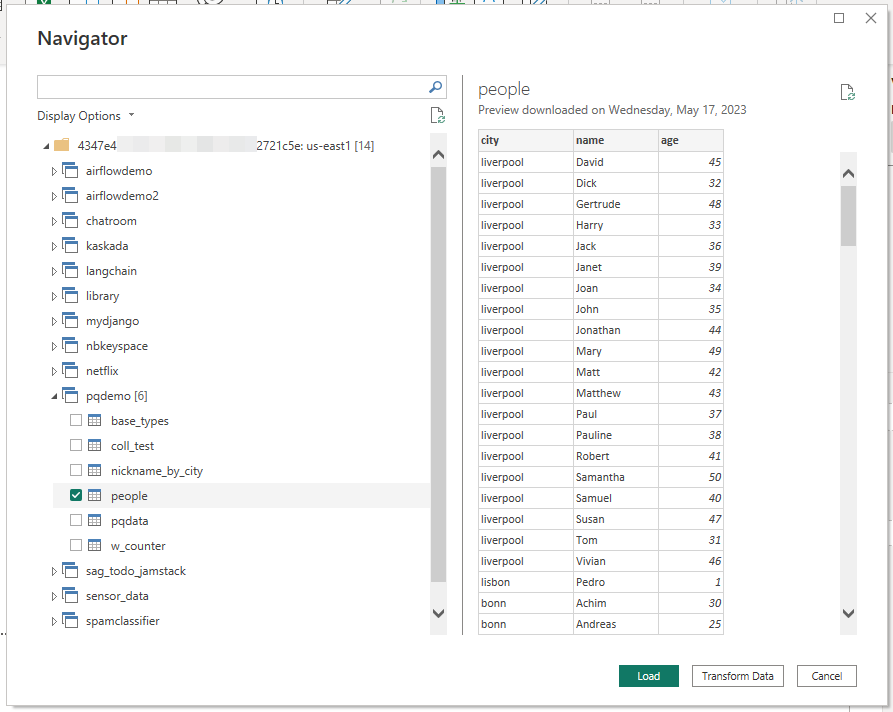
If you do, chances are you will see something like this "preview" dialog for a long time:
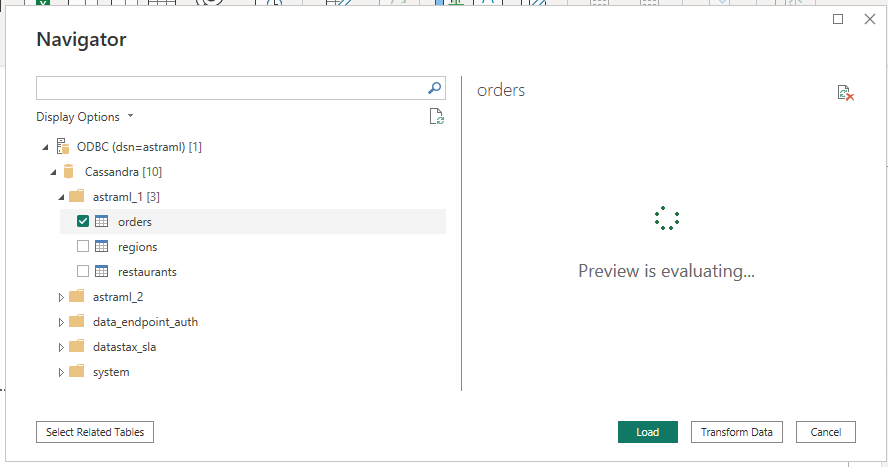 In essence, this is a manifestation of Cassandra's take on data models and its OLTP-first nature, whereby tables should be generally designed to support single-partition queries only (and not whole-table scans). In practice, this potential issue can reasonably be ignored below the 10k-100k-rows mark (depending on factors such as your latency requirements, the network bandwidth and cost, and the average row size).
The ODBC connector lets you specify a query string in order to
In essence, this is a manifestation of Cassandra's take on data models and its OLTP-first nature, whereby tables should be generally designed to support single-partition queries only (and not whole-table scans). In practice, this potential issue can reasonably be ignored below the 10k-100k-rows mark (depending on factors such as your latency requirements, the network bandwidth and cost, and the average row size).
The ODBC connector lets you specify a query string in order to SELECT a subset of rows from very large tables: as long as the query complies with Cassandra's data modeling best practices, this is a sensible approach. Keep reading for details.
The Custom connector, conversely, is not suitable for very large tables as it only supports reading a table in full.
In any case, keep in mind that by reading from massive tables one might unwittingly consume a sizeable amount of Astra credits.
ODBC connection (local)
This way of connecting works by first creating and configuring, outside of Power Query, an ODBC connection right to your specific target database and then simply connecting to it (without specifying additional connection parameters anymore) from Power Query (e.g. from Power BI). Let's see how this works.
Pre-requisites
Note
In the following it is assumed that you have a local installation of Power BI Desktop. Consult the Microsoft documentation if your goal is to use another of the products that support Power Query.
Database
- You should have an Astra account.
- You should Create an Astra Database.
- You should Have an Astra Token. You will need the various string fields contained therein.
- You should Download your Secure Connect Bundle.
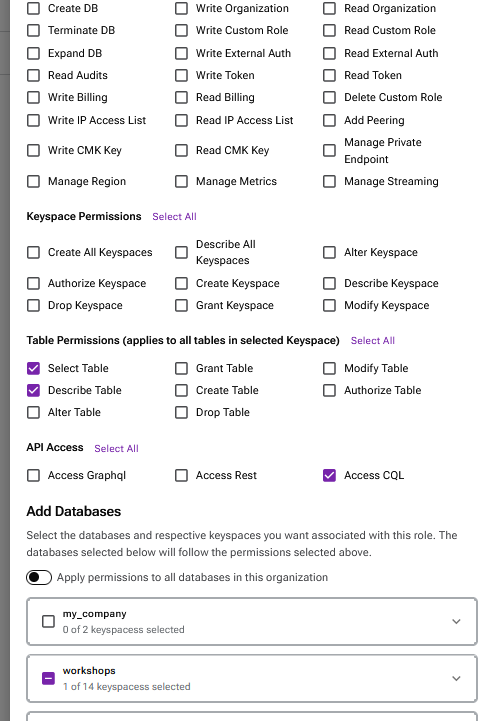
Minimal token permissions
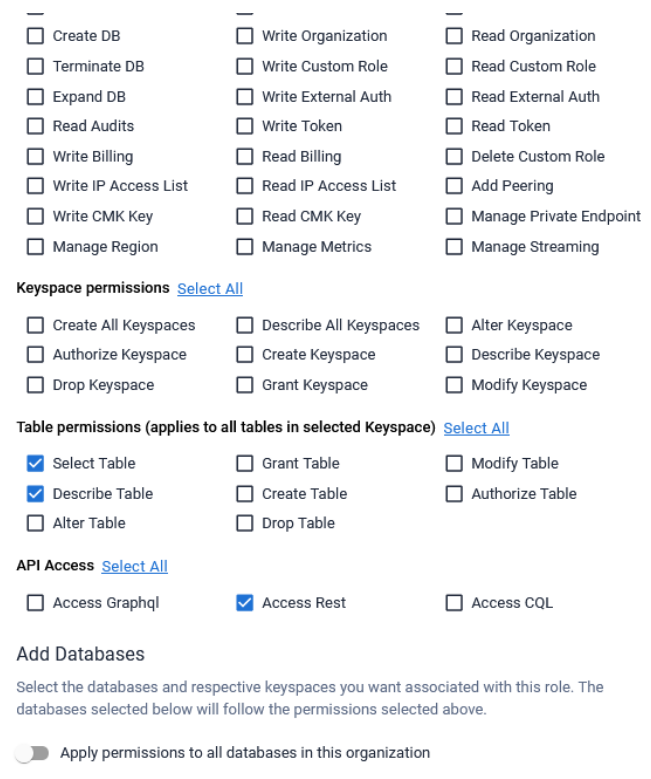
While you can certainly use a standard "Database Administrator" token, you may want to use a least-privilege token for this data connection through the ODBC connector. These are the specifications for a minimal Custom Role for this purpose:
- The token must have, in Table Permissions, (1) Select Table and (2) Describe Table; and (3) in API Access it needs CQL;
- It is OK if the token is scoped to just the one DB that is being used;
- If the token is disallowed on certain keyspaces, you will still be able to list the tables they contain, but you will get a permission error if trying to read data from them.
Note
You might find it convenient to have some tables with data in your database in order to ensure the connection works all right. See Awesome Astra's "Load and Export" page for suggestions on how to load data in Astra DB.
ODBC Driver
You need to install and configure the "DataStax ODBC Driver for Apache Cassandra" on your Windows machine. A useful reference during these steps is the Install Guide.
First, visit this download link and select your architecture (most probably the 64-bit one will do).
Second install the driver (by double-clicking on the *.msi Windows installer
file you just downloaded and following the instructions).
Third you need to download and install the "Visual C++ 2013 redistributable bundle" on your Windows machine.
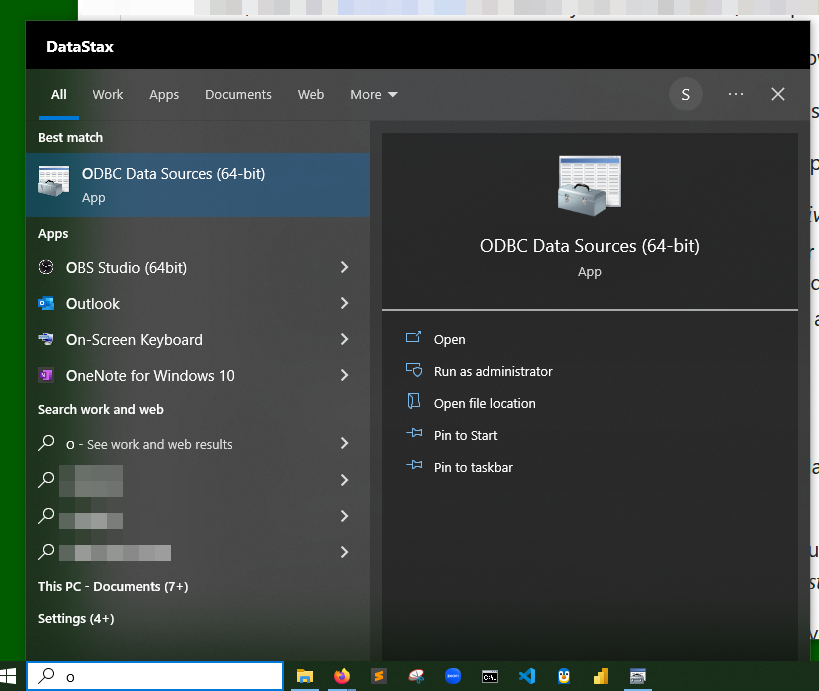
Fourth. Run the ODBC Data Source Administrator program on Windows (choose Run as administrator). In the taskbar the program will show as "ODBC Data Sources (64-bit)".
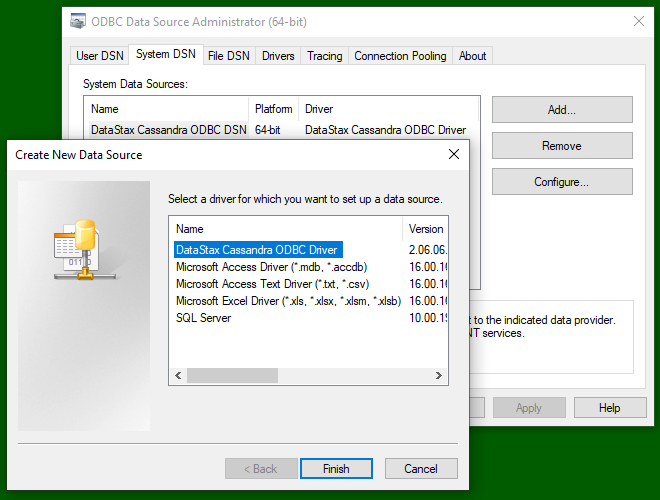
- Go to the "System DSN" tab click "Add..." to create a new Data Source, selecting the DataStax Cassandra ODBC Driver;
- Configure the source (check the Install Guide linked above for details):
- Authentication mechanisms is Cloud secure connect bundle;
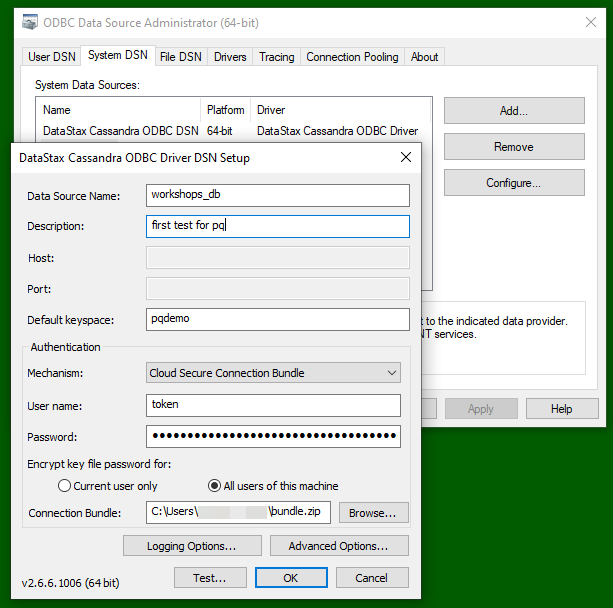
- User name is
token(the literal lower-case word "token"!); - Password is the string starting with
AstraCS:...in your Database Token; - Upload your Secure Connect Bundle zip file;
- Choose a "Data source name";
- Choose a "Description";
- Set the "Default keyspace" to a keyspace in your database.
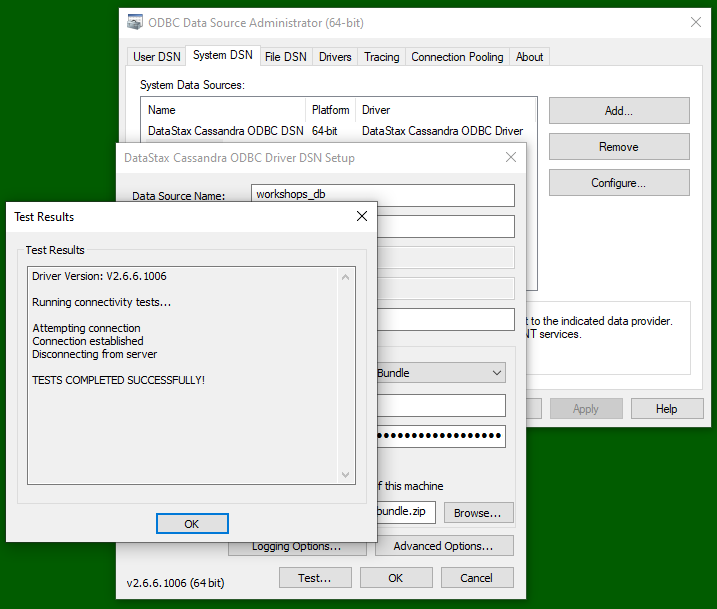
- Hit the "Test ..." button and make sure you get back a "Test completed successfully" message.
Visual guide
Starting the Manager:
 Creating the Data source:
 Configuring the Data source:
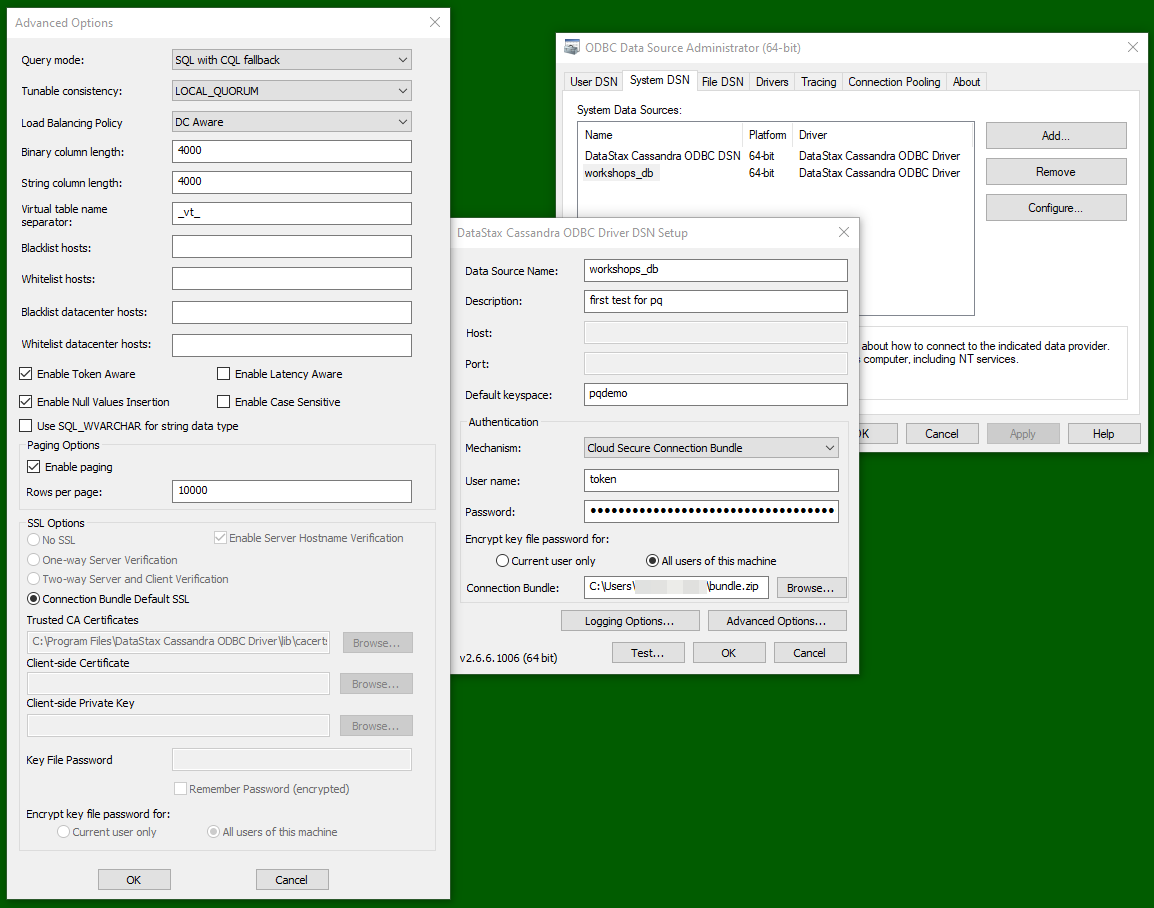
 The "Advanced settings" can be left to their defaults:
 Testing the Data source:
Close the ODBC Administrator. You are ready to launch Power BI Desktop and head for the next section.
How-to
Now that you have configured your Astra DB as a specific ODBC data source, all that remains is to channel the data coming from it into a report.
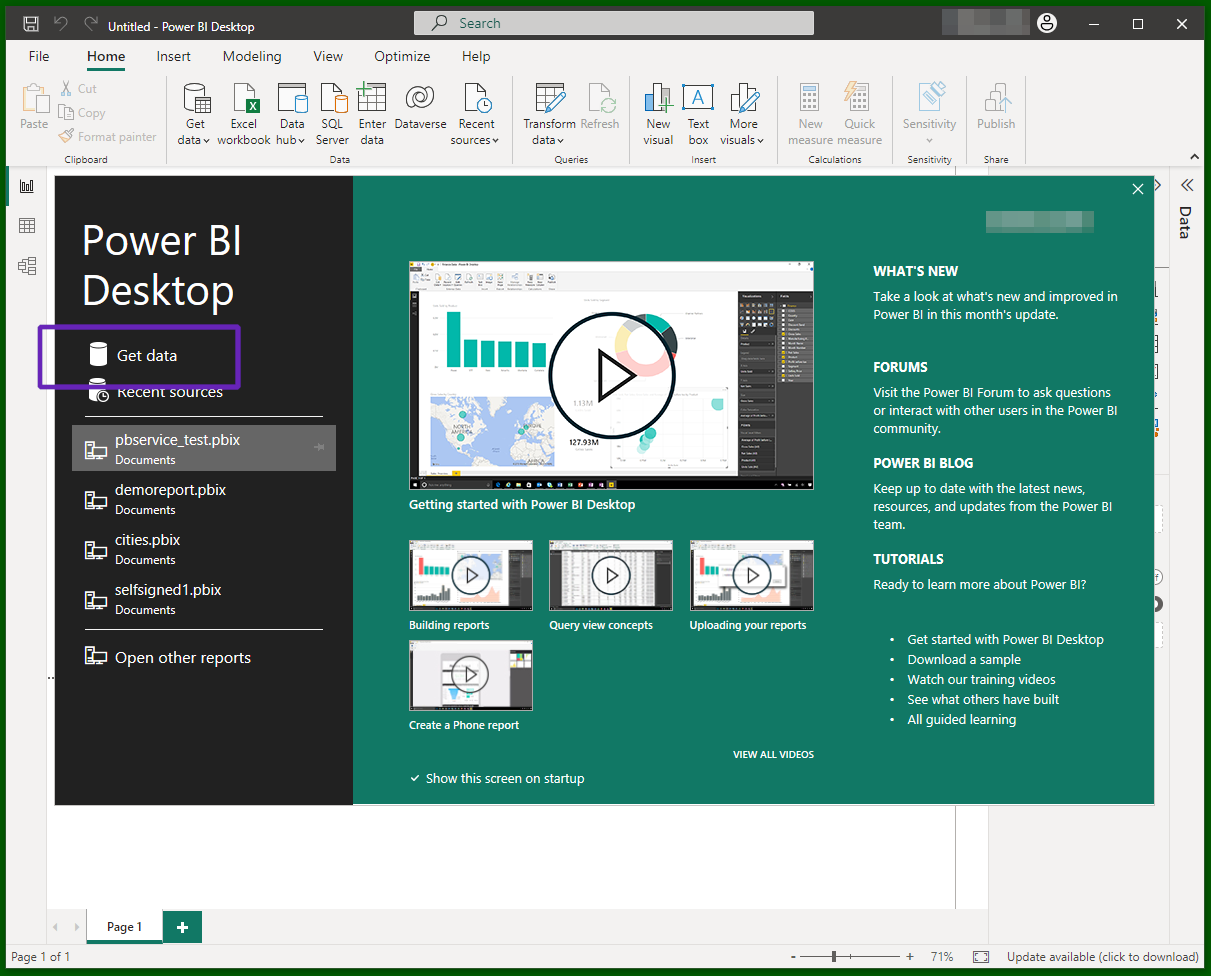
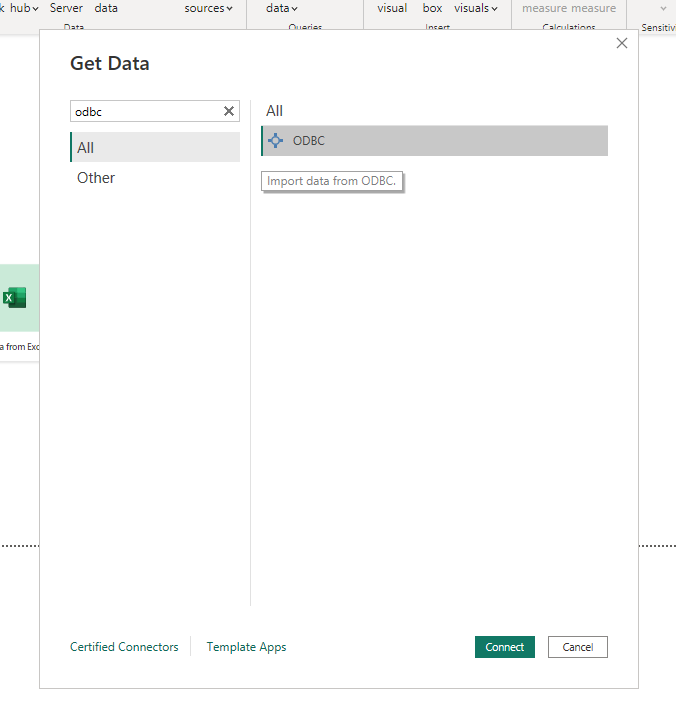
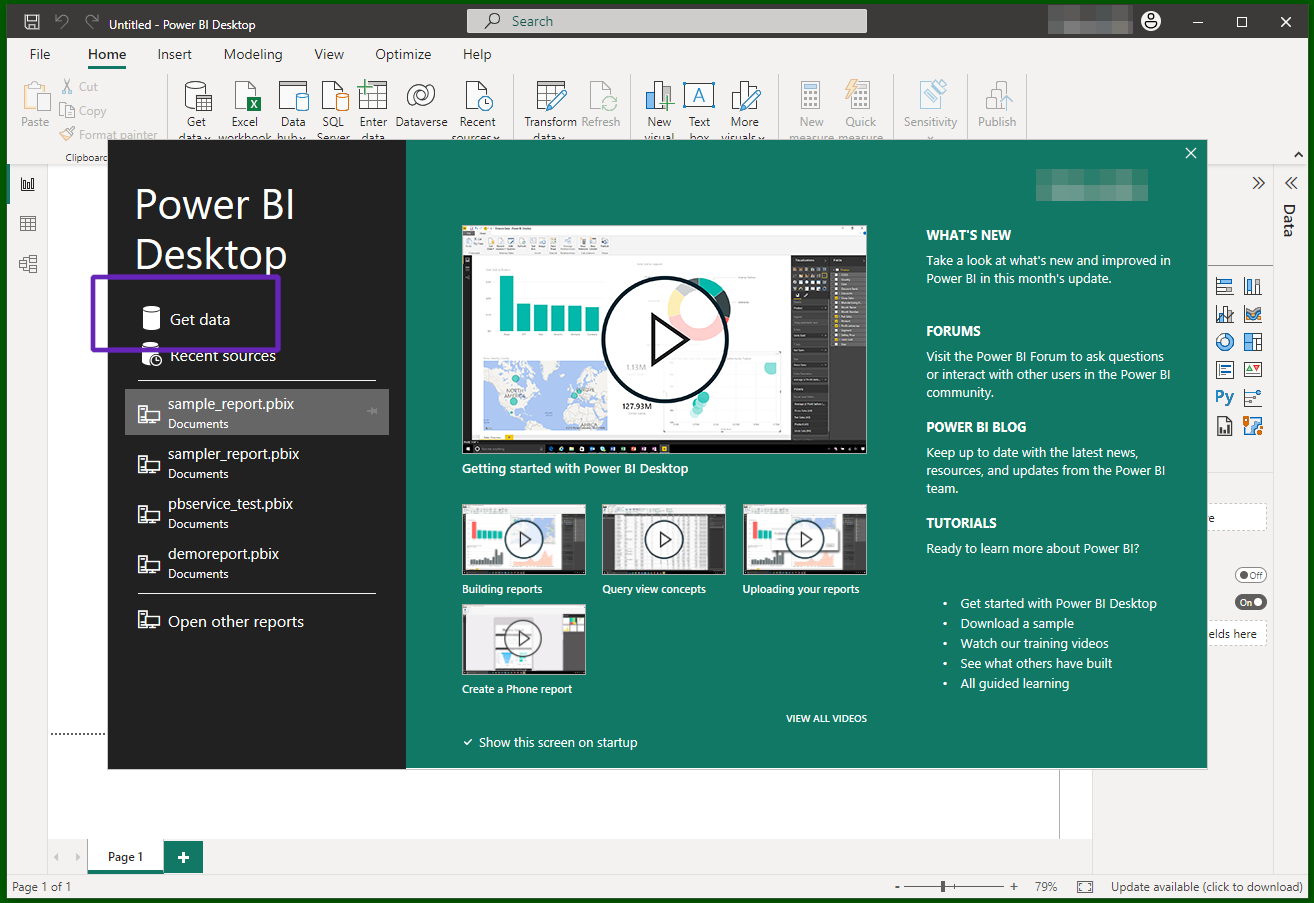
Open Power BI Desktop and go through the "Get Data" action (usually the first choice when starting the program). Choose the standard ODBC source among the proposed connectors (tip: you can restrict the list by typing a search term).
Visual guide
Click "Get Data":
 Choose the ODBC connector:
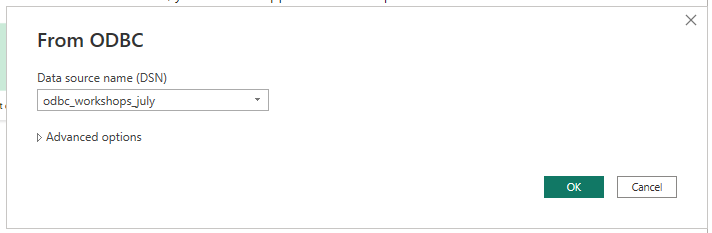
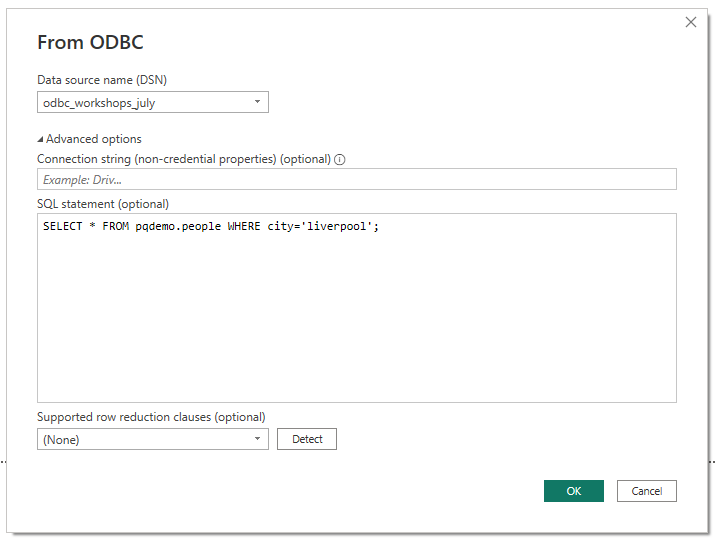
In the configuration of the ODBC connector, pick the "Data source name (DSN)" you just created, i.e. your Astra DB connection.
You can leave the "Advanced options" as they are; however, if you need to specify
a custom query (typically to restrict the data ingestion to a subset
of the whole table, such as a single partition), expand the options and write
an appropriate SELECT CQL query.
Visual guide
Choosing the Data Source Name (DSN) for the ODBC connection:
 (Optional) adding a CQL query in the Advanced options:
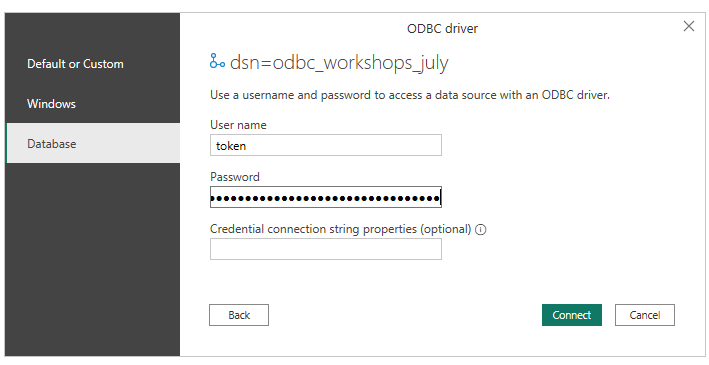
You will need to provide authentication credentials once more at this point:
enter again token as user and your AstraCS:... string as password, and
leave the connection string empty. Confirm and wait a few seconds for the
connection to be established.
Visual guide
You will finally be able to explore the data in your database in Power BI's "Navigator" preview, in the form of a "database / keyspaces / tables" navigable hierarchy.
Visual guide
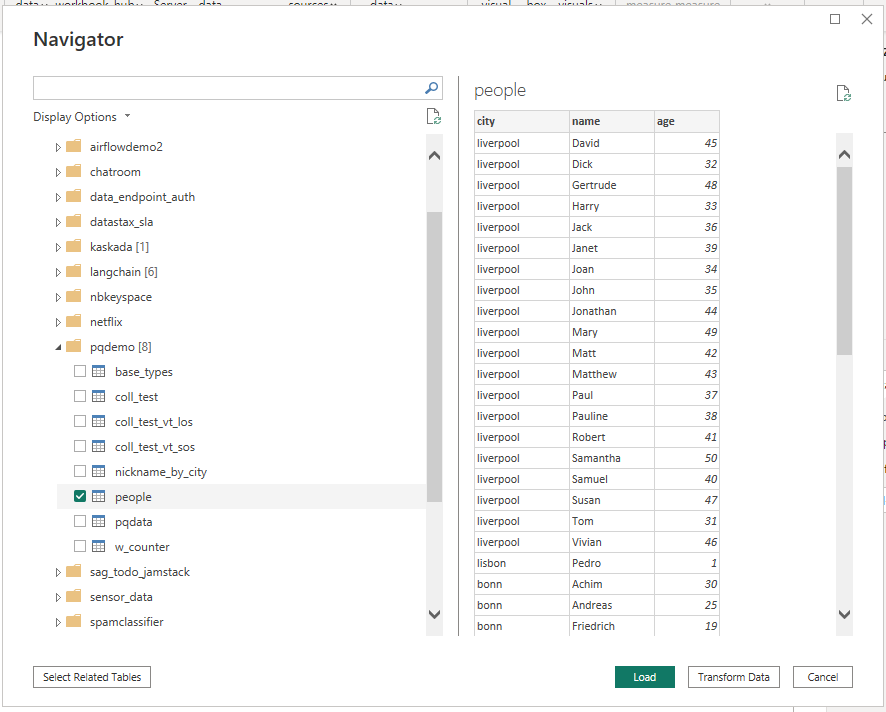
Now you can select a table and hit "Load" (or "Transform data"): the data will be available in Power BI Desktop for you, e.g. to create a report which you can save to (local) file. See the "Power BI Service" section below if you want to bring the report to the cloud.
Visual guide
Astra DB Custom connector (local)
When using the Custom connector, no ODBC is involved: the connector uses directly the REST API endpoints to access your database data. Pending completion of the certification process, you need to install the connector as a self-signed plugin and authorize Power BI Desktop to run it.
Pre-requisites
Note
In the following it is assumed that you have a local installation of Power BI Desktop. Consult the Microsoft documentation if your goal is to use another of the products that support Power Query.
Database
- You should have an Astra account
- You should Create an Astra Database
- You should Have an Astra Token. Note that in this case you only need the "token" string, i.e. the one starting with "AstraCS:...".
Minimal token permissions
While you can certainly use a standard "Database Administrator" token, you may want to use a least-privilege token for this data connection through the Custom connector. These are the specifications for a minimal Custom Role for this purpose:
- The token must have, in Table Permissions, (1) Select Table and (2) Describe Table; and (3) in API Access it needs REST;
- It is OK if the token is scoped to just the one DB that is being used;
- If the token is disallowed on certain keyspaces, they will show up as empty in the connector's resulting navigation table.
Note
You might find it convenient to have some tables with data in your database in order to ensure the connection works all right. See Awesome Astra's "Load and Export" page for suggestions on how to load data in Astra DB.
Custom connector setup
This section explains how the Astra DB Custom connector is installed locally. For more information, check the connector project on GitHub.
Note
As soon as the connector will be certified by Microsoft, manual installation will be unnecessary, as the connector will ship bundled with Power BI already.
First, obtain the latest PQX file from the releases
page and place the file in (your equivalent for) directory
C:\Users\USER\Documents\Power BI Desktop\Custom Connectors.
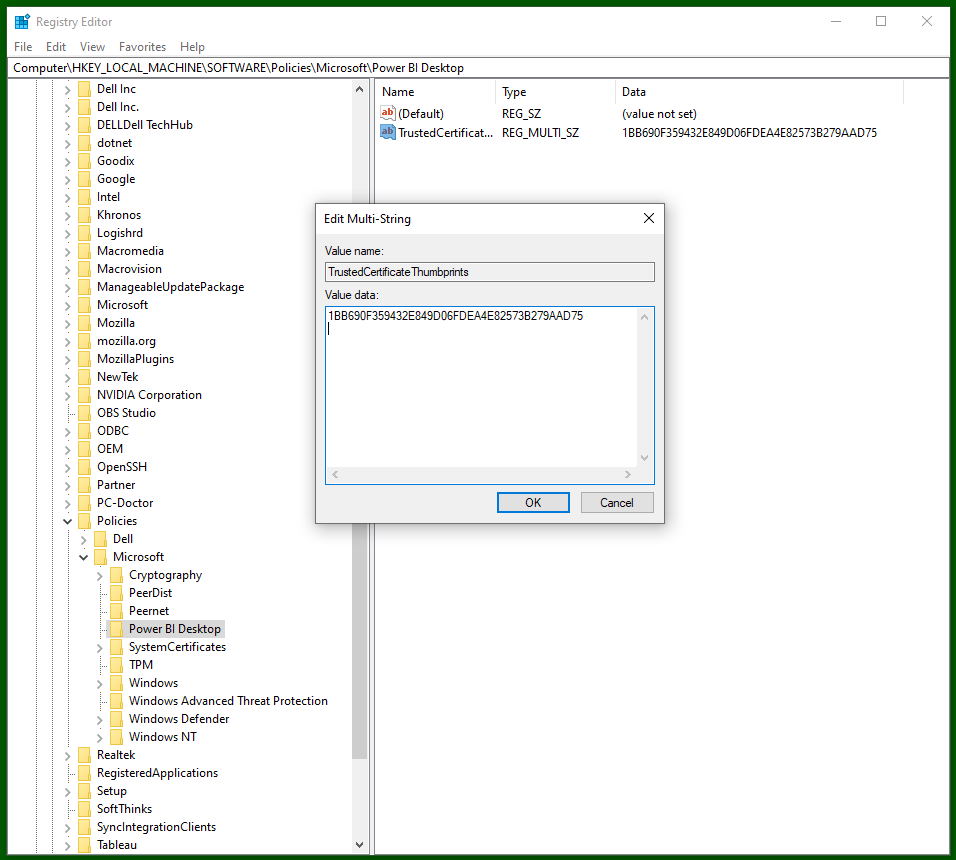
Now, as long as the connector awaits certification, it will run as "self-signed", so you need a way to tell Power BI that you do indeed trust it to run. To this aim, you can either list the certificate thumbprint as "trusted" in your system (recommended) or alternatively enable untrusted extensions in PowerBI.
Trusted certificate thumbprint
To mark the thumbprint as trusted, the steps are outlined at this link:
- Open
regeditas admin; - Locate the key
HKEY_LOCAL_MACHINE\Software\Policies\Microsoft\Power BI Desktop, creating it if absent; - In this key, create a multi-string (
REG_MULTI_SZ) entry namedTrustedCertificateThumbprints; - The value must be a newline-separated string (right-click, Modify to edit as text), each with a trusted thumbprint;
- Enter the following thumbprint of the certificate used to sign the connector releases:
Visual guide
You can now close regedit and move on.
Enable untrusted connectors
Note: you don't need to do this if you marked the signer's thumbprint as trusted as per the instructions above.
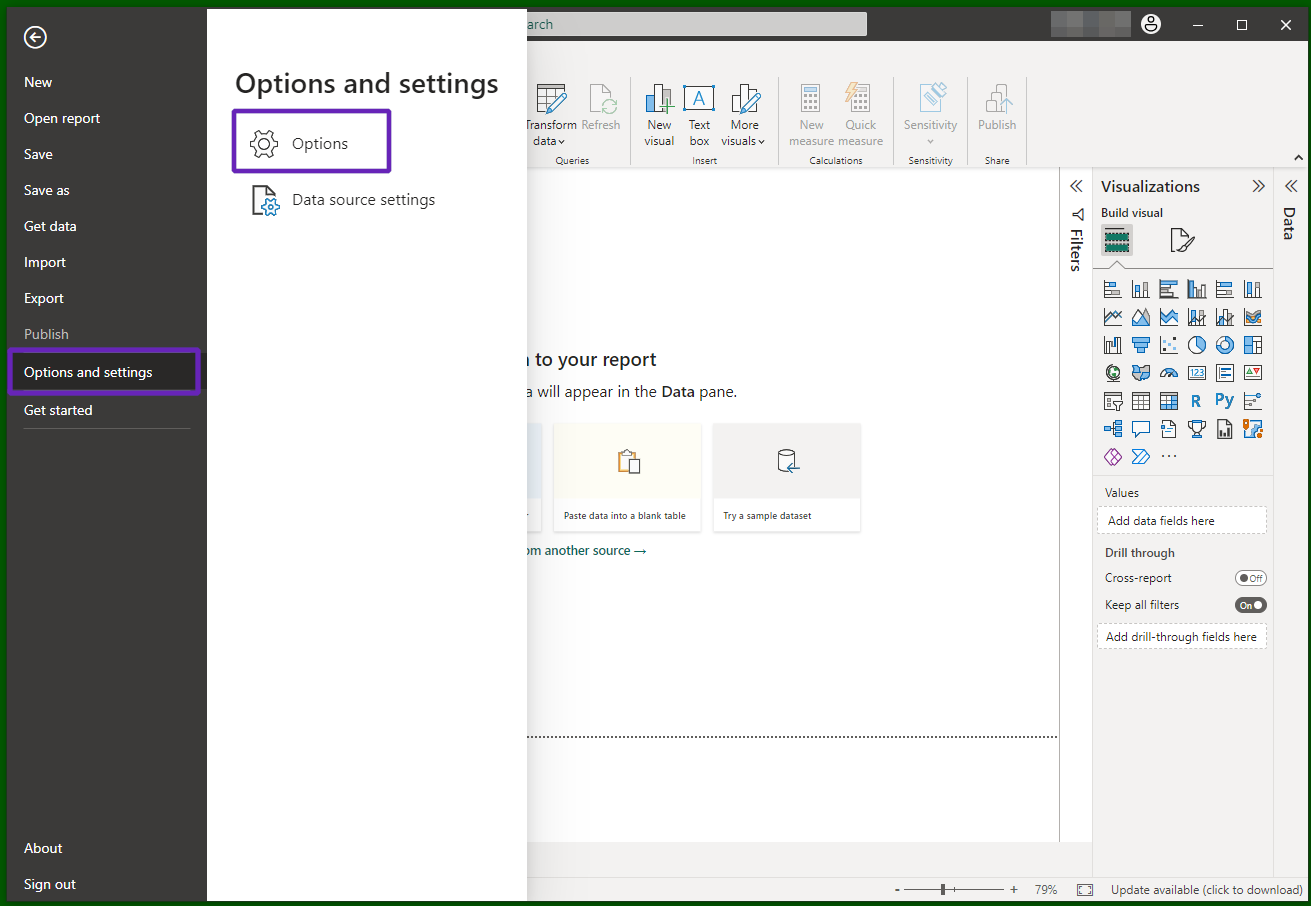
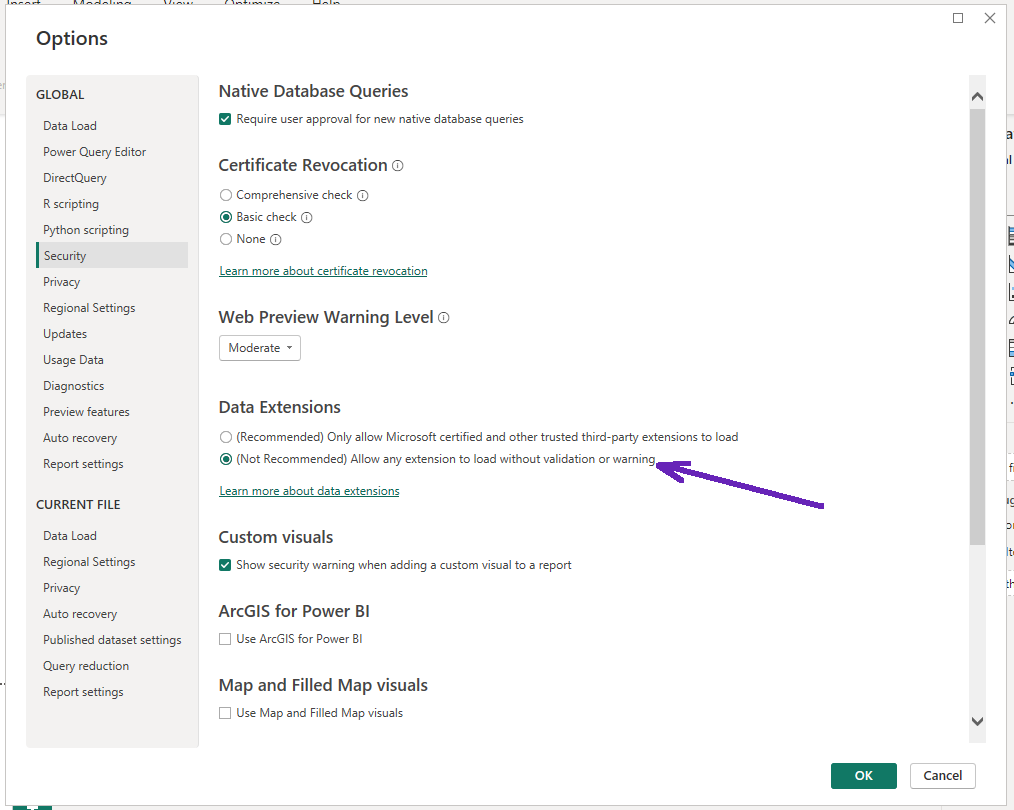
Alternatively, if you don't have admin access to regedit, you can lower the overall security level of PowerBI Desktop as outlined here:
File => Options and Settings => Options => Security => in "Data Extensions", choose
Allow any data extension to load without validation or warning. Then restart PowerBI Desktop.
Visual guide
Go to Power BI Desktop's Settings:
 Enable untrusted extensions:
How-to
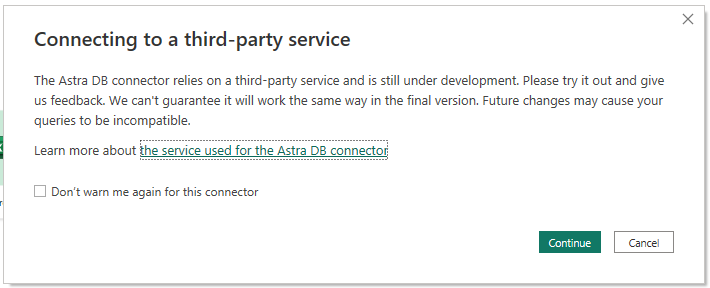
Now you can start PowerBI Desktop, choose "Get Data", search for the "Astra DB" connector and select it. A warning will show up about the connector being a third-party plugin in beta version: you can dismiss it and move on.
Visual guide
Click "Get Data":
 Choose the "Astra DB" connector:
 Dismiss the warning about a third-party connector:
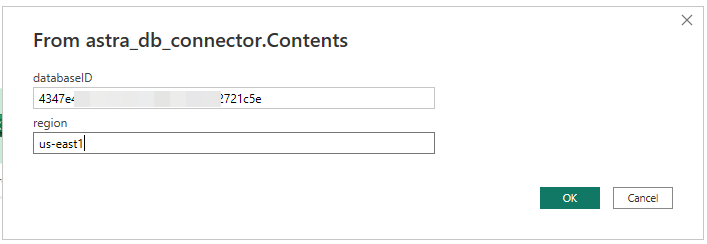
You will then be asked for the connection details: database ID and region.
Visual guide
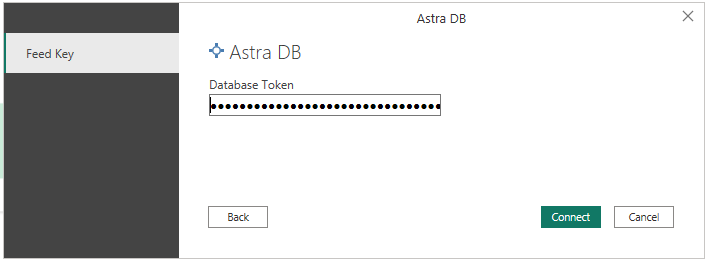
Next, you will provide the "Database Token" (the string starting with AstraCS:...) as credentials.
Visual guide
At this point you will be able to explore the data in your database in Power BI's "Navigator" preview, in the form of a "keyspaces / tables" navigable hierarchy.
Visual guide
Now you can select a table and hit "Load" (or "Transform data"): the data will be available in Power BI Desktop for you, e.g. to create a report which you can save to (local) file. See the "Power BI Service" section below if you want to bring the report to the cloud.
Visual guide

Power BI Service (with a Data Gateway)
You can publish the report to the cloud product Power BI Service with the help of an On-Premises Data Gateway.
Note
In the following it is assumed that you have a Power Query Service account (logged to the same account as the Desktop version). Consult the Microsoft documentation if your goal is to use another of the products that support Power Query.
Pre-requisites
Desktop setup
First complete one of the Desktop flows described above (i.e. either the ODBC option or the Custom connector option) and successfully create a report powered by data from Astra DB.
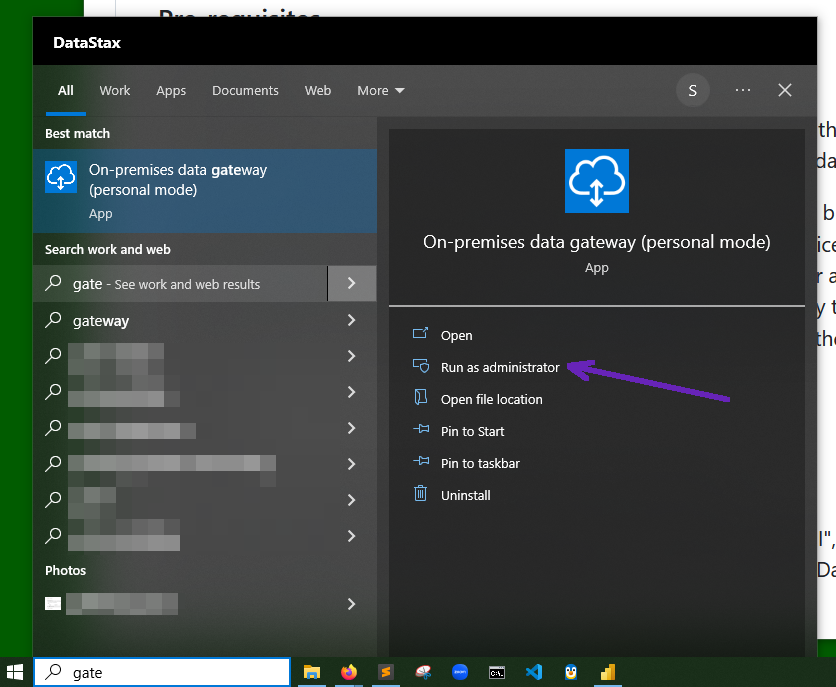
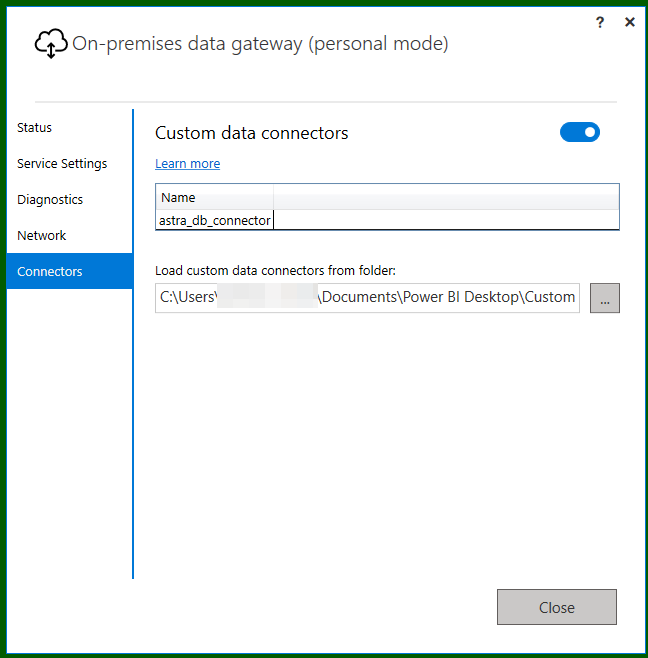
You need to additionally install a Data Gateway which will serve as data bridge between the locally-running connector and the data source as seen on Power BI Service (running in Azure's cloud). See here for the "personal mode" installation (easiest) or here for an enterprise, production-grade setup. (See also this community blog post for gateway troubleshooting tips, also covering how to make sure that the custom-connector directory is the same as for Power BI Desktop.)
Visual guide
Starting the Data Gateway interface:
 Checking the "Custom data connectors" it has detected:
How-to
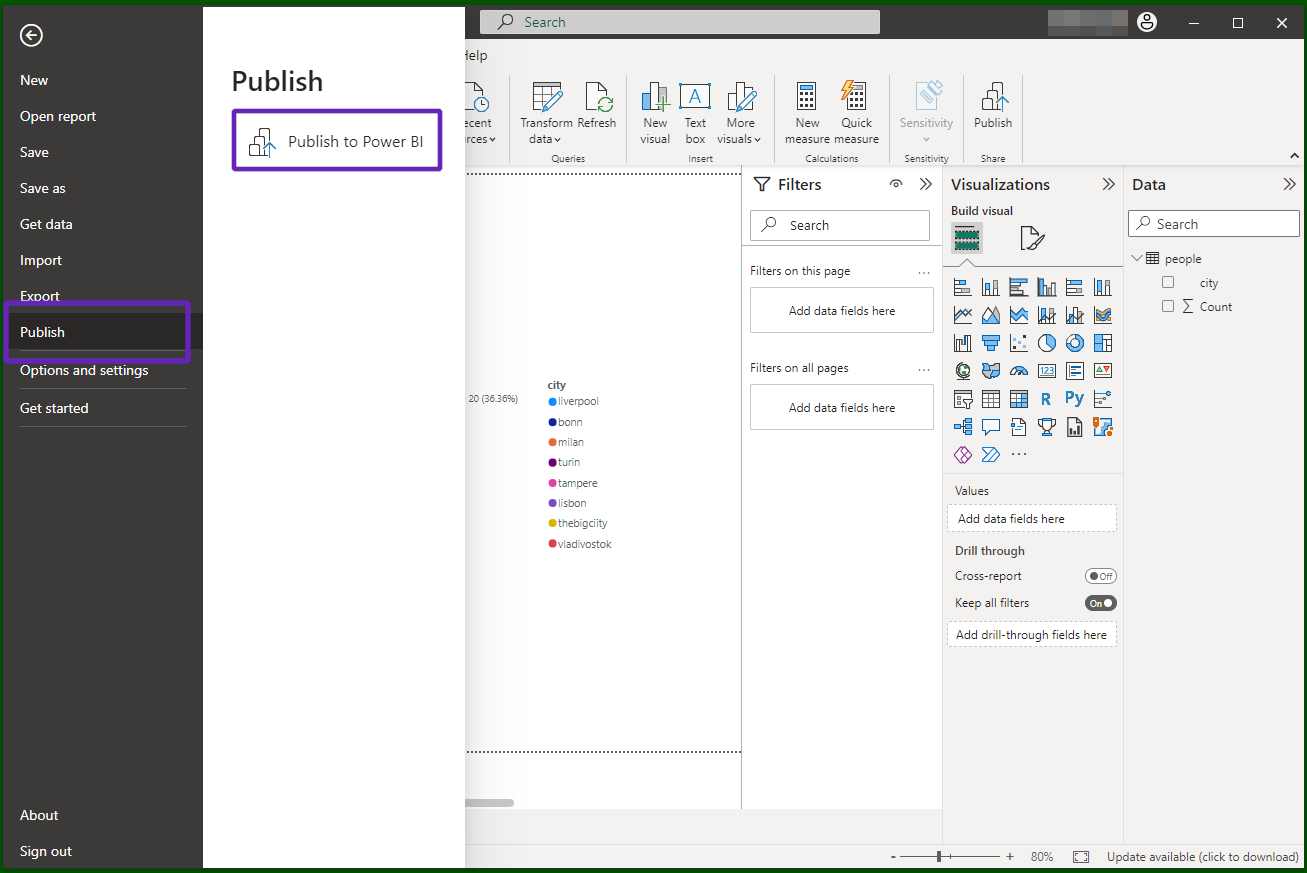
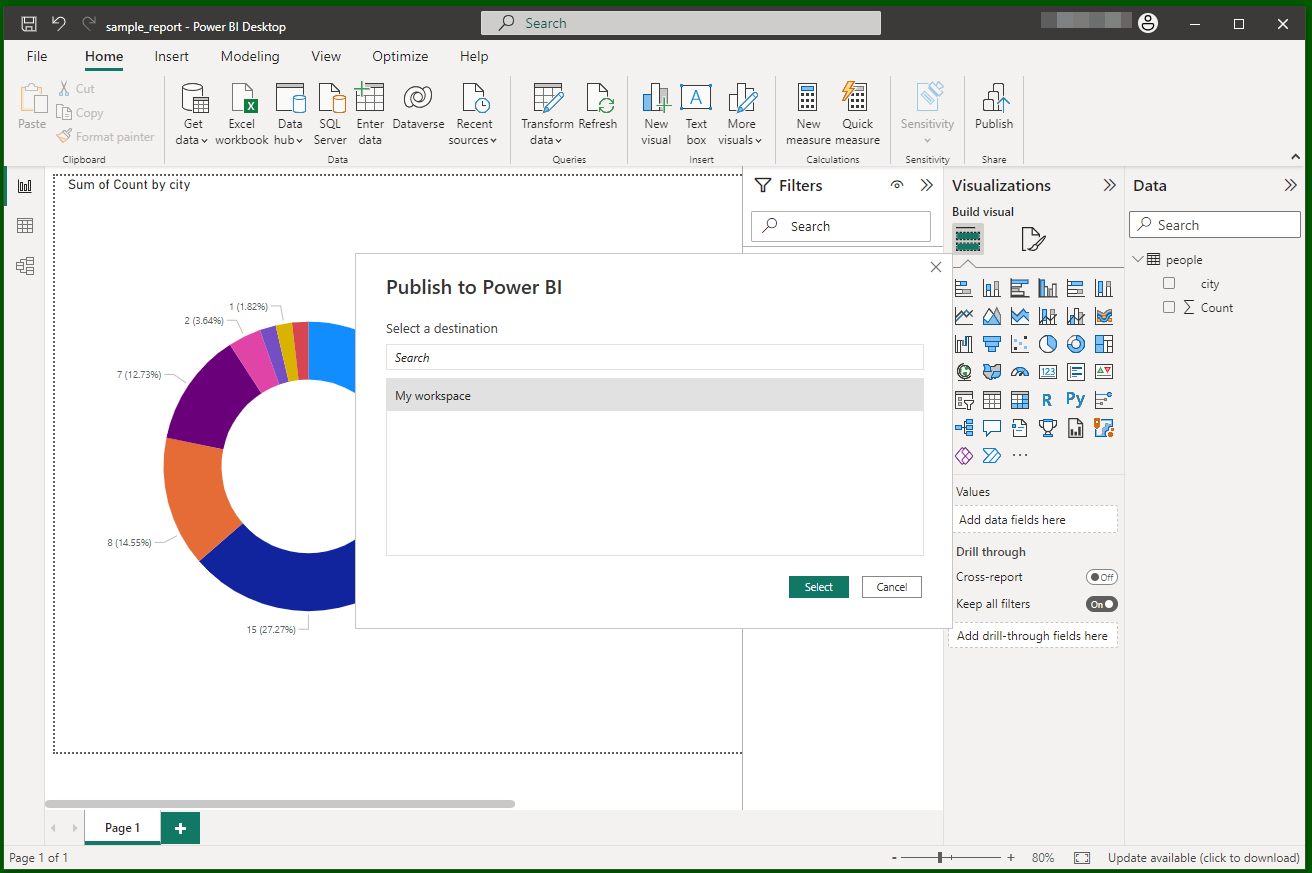
Make sure you save the report you created to a local pbix file.
From the Power BI Desktop main menu, pick "File" / "Publish to Power BI", choosing your destination workspace. This will upload the report, and the associated "Dataset", to the cloud service in your account.
Visual guide
The "Publish" item in Power BI Desktop's menu:
 Publishing a report:
Open app.powerbi.com and check that you are logged in with the correct account. Navigate to the chosen workspace, where you should see the newly-uploaded report. Click on its name to open it.
Visual guide
Your workspace on Power BI Service:
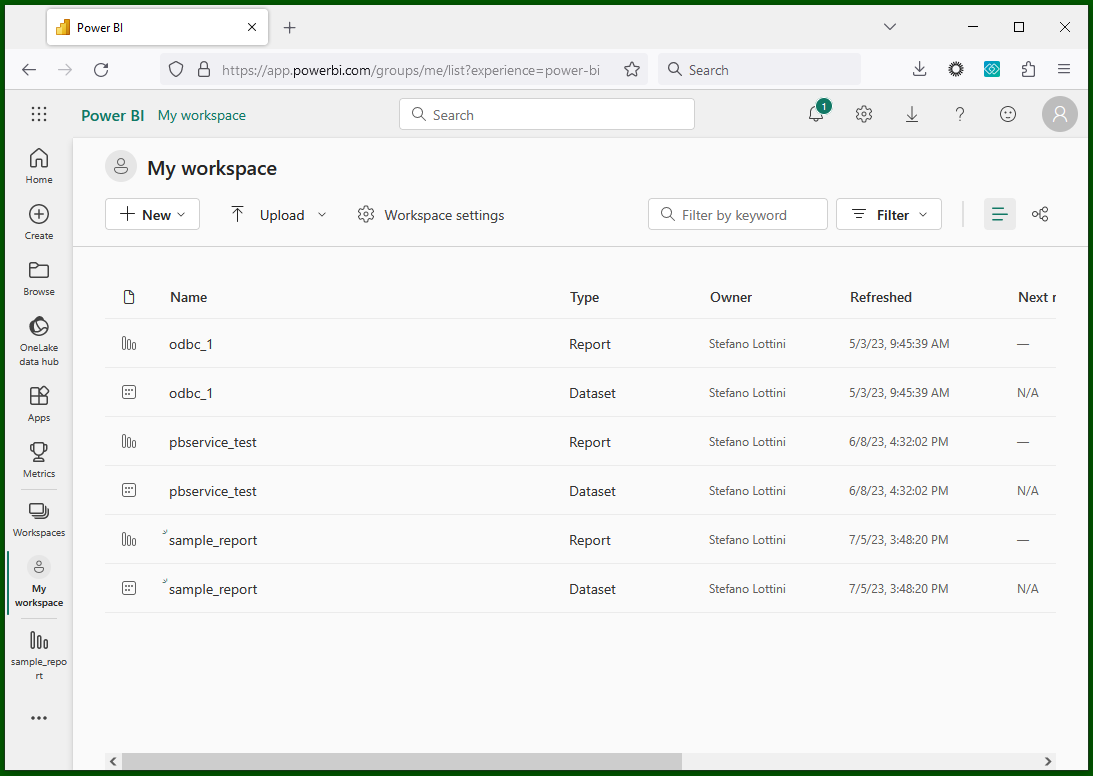 Viewing a report:

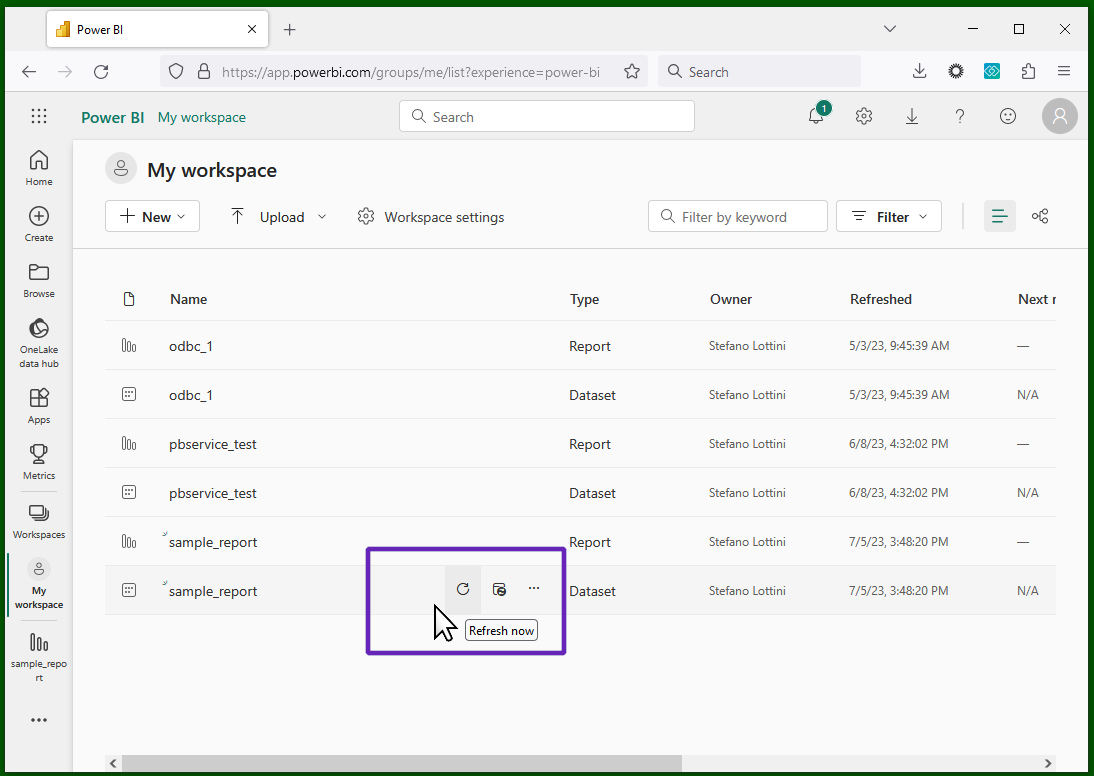
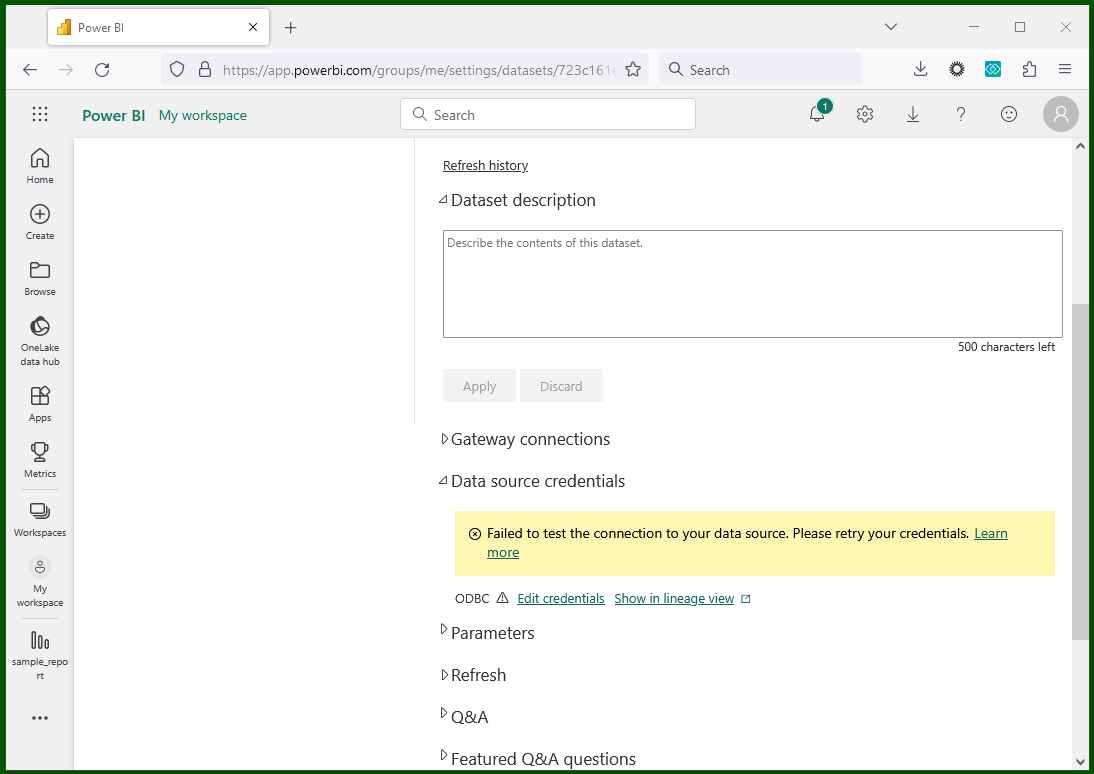
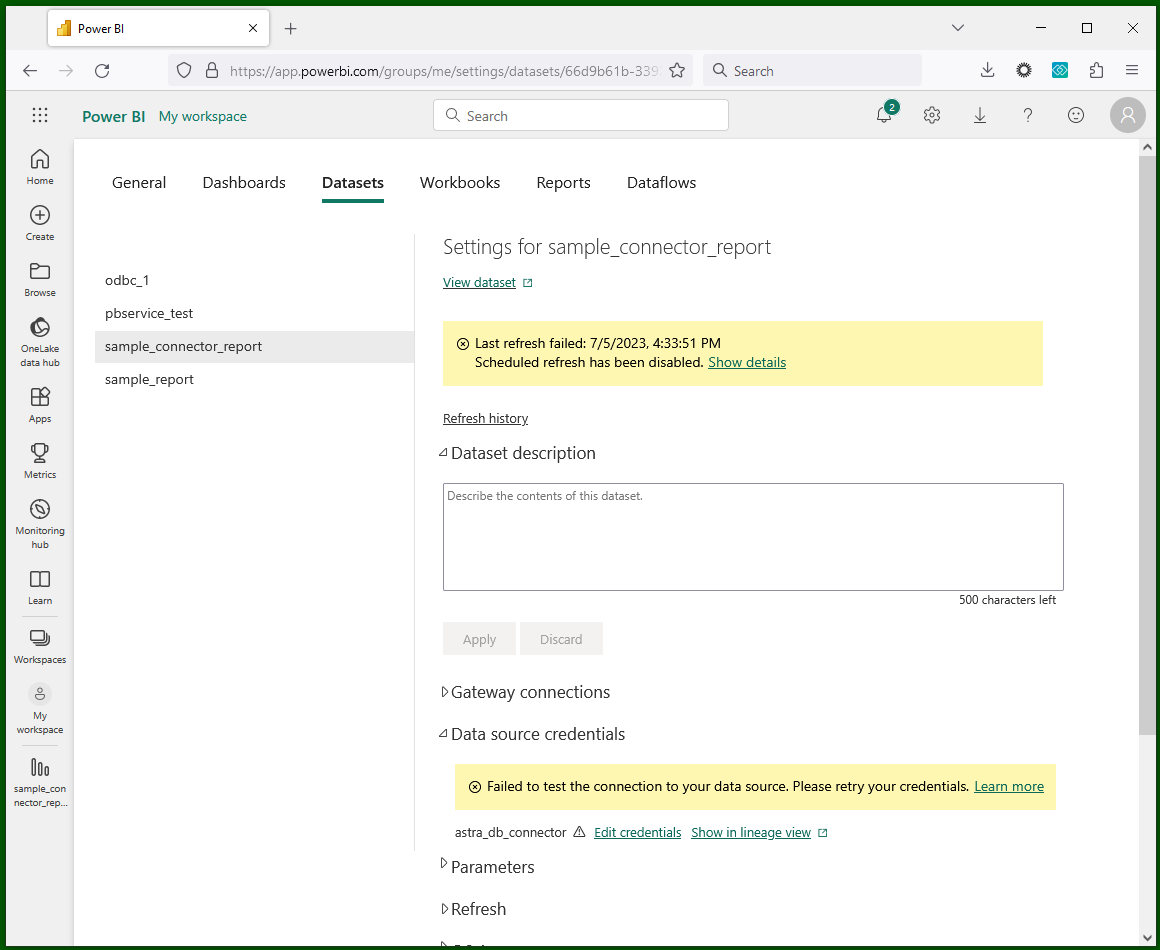
Now you have to check that Power BI Service can read from Astra DB.
Go back to the workspace and click
the "Refresh now" button next to the dataset name (you must hover on the dataset
for the
 button to show up).
Visual guide
Hover on the data source name to reveal the buttons:
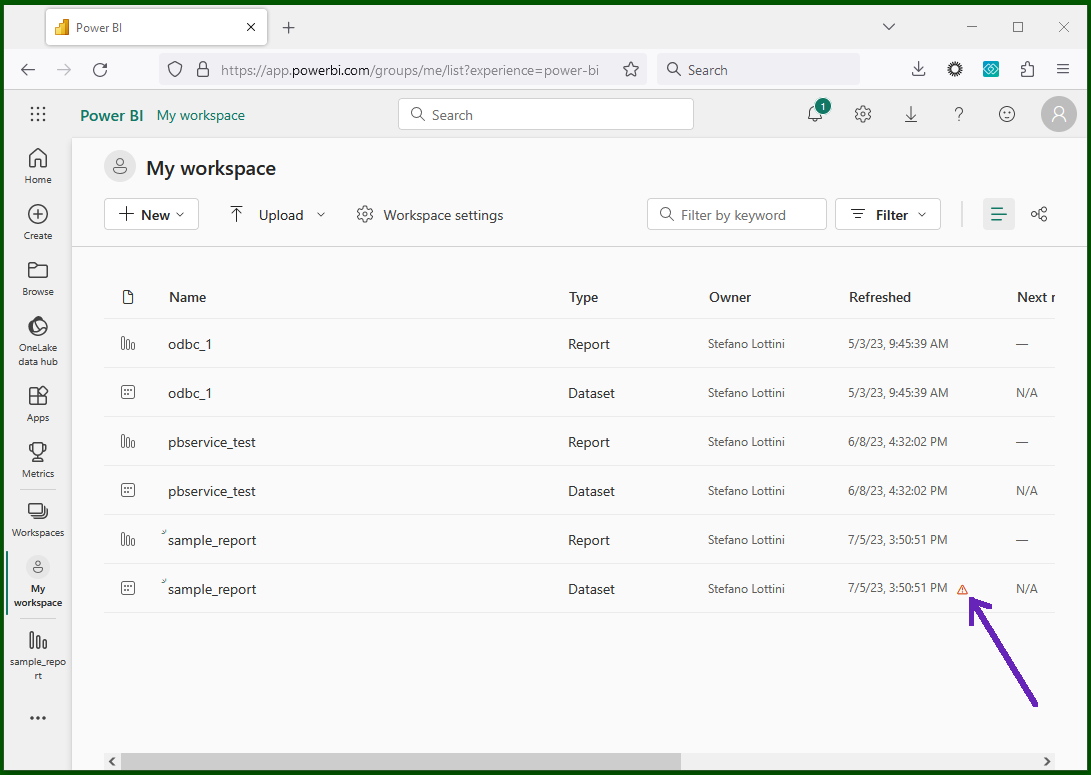
This will fail, as signaled by a tiny "danger" icon next to
the date in the "refreshed" column,
for lack of credentials (indeed, the Desktop and the Service product
do not share any credential store). To provide the credentials, click
the "Schedule refresh" button for the dataset
(hover with the mouse again to reveal the
 button)
and look for the "Data source credentials"
section in the settings page you just reached.
button)
and look for the "Data source credentials"
section in the settings page you just reached.
Visual guide
A failed data refresh:
 The Data Source settings for the ODBC method:
 The Data Source settings for the Custom connector method:
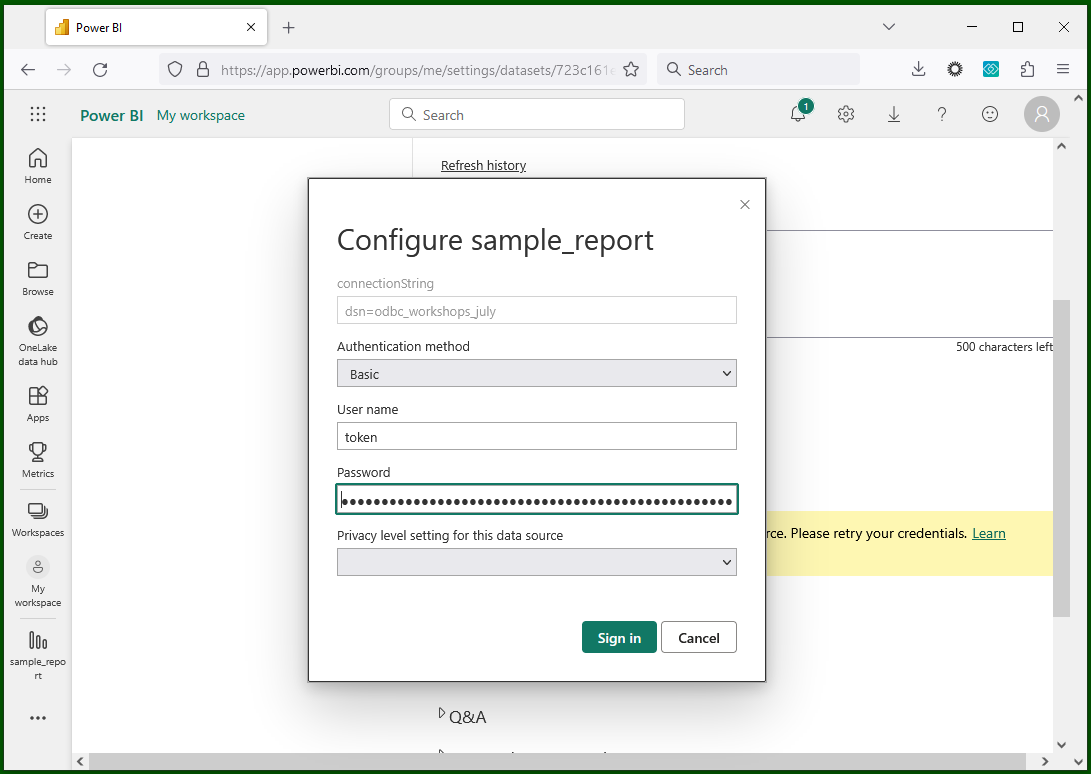
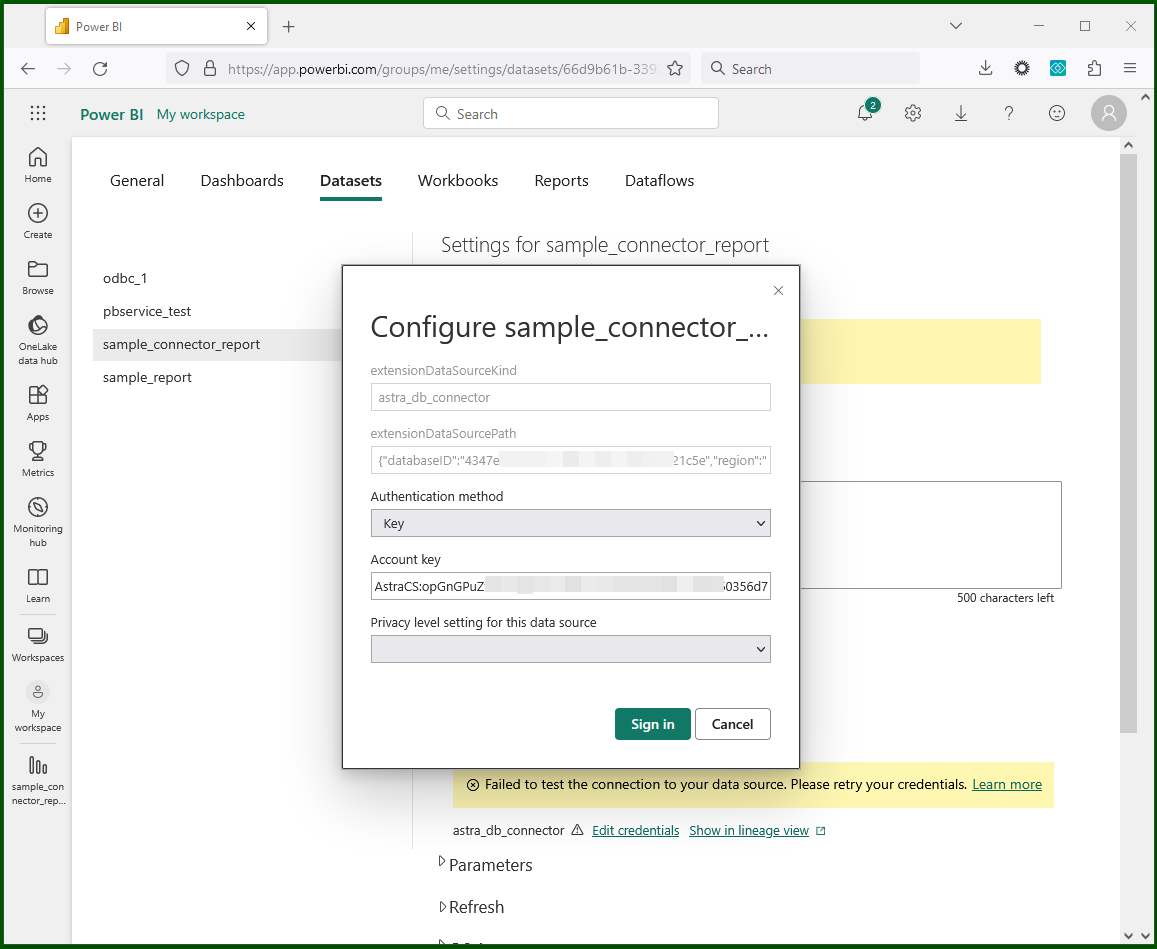
Choose "Edit credentials"
to insert the required secrets, right as you did for the Desktop setup.
Note that depending on the connection method you are using, the Credentials
dialog will require either the token/AstraCS:... pair or just the
AstraCS:... token string (for ODBC and Custom connector, respectively).
Visual guide
Entering the credentials for the ODBC method:
 Entering the credentials for the Custom connector method:
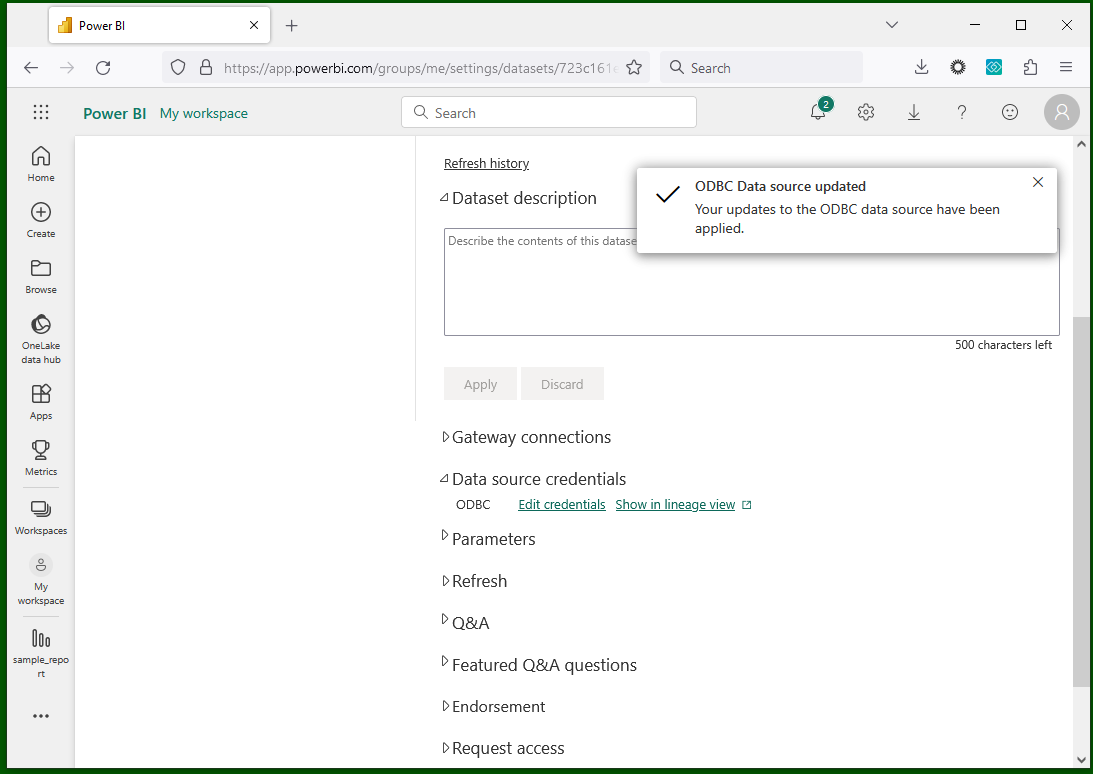
 Credentials are updated (ODBC):
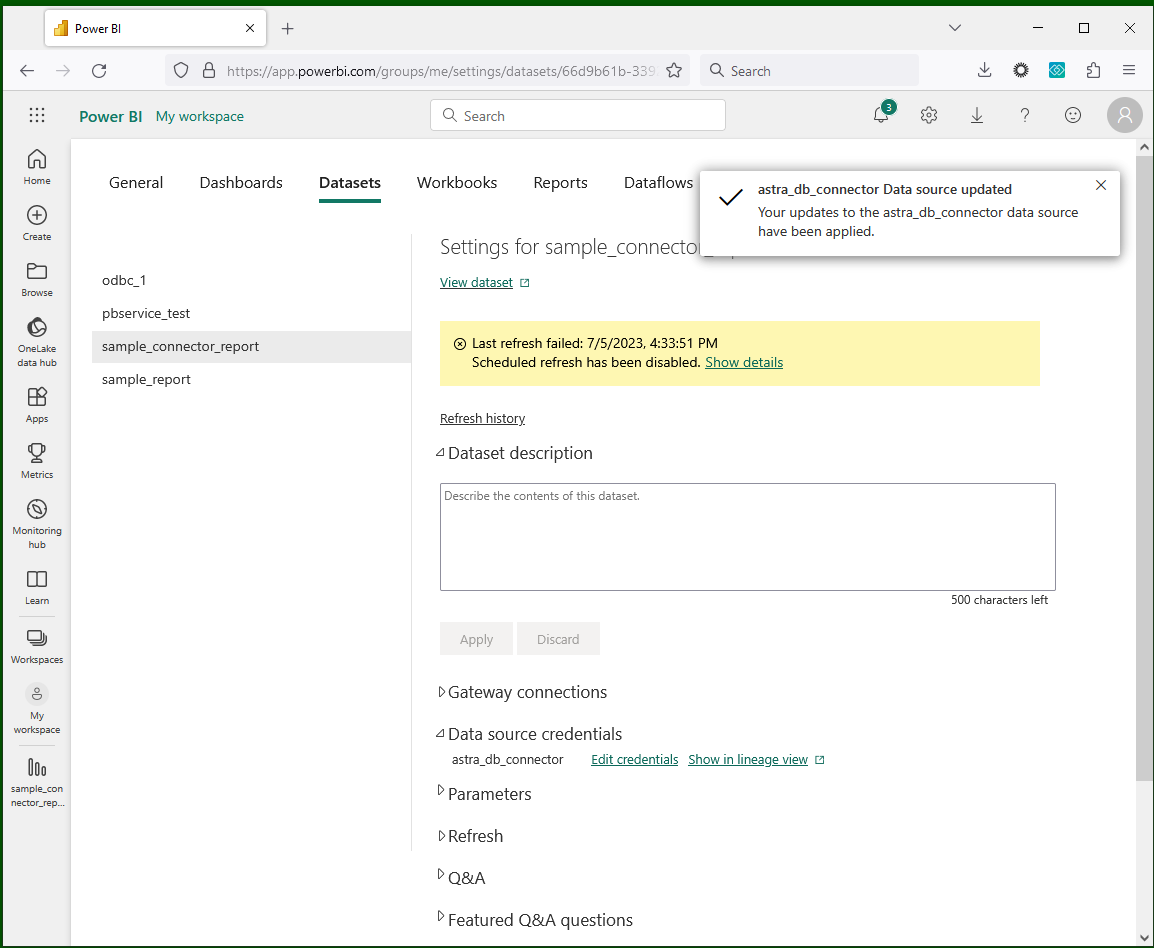
 Credentials are updated (Custom connector):
Then click "Sign in" to confirm the credentials, go back to the workspace and try "Refresh now" again. There should be no errors anymore.
As a confirmation exercise, you can try changing some data on the table in an obvious way, then triggering a refresh, and finally opening the report again (you may need to reload the browser page to see the change finally reflected in your report).
Further problems during data refresh
If you notice the small "danger" icon next to the dataset persists, there is presumably something wrong with the data connection. Please check the above-mentioned community blog post as a valid starting point for your troubleshooting journey.