Google Cloud Functions
Overview
Cloud Functions is Google's function-as-a-service offering that provides a serverless execution environment for your code. Cloud Functions are commonly used to:
- Extend Astra DB with additional data processing capabilities, such as aggregating, summarizing and validating data periodically;
- Connect Astra DB with other cloud services into data pipelines that move, process and analyze data.
Prerequisites
- You should have an Astra account
- You should Create an Astra Database
- You should Have an Astra Token
- You should Download your Secure Connect Bundle
- Optionally, if you are new to Cloud Functions, practice creating a simpler function first.
Using Python Driver
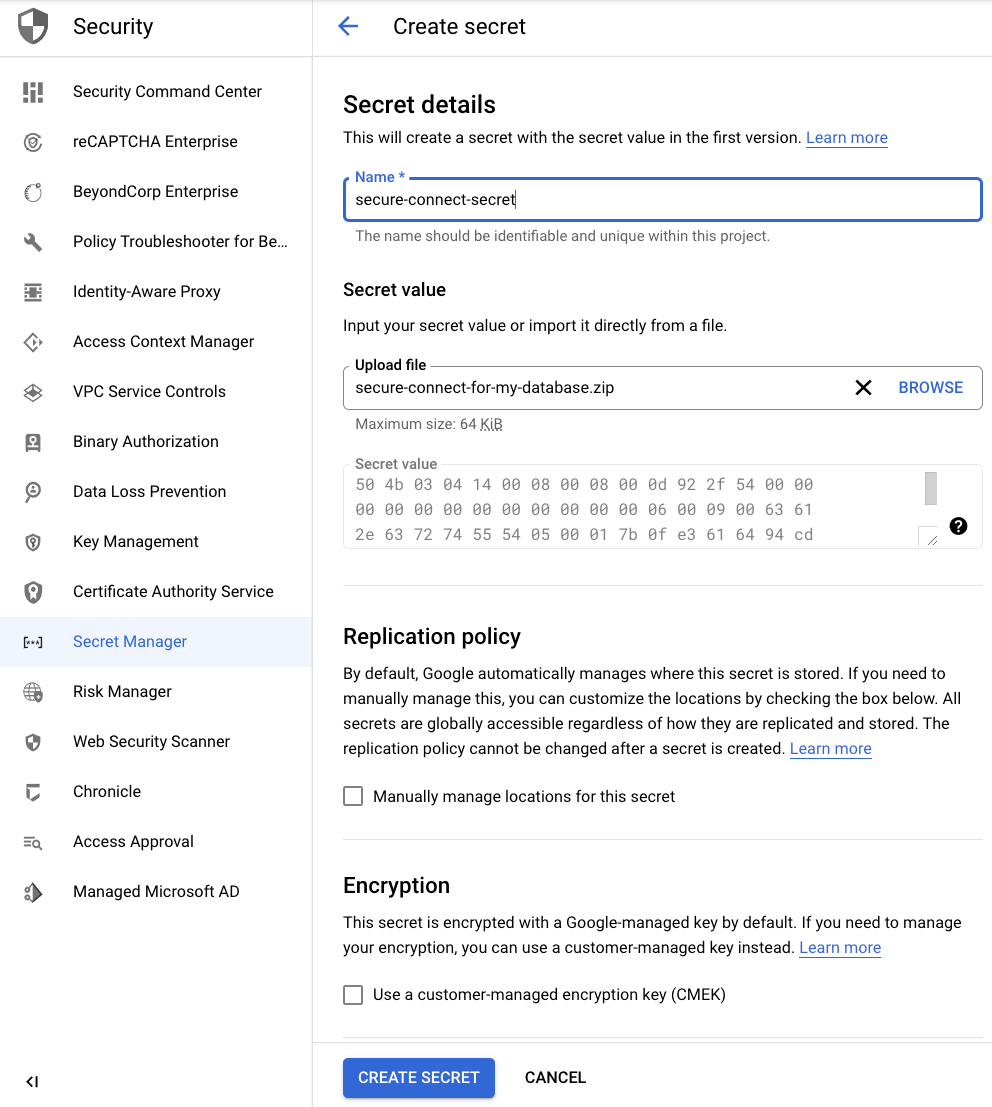
✅ 1. Create a secret with the secure connect bundle file.
-
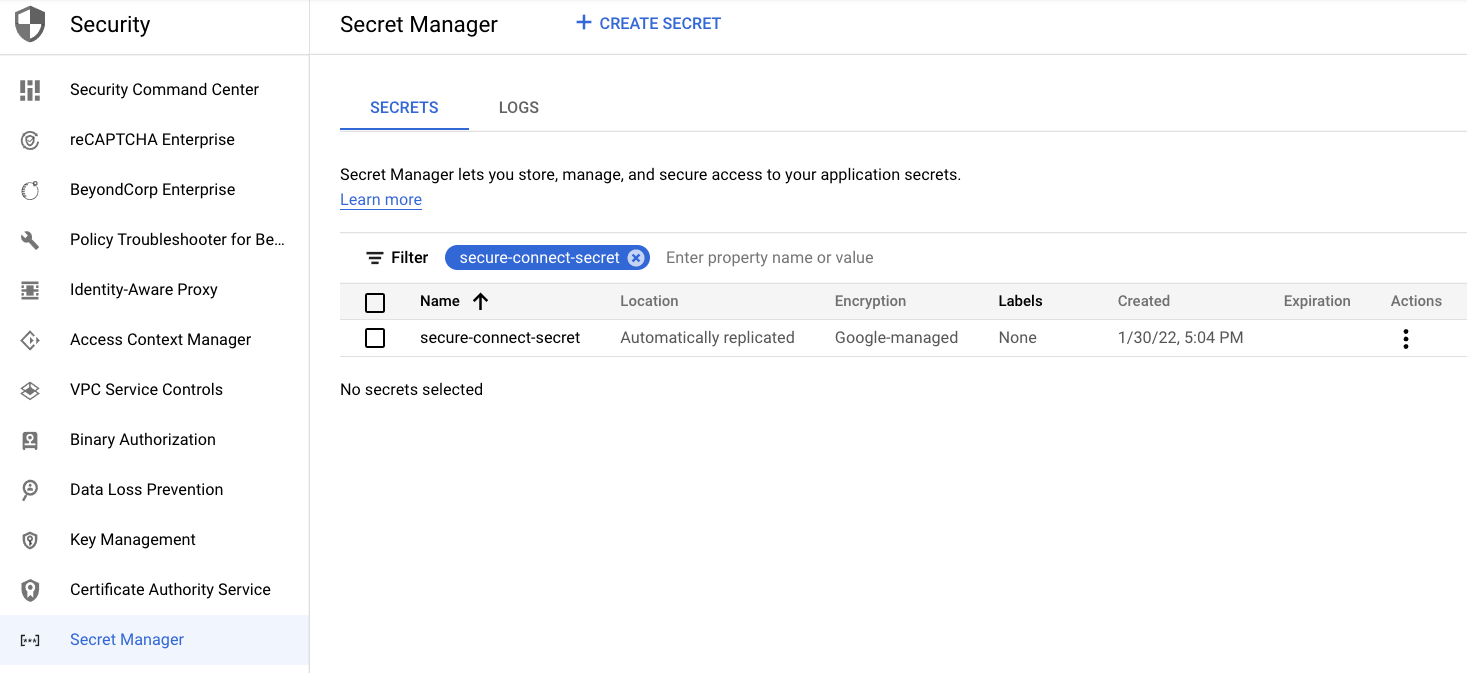
Go to the Secret Manager page, select a project that has Secret Manager and Cloud Functions enabled, and click Create secret.
-
Give a Name to the secret and upload the secure connect bundle file as a Secret value. (See the Prerequisites section above if you need to download your secure connect bundle.) Optionally, customize other secret management settings.
-
Click Create secret.
-
On the Secret Manager page, find the newly created secret.

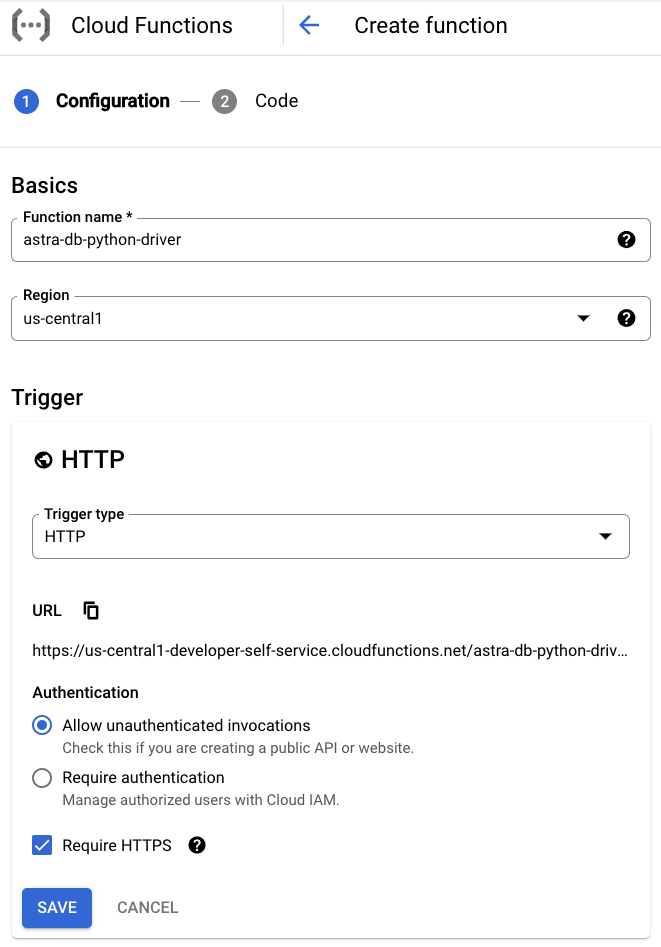
✅ 2. Create a function.
- Go to the Functions Overview page, select the same project that has Secret Manager and Cloud Functions enabled, and click Create function.
- Under the Basics section, specify preferred Function name and Region.
-
Under the Trigger section, select HTTP, Allow unauthenticated invocations, and Require HTTPS.
-
Click Save.
-
Under the Runtime, build, connections and security settings section, customize additional settings and create these Runtime environment variables:
ASTRA_DB_CLIENT_ID: A Client ID is generated together with an application token (see the Prerequisites section above).ASTRA_DB_CLIENT_SECRET: A Client secret is generated together with an application token (see the Prerequisites section above).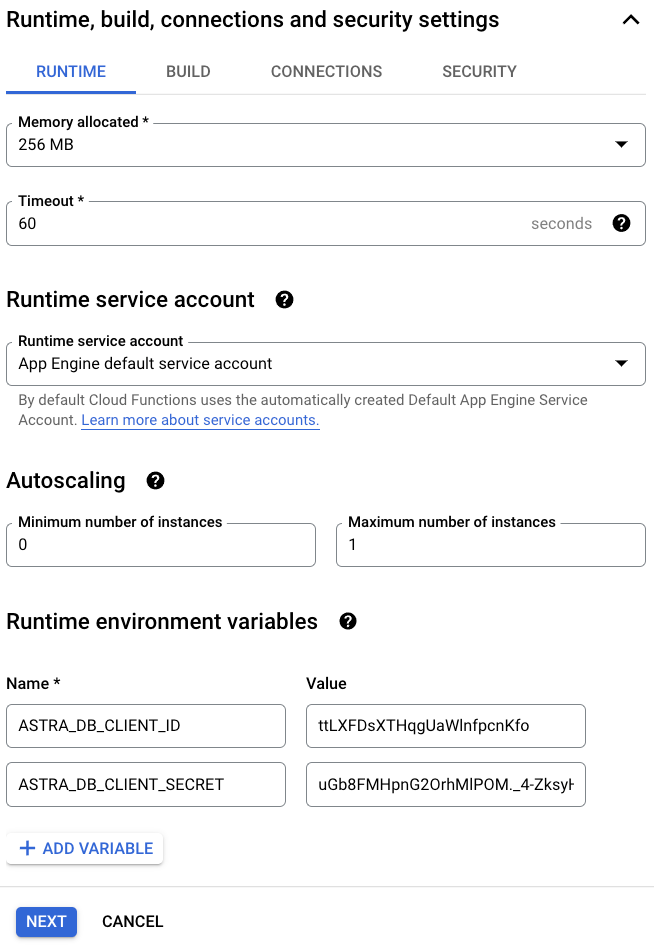
Note that, for better security, you can alternatively use the Secret Manager service to store and manage a client secret. A secret can then be similarly exposed as an environment variable. The settings can be found under the Runtime, build, connections and security settings section, the Security tab, and the Secrets field.
-
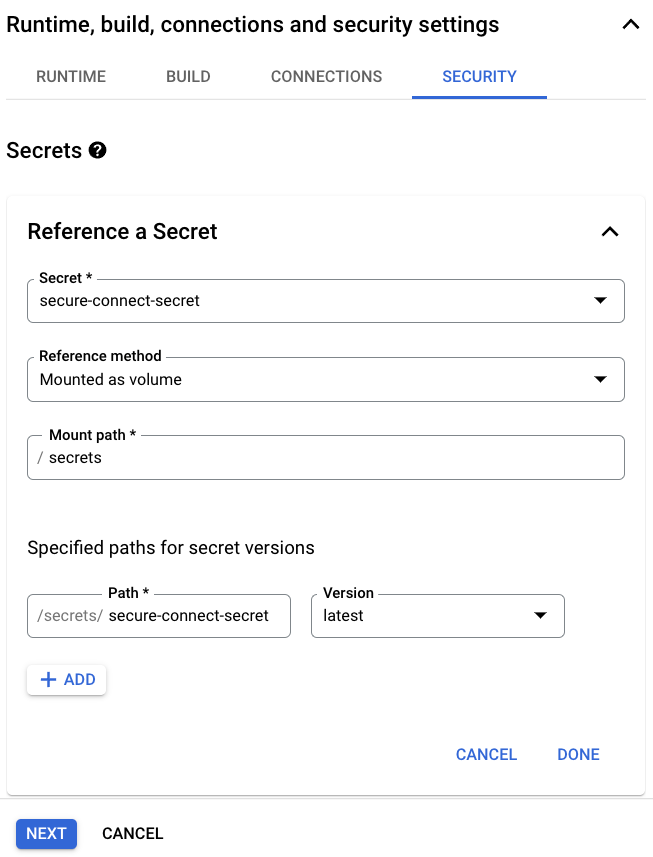
Under the Runtime, build, connections and security settings section and the Security, click Reference a secret. Select the previously created Secret with the secure connect bundle file, Grant the service account access to the secret, if needed, use Mounted as volume in the Reference method field, and enter secrets in the Mount path field.

Notice the final Path that should be used to access the secure connect bundle in the function code. -
Click Done and Next.
-
Select Python 3.7 or your preferred version in the Runtime field.
-
Select Inline Editor in the Source code field.
-
Enter query_astra_db in the Entry point field.
-
Add cassandra-driver, a Python client library for Apache Cassandra, DataStax Astra DB and DataStax Enterprise, to the
requirements.txtfile.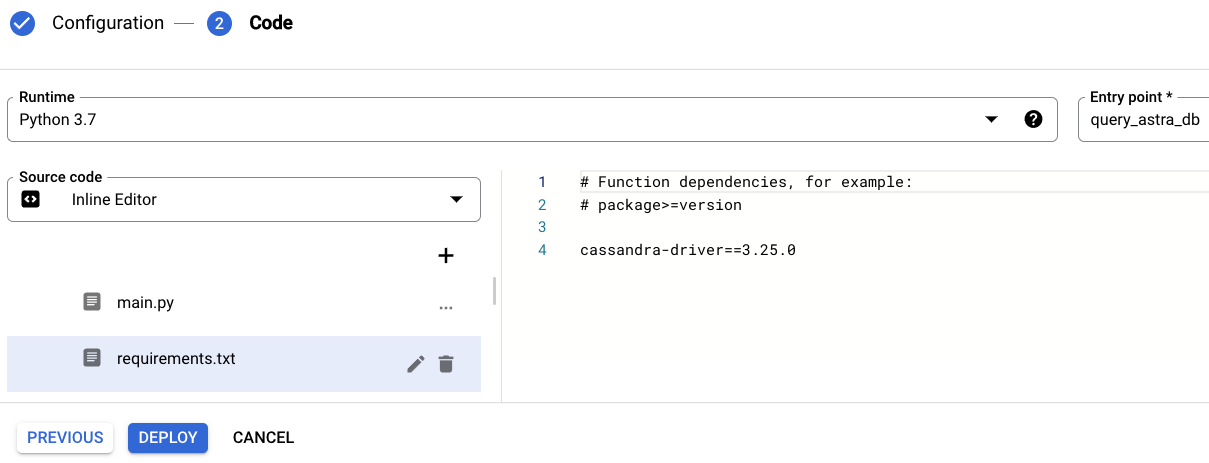
-
Replace the
main.pycontent with:from cassandra.cluster import Cluster from cassandra.auth import PlainTextAuthProvider import os ASTRA_DB_CLIENT_ID = os.environ.get('ASTRA_DB_CLIENT_ID') ASTRA_DB_CLIENT_SECRET = os.environ.get('ASTRA_DB_CLIENT_SECRET') cloud_config= { 'secure_connect_bundle': '/secrets/secure-connect-secret', 'use_default_tempdir': True } auth_provider = PlainTextAuthProvider(ASTRA_DB_CLIENT_ID, ASTRA_DB_CLIENT_SECRET) cluster = Cluster(cloud=cloud_config, auth_provider=auth_provider, protocol_version=4) def query_astra_db(request): session = cluster.connect() row = session.execute("SELECT cql_version FROM system.local WHERE key = 'local';").one() print(row[0]) print ('Success')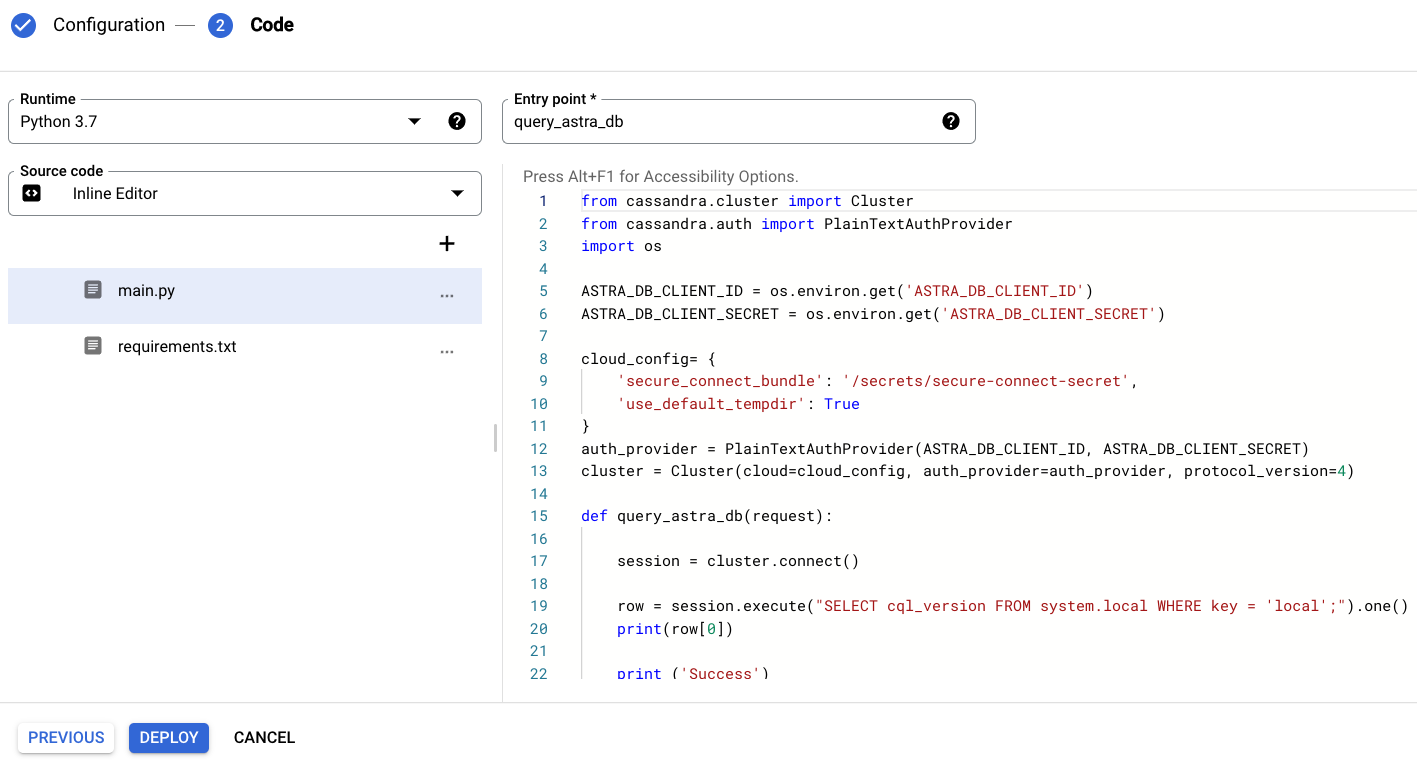
You can learn more about the code above by reading the python-driver documentation.
✅ 3. Deploy the function.
-
Click Deploy.
-
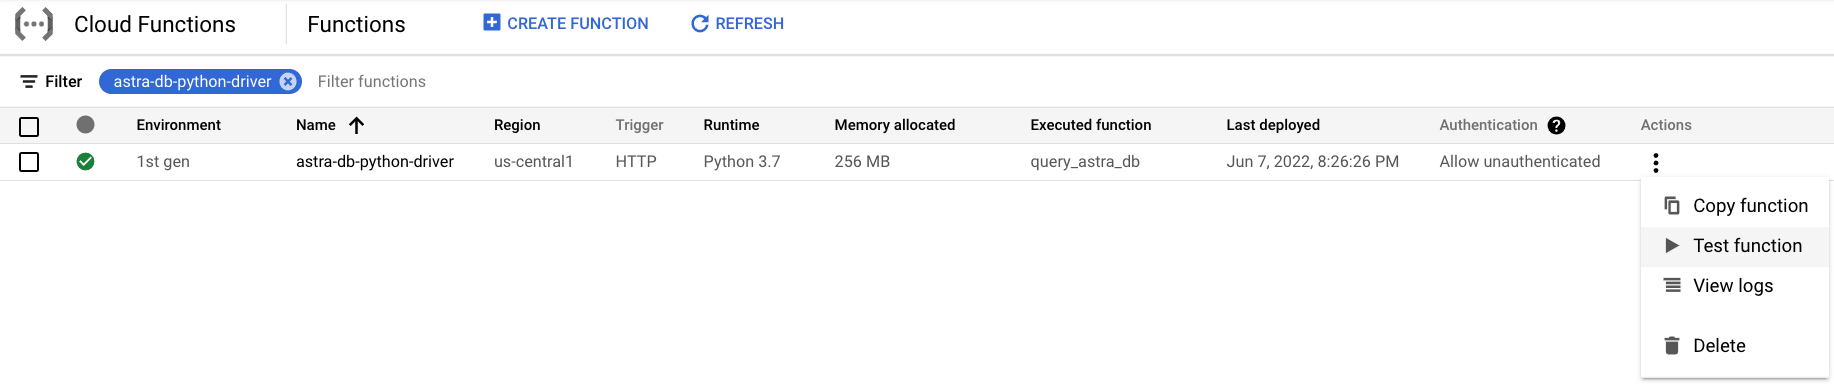
On the Cloud Functions Overview page, find the newly deployed function.

✅ 4. Test the function.
-
Under Actions, select Test function.
-
On the testing page, click Test the function and observe the output.
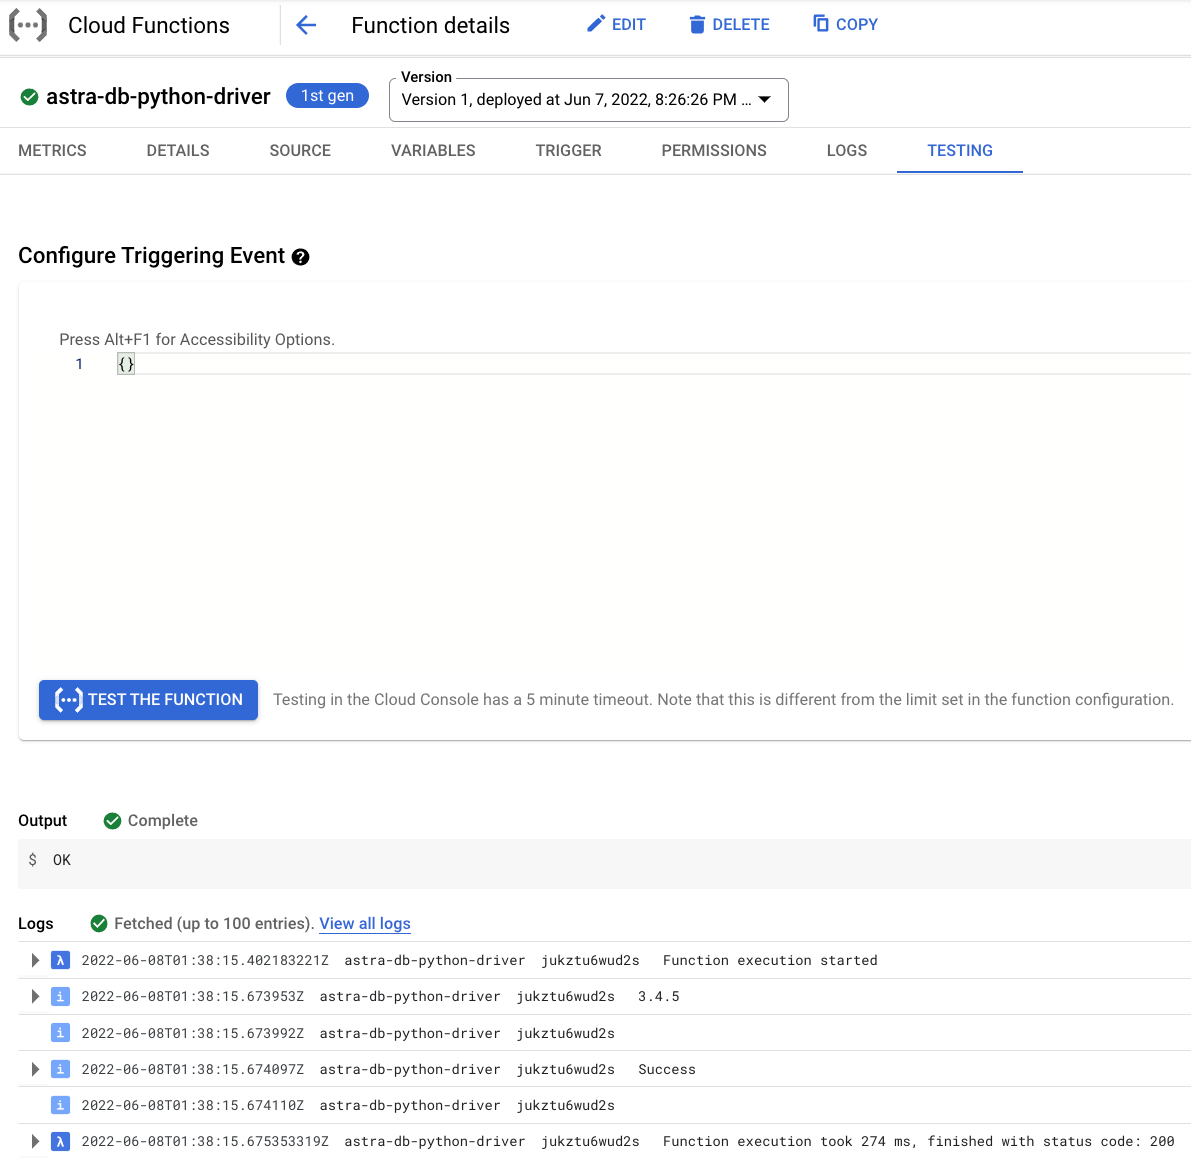
Notice the CQL version output 3.4.5 and status code 200.
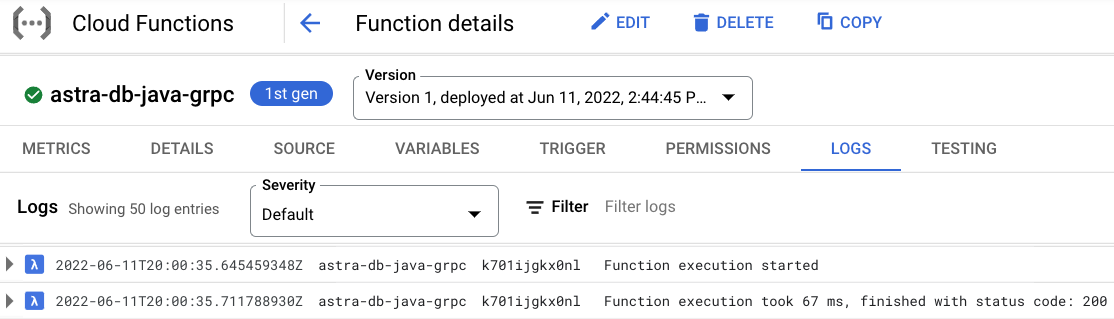
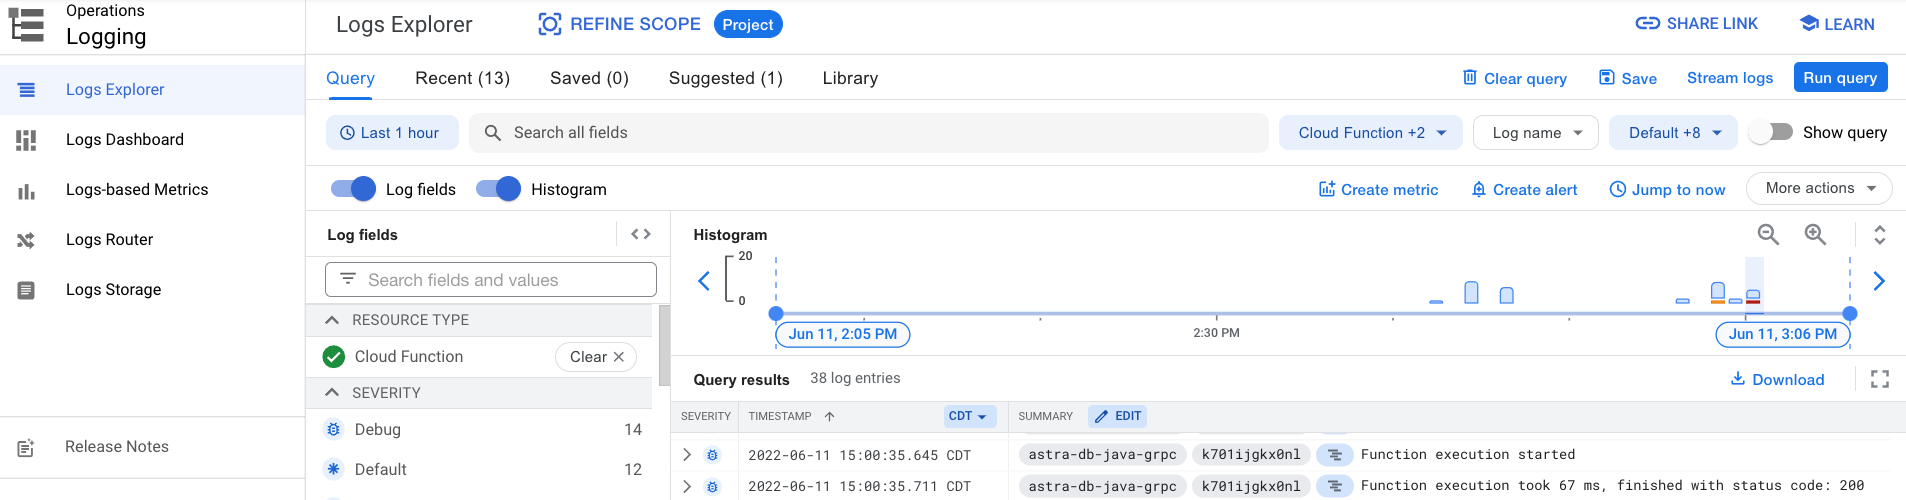
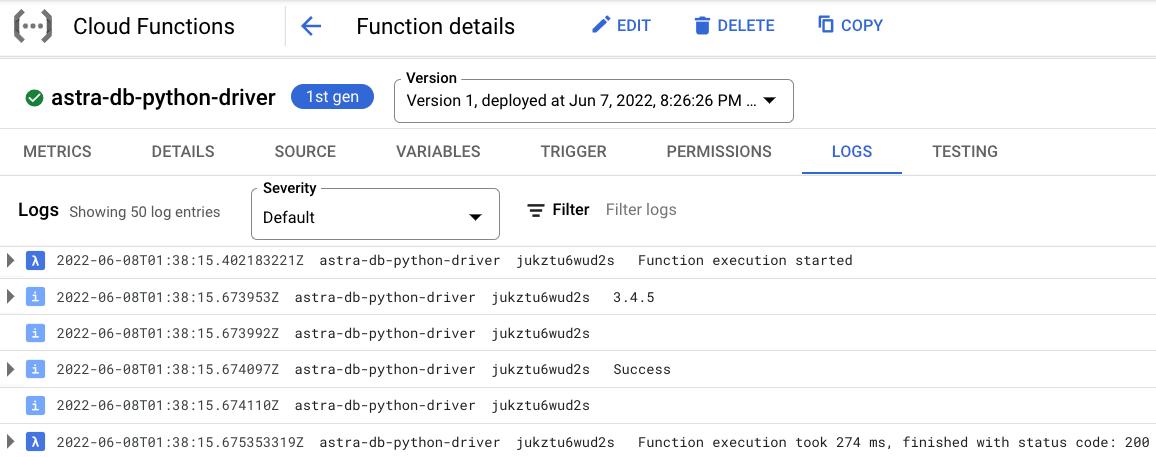
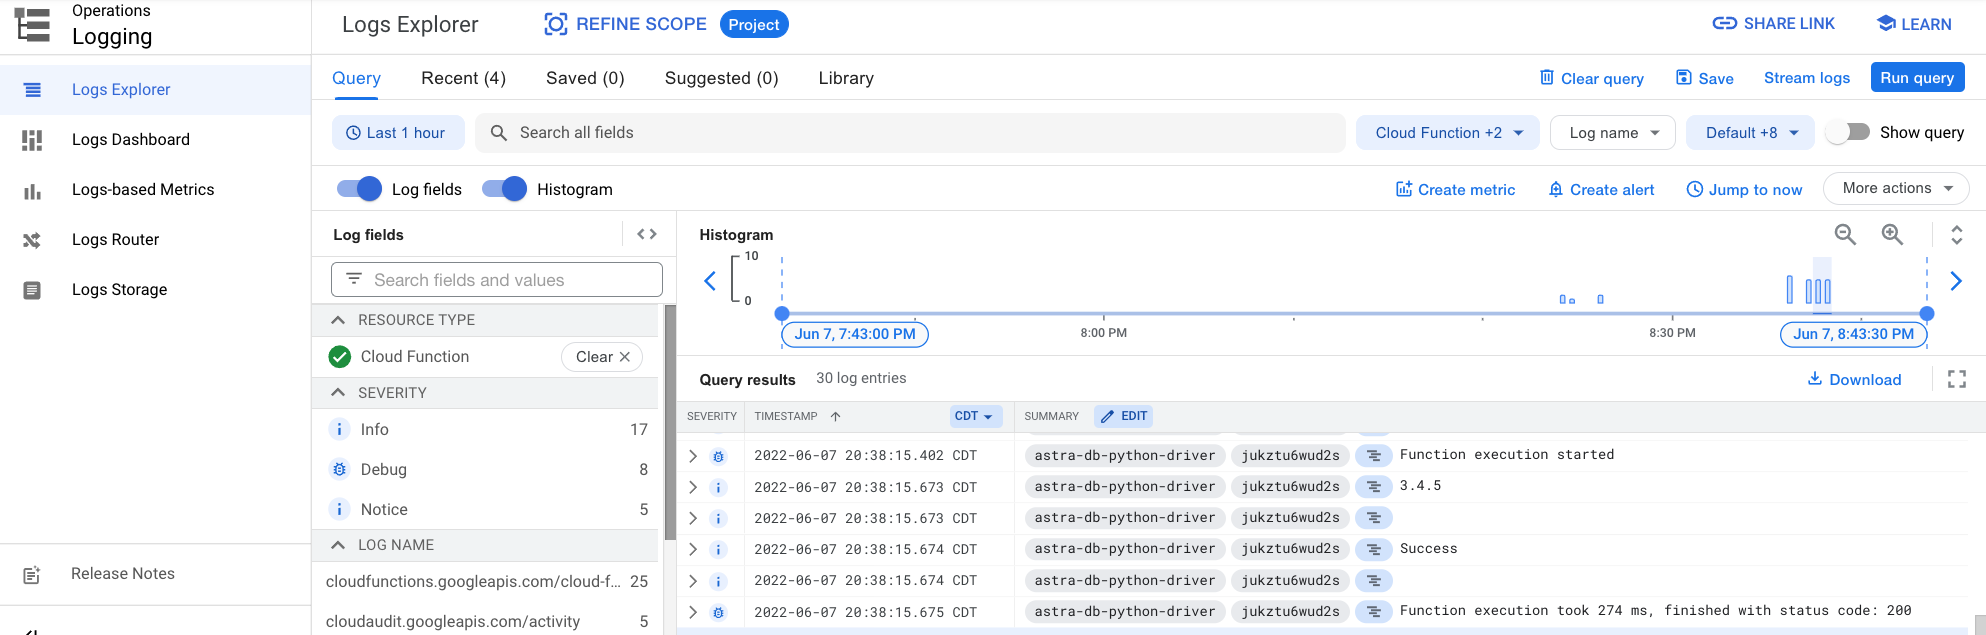
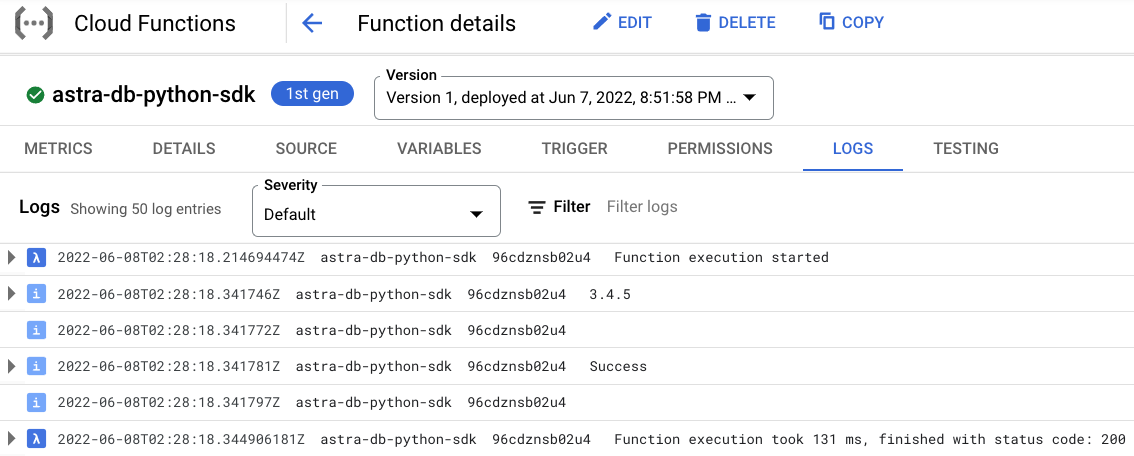
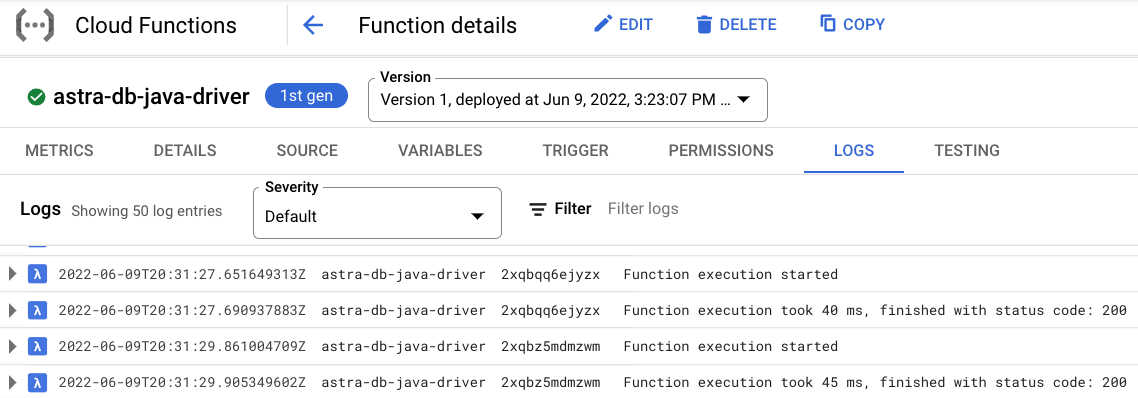
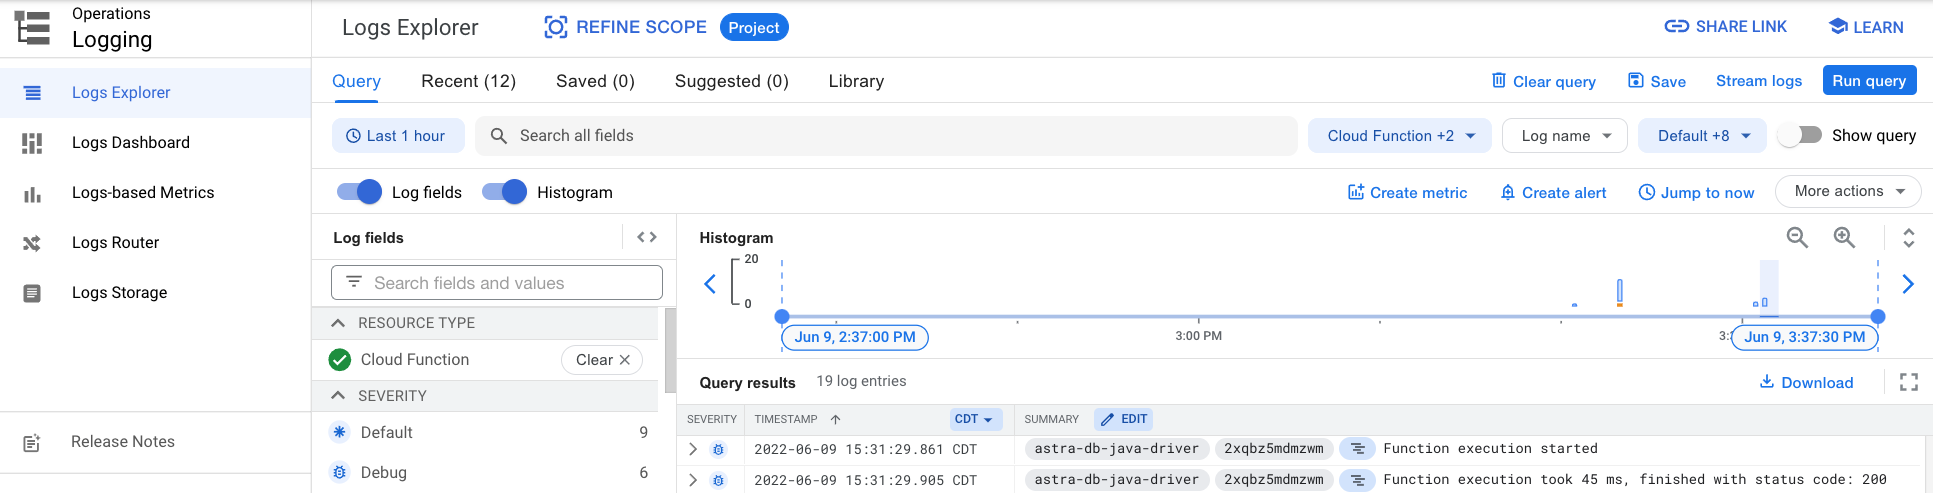
✅ 5. View logs.
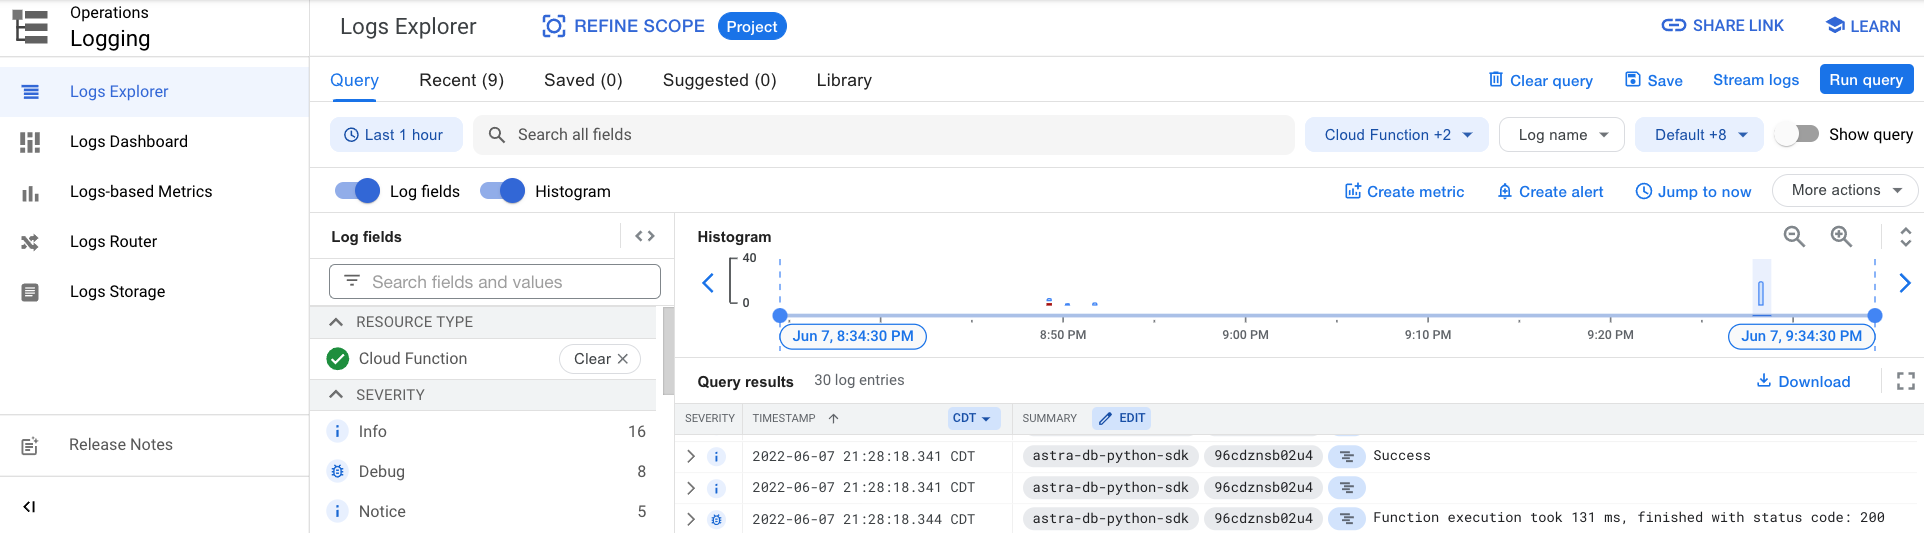
You can further explore the log history by either clicking on the Logs tab or the View all logs link that opens Logs Explorer.
Using Python SDK
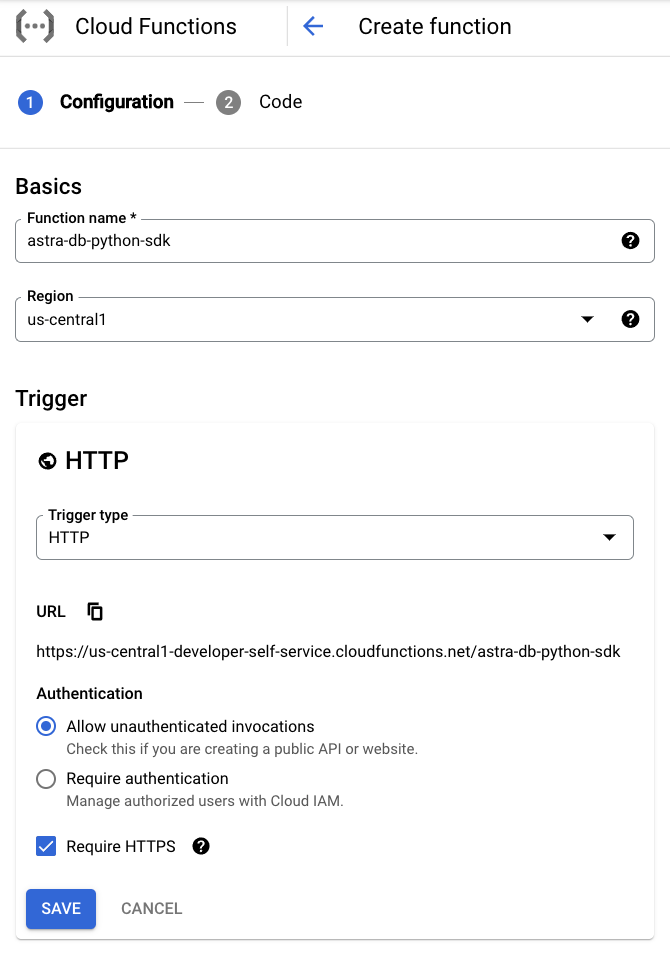
✅ 1. Create a function.
-
Go to the Functions Overview page, select a project that has Cloud Functions enabled, and click Create function.
-
Under the Basics section, specify preferred Function name and Region.
-
Under the Trigger section, select HTTP, Allow unauthenticated invocations, and Require HTTPS.
-
Click Save.
-
Under the Runtime, build, connections and security settings section, customize additional settings and create these Runtime environment variables:
ASTRA_DB_ID: A Database ID value can be found on the Astra DB dashboard.ASTRA_DB_REGION: A Region name can be found on the overview page for a specific Astra DB database.ASTRA_DB_APPLICATION_TOKEN: An Application Token can be generated for a specific Astra DB database (see the Prerequisites section above).
Note that, for better security, you can alternatively use the Secret Manager service to store and manage an application token as a secret. A secret can then be similarly exposed as an environment variable. The settings can be found under the Runtime, build, connections and security settings section, the Security tab, and the Secrets field.
-
Click Next.
-
Select Python 3.7 or your preferred version in the Runtime field.
-
Select Inline Editor in the Source code field.
-
Enter query_astra_db in the Entry point field.
-
Add AstraPy, a Pythonic SDK for DataStax Astra and Stargate, and its preferred version to the
requirements.txtfile.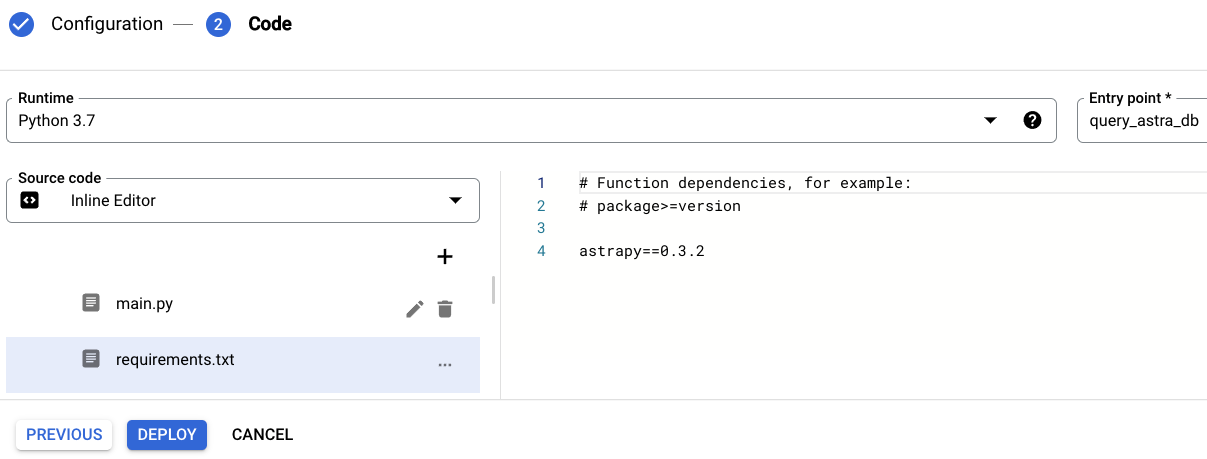
-
Replace the
main.pycontent with:from astrapy.rest import create_client, http_methods import os ASTRA_DB_ID = os.environ.get('ASTRA_DB_ID') ASTRA_DB_REGION = os.environ.get('ASTRA_DB_REGION') ASTRA_DB_APPLICATION_TOKEN = os.environ.get('ASTRA_DB_APPLICATION_TOKEN') astra_http_client = create_client(astra_database_id=ASTRA_DB_ID, astra_database_region=ASTRA_DB_REGION, astra_application_token=ASTRA_DB_APPLICATION_TOKEN) def query_astra_db(request): # Retrieve a row with primary key value 'local' # from table 'local' in keyspace 'system' res = astra_http_client.request( method=http_methods.GET, path=f"/api/rest/v2/keyspaces/system/local/local" ) # Print the 'cql_version' field value of the row print(res["data"][0]['cql_version']) print ('Success')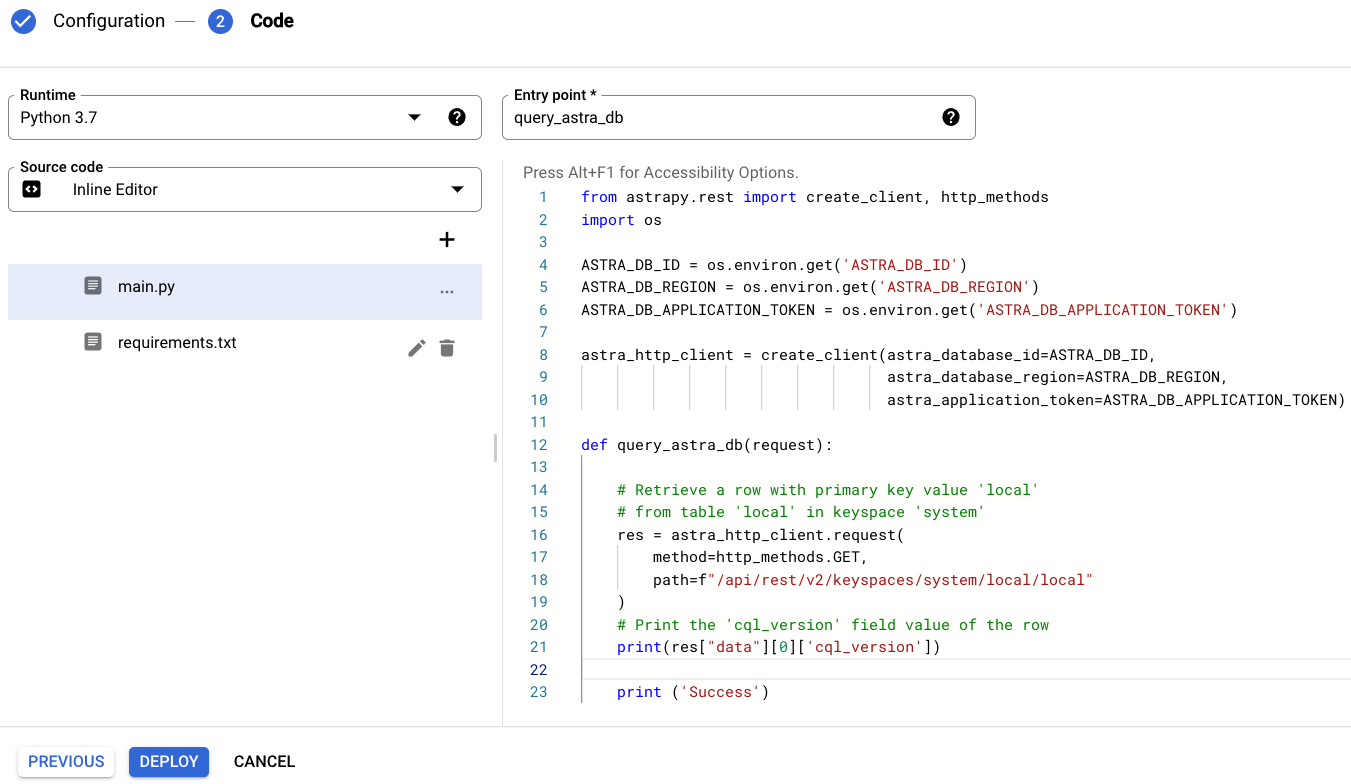
You can learn more about the code above by reading the AstraPy documentation.
✅ 2. Deploy the function.
-
Click Deploy.
-
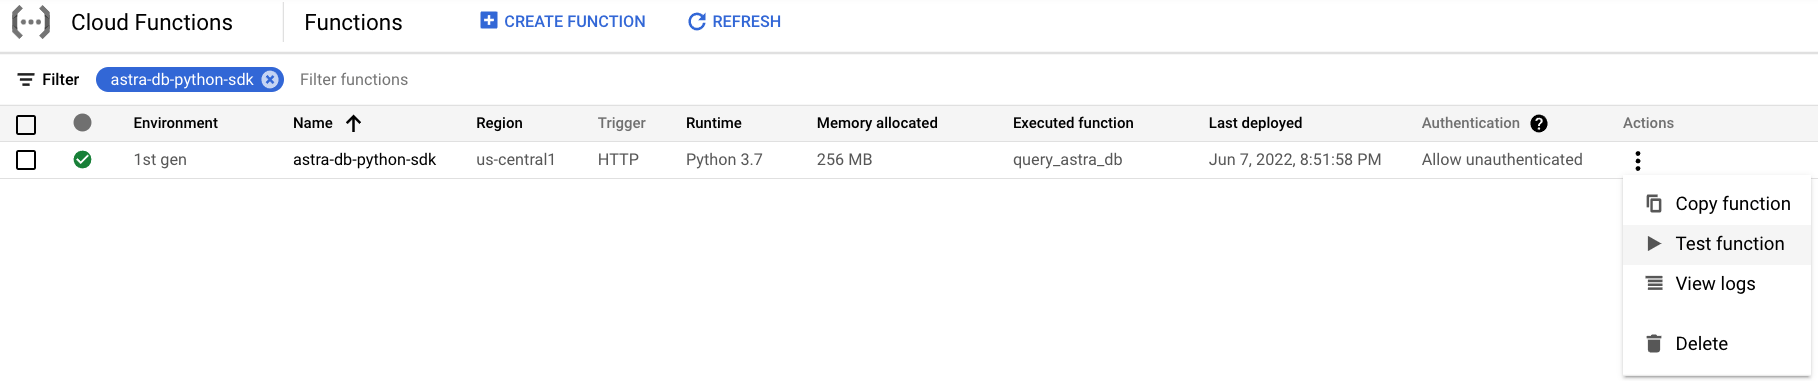
On the Cloud Functions Overview page, find the newly deployed function.

✅ 3. Test the function.
-
Under Actions, select Test function.
-
On the testing page, click Test the function and observe the output.
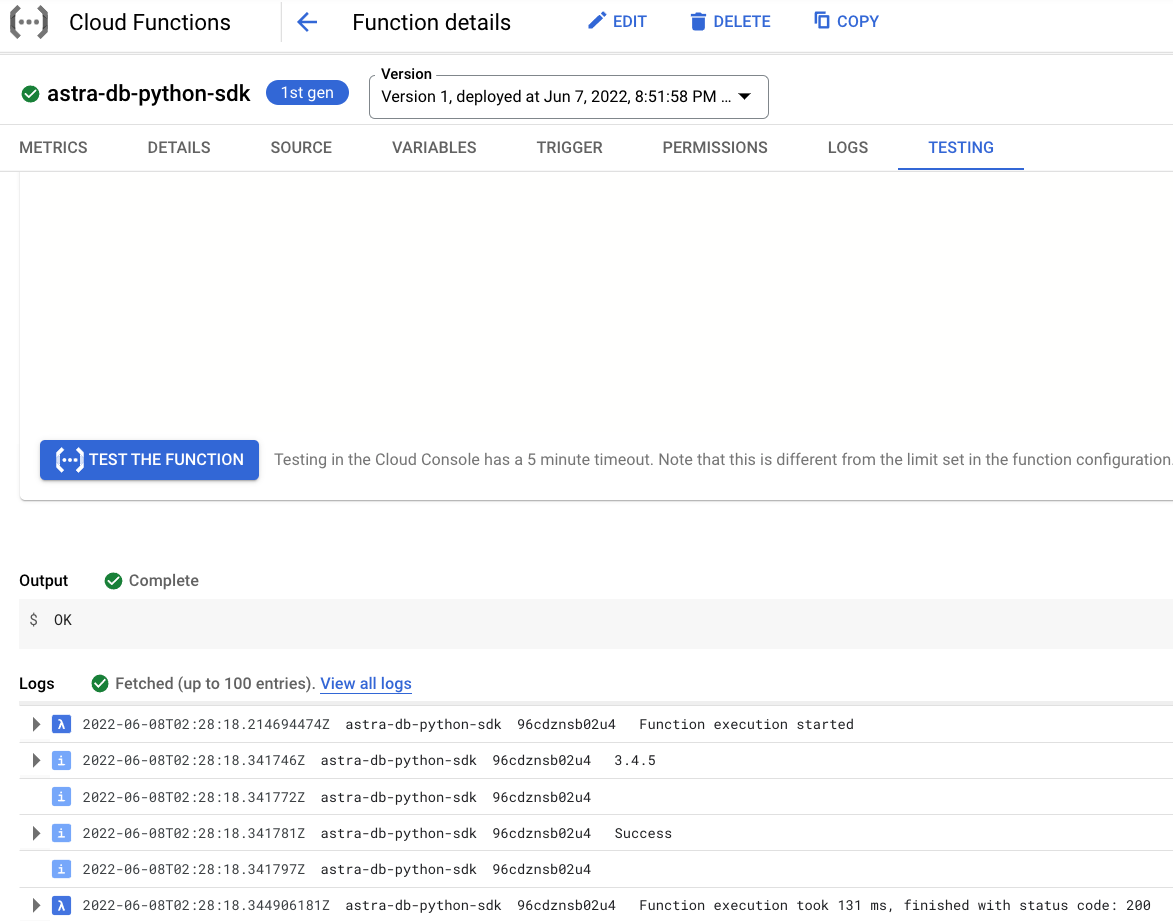
Notice the CQL version output 3.4.5 and status code 200.
✅ 4. View logs.
You can further explore the log history by either clicking on the Logs tab or the View all logs link that opens Logs Explorer.
Using Java Driver
✅ 1. Create a secret with the secure connect bundle file.
-
Go to the Secret Manager page, select a project that has Secret Manager and Cloud Functions enabled, and click Create secret.
-
Give a Name to the secret and upload the secure connect bundle file as a Secret value. (See the Prerequisites section above if you need to download your secure connect bundle.) Optionally, customize other secret management settings.

-
Click Create secret.
-
On the Secret Manager page, find the newly created secret.
✅ 2. Create a function.
- Go to the Functions Overview page, select the same project that has Secret Manager and Cloud Functions enabled, and click Create function.
- Under the Basics section, specify preferred Function name and Region.
-
Under the Trigger section, select HTTP, Allow unauthenticated invocations, and Require HTTPS.

-
Click Save.
-
Under the Runtime, build, connections and security settings section, customize additional settings and create these Runtime environment variables:
ASTRA_DB_CLIENT_ID: A Client ID is generated together with an application token (see the Prerequisites section above).ASTRA_DB_CLIENT_SECRET: A Client secret is generated together with an application token (see the Prerequisites section above).
Note that, for better security, you can alternatively use the Secret Manager service to store and manage a client secret. A secret can then be similarly exposed as an environment variable. The settings can be found under the Runtime, build, connections and security settings section, the Security tab, and the Secrets field.
-
Under the Runtime, build, connections and security settings section and the Security, click Reference a secret. Select the previously created Secret with the secure connect bundle file, Grant the service account access to the secret, if needed, use Mounted as volume in the Reference method field, and enter secrets in the Mount path field.
Notice the final Path that should be used to access the secure connect bundle in the function code. -
Click Done and Next.
-
Select Java 11 or your preferred version in the Runtime field.
-
Select Inline Editor in the Source code field.
-
Enter com.example.AstraDBFunction in the Entry point field.
-
Add java-driver, a Java client library for Apache Cassandra, DataStax Astra DB and DataStax Enterprise, to the
pom.xmlfile:<dependency> <groupId>com.datastax.oss</groupId> <artifactId>java-driver-core</artifactId> <!--Use the latest version from https://search.maven.org/artifact/com.datastax.oss/java-driver-core --> <version>4.15.0</version> </dependency>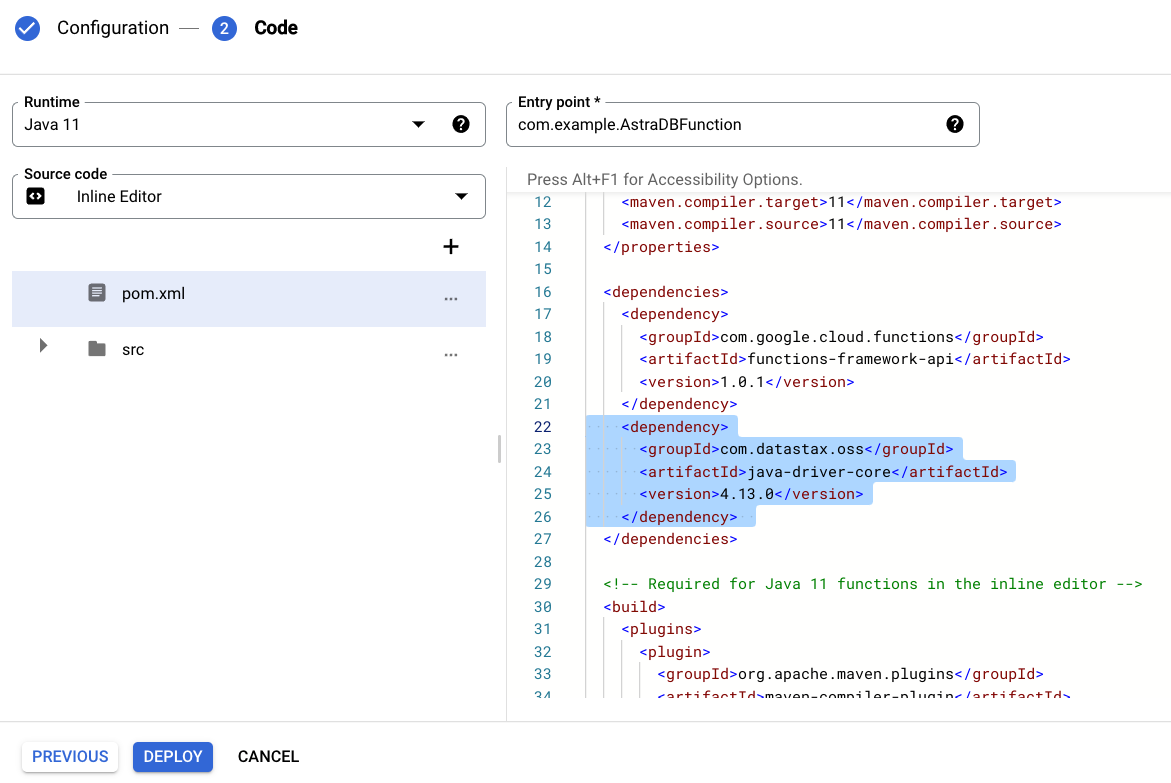
-
Rename the
Example.javafile toAstraDBFunction.javaand replace its content with:package com.example; import com.google.cloud.functions.HttpFunction; import com.google.cloud.functions.HttpRequest; import com.google.cloud.functions.HttpResponse; import java.io.BufferedWriter; import com.datastax.oss.driver.api.core.CqlSession; import com.datastax.oss.driver.api.core.cql.ResultSet; import com.datastax.oss.driver.api.core.cql.Row; import java.nio.file.Paths; public class AstraDBFunction implements HttpFunction { public static final String ASTRA_DB_CLIENT_ID = System.getenv("ASTRA_DB_CLIENT_ID"); public static final String ASTRA_DB_CLIENT_SECRET = System.getenv("ASTRA_DB_CLIENT_SECRET"); public static CqlSession session = CqlSession.builder() .withCloudSecureConnectBundle(Paths.get("/secrets/secure-connect-secret")) .withAuthCredentials(ASTRA_DB_CLIENT_ID,ASTRA_DB_CLIENT_SECRET) .build(); public void service(HttpRequest request, HttpResponse response) throws Exception { BufferedWriter writer = response.getWriter(); ResultSet rs = session.execute("SELECT cql_version FROM system.local WHERE key = 'local';"); Row row = rs.one(); writer.write( row.getString("cql_version") ); writer.newLine(); writer.write("Success"); } }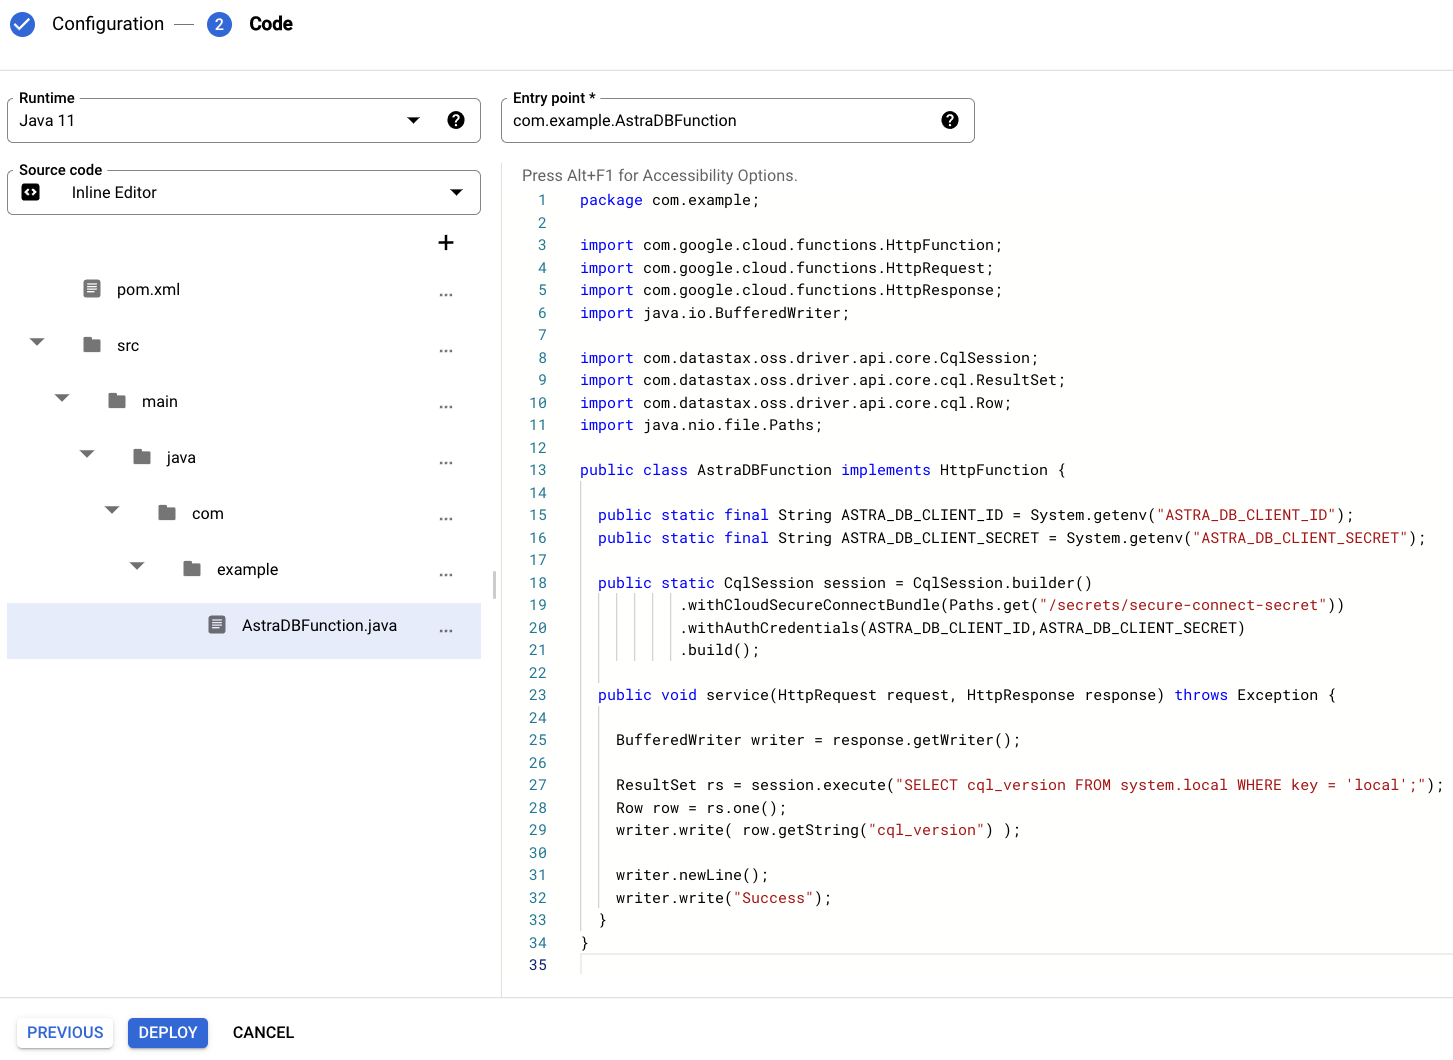
You can learn more about the code above by reading the java-driver documentation.
✅ 3. Deploy the function.
-
Click Deploy.
-
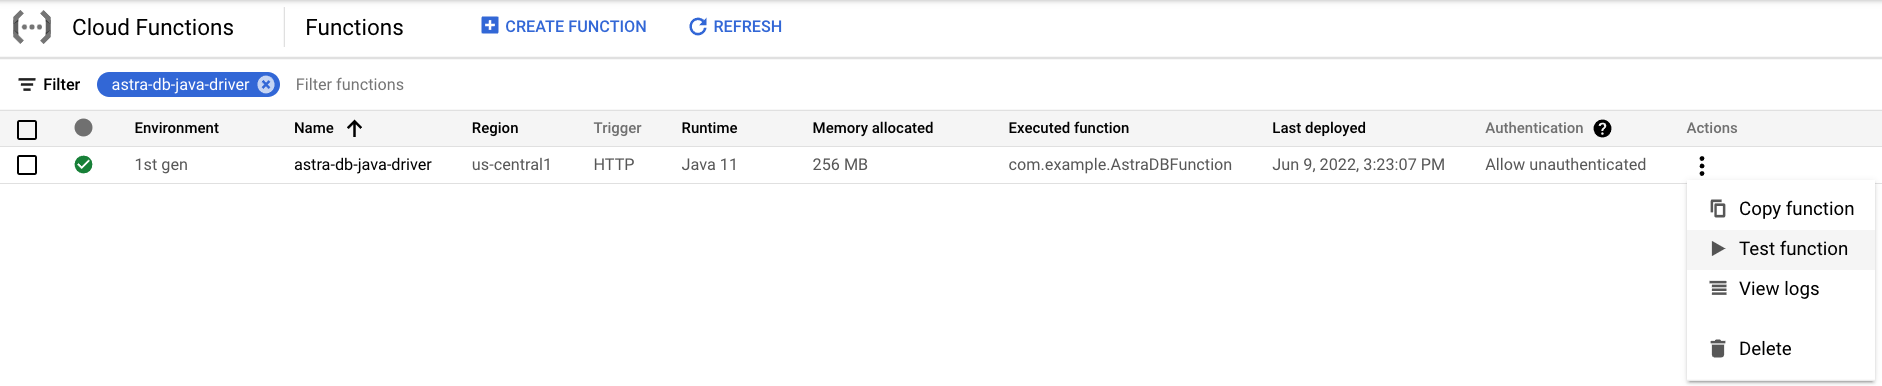
On the Cloud Functions Overview page, find the newly deployed function.

✅ 4. Test the function.
-
Under Actions, select Test function.
-
On the testing page, click Test the function and observe the output.
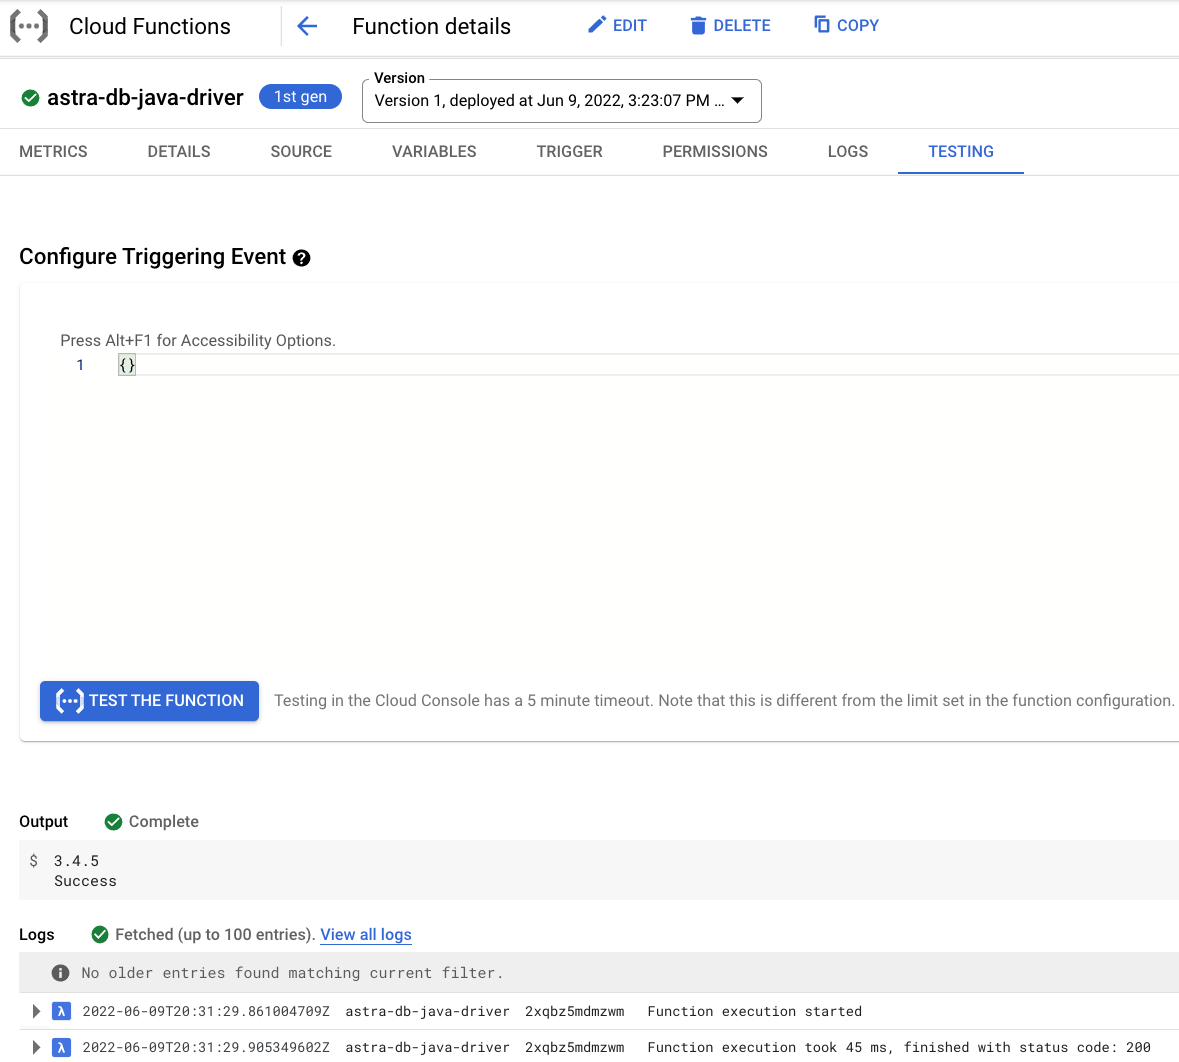
Notice the CQL version output 3.4.5 and status code 200.
✅ 5. View logs.
You can further explore the log history by either clicking on the Logs tab or the View all logs link that opens Logs Explorer.
Using Java gRPC
✅ 1. Create a function.
- Go to the Functions Overview page, select a project that has Cloud Functions enabled, and click Create function.
- Under the Basics section, specify preferred Function name and Region.
-
Under the Trigger section, select HTTP, Allow unauthenticated invocations, and Require HTTPS.
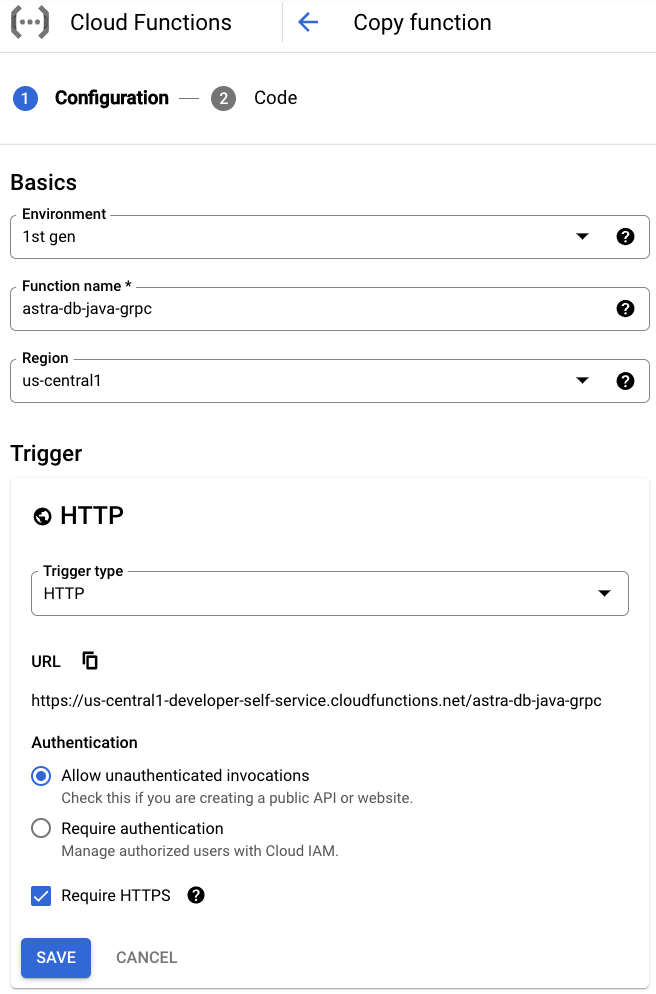
-
Click Save.
-
Under the Runtime, build, connections and security settings section, customize additional settings and create these Runtime environment variables:
ASTRA_DB_ID: A Database ID value can be found on the Astra DB dashboard.ASTRA_DB_REGION: A Region name can be found on the overview page for a specific Astra DB database.ASTRA_DB_APPLICATION_TOKEN: An Application Token can be generated for a specific Astra DB database (see the Prerequisites section above).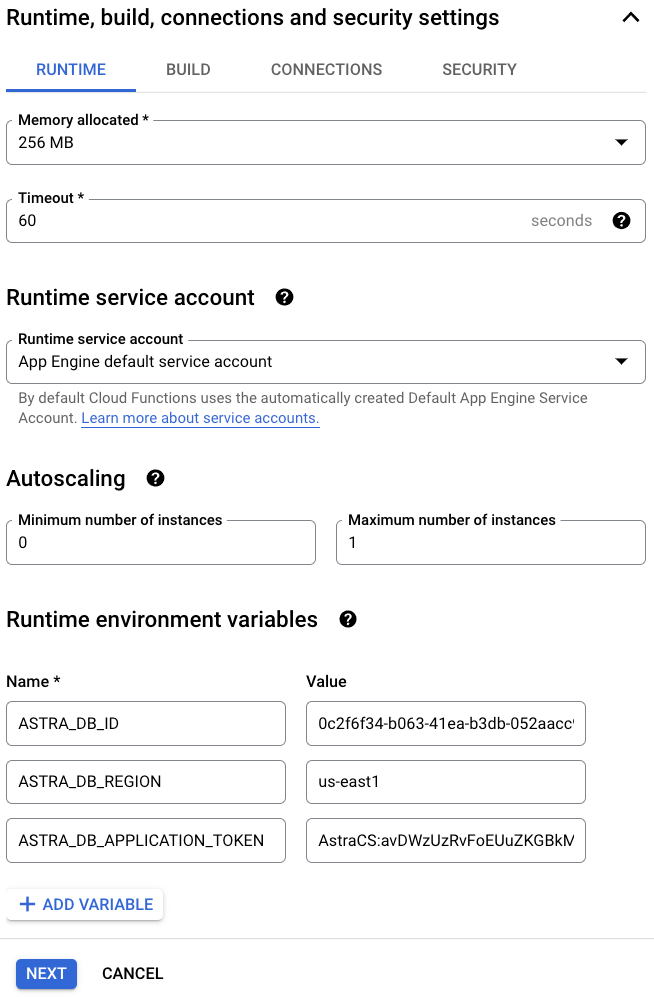
Note that, for better security, you can alternatively use the Secret Manager service to store and manage an application token as a secret. A secret can then be similarly exposed as an environment variable. The settings can be found under the Runtime, build, connections and security settings section, the Security tab, and the Secrets field.
-
Click Next.
-
Select Java 11 or your preferred version in the Runtime field.
-
Select Inline Editor in the Source code field.
-
Enter com.example.AstraDBFunction in the Entry point field.
-
Add gRPC dependencies to the
pom.xmlfile:<dependency> <groupId>io.stargate.grpc</groupId> <artifactId>grpc-proto</artifactId> <!-- Use the latest version from https://central.sonatype.dev/artifact/io.stargate.grpc/grpc-proto/2.0.4/versions --> <version>1.0.41</version> </dependency> <dependency> <groupId>io.grpc</groupId> <artifactId>grpc-netty-shaded</artifactId> <!-- Use the latest version from https://central.sonatype.dev/artifact/io.grpc/grpc-netty-shaded/1.51.1/versions --> <version>1.41.0</version> </dependency>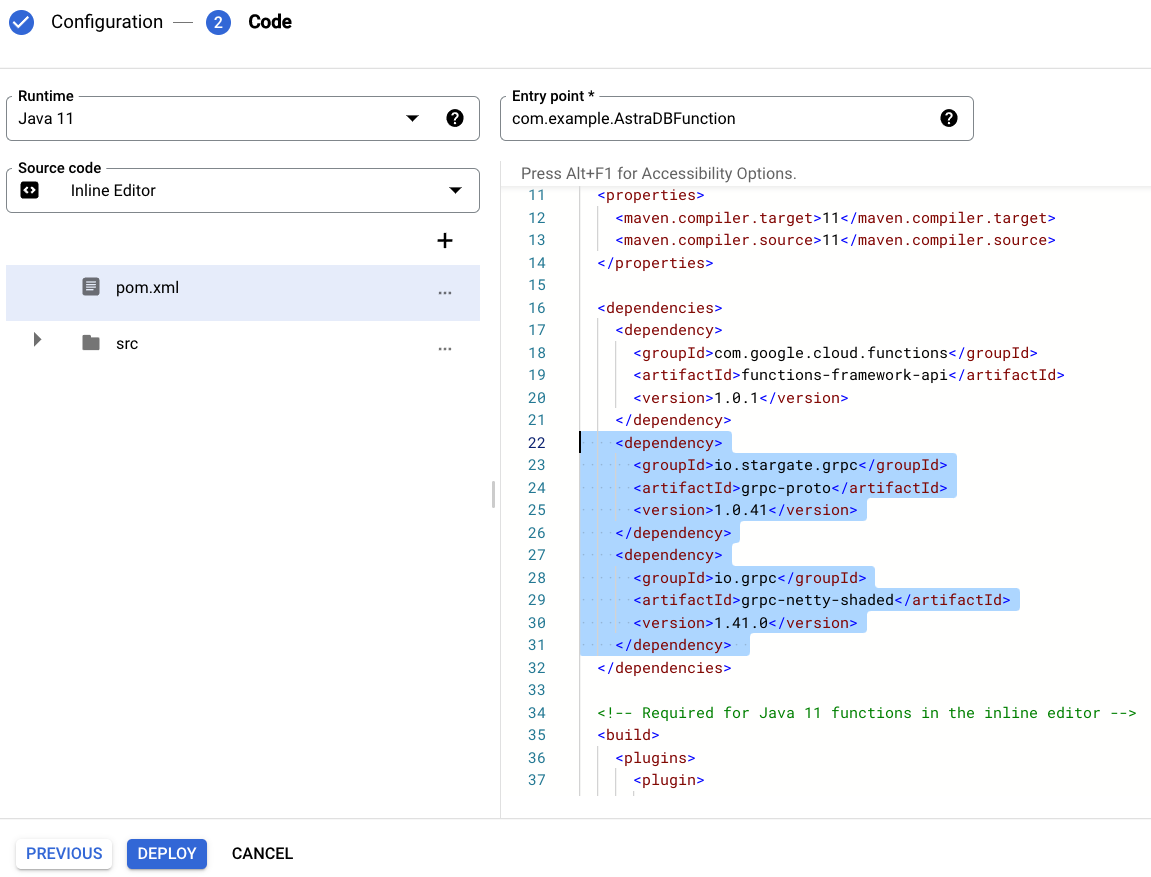
-
Rename the
Example.javafile toAstraDBFunction.javaand replace its content with:package com.example; import com.google.cloud.functions.HttpFunction; import com.google.cloud.functions.HttpRequest; import com.google.cloud.functions.HttpResponse; import java.io.BufferedWriter; import java.util.concurrent.TimeUnit; import io.grpc.ManagedChannel; import io.grpc.ManagedChannelBuilder; import io.stargate.grpc.StargateBearerToken; import io.stargate.proto.QueryOuterClass; import io.stargate.proto.QueryOuterClass.Row; import io.stargate.proto.StargateGrpc; public class AstraDBFunction implements HttpFunction { public static final String ASTRA_DB_TOKEN = System.getenv("ASTRA_DB_APPLICATION_TOKEN"); public static final String ASTRA_DB_ID = System.getenv("ASTRA_DB_ID"); public static final String ASTRA_DB_REGION = System.getenv("ASTRA_DB_REGION"); public static ManagedChannel channel = ManagedChannelBuilder .forAddress(ASTRA_DB_ID + "-" + ASTRA_DB_REGION + ".apps.astra.datastax.com", 443) .useTransportSecurity() .build(); public static StargateGrpc.StargateBlockingStub blockingStub = StargateGrpc.newBlockingStub(channel).withCallCredentials(new StargateBearerToken(ASTRA_DB_TOKEN)); public void service(HttpRequest request, HttpResponse response) throws Exception { QueryOuterClass.Response queryString = blockingStub.executeQuery(QueryOuterClass .Query.newBuilder() .setCql("SELECT cql_version FROM system.local WHERE key = 'local';") .build()); QueryOuterClass.ResultSet rs = queryString.getResultSet(); BufferedWriter writer = response.getWriter(); writer.write( rs.getRows(0).getValues(0).getString() ); writer.newLine(); writer.write("Success"); } }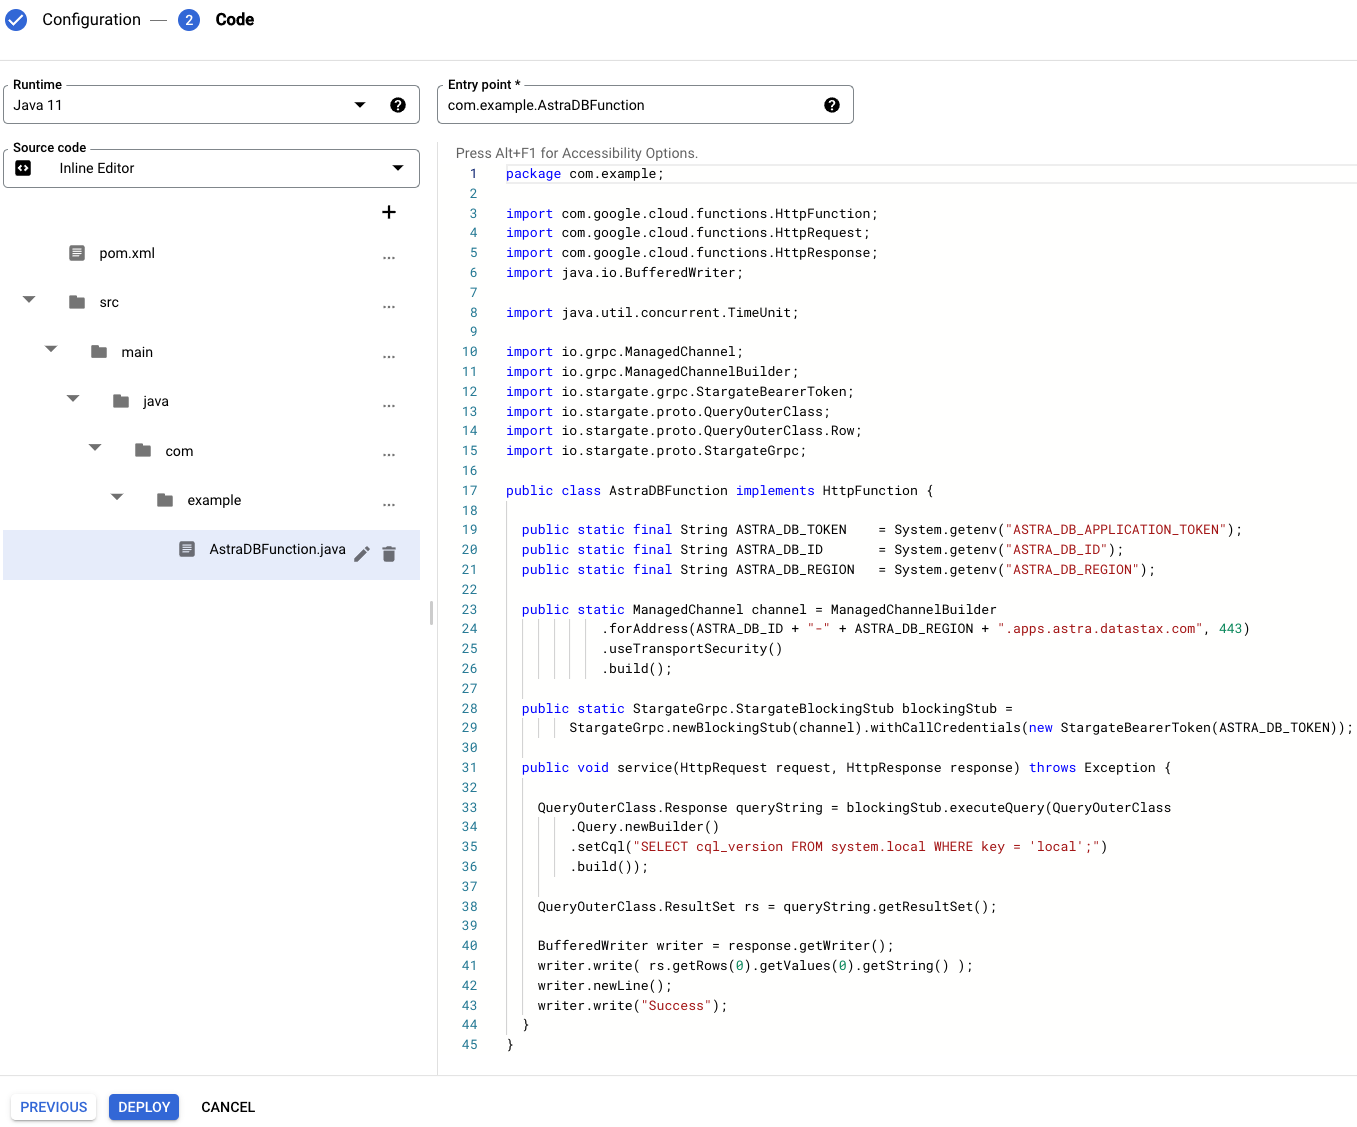
You can learn more about the code above by reading the Stargate documentation.
✅ 2. Deploy the function.
-
Click Deploy.
-
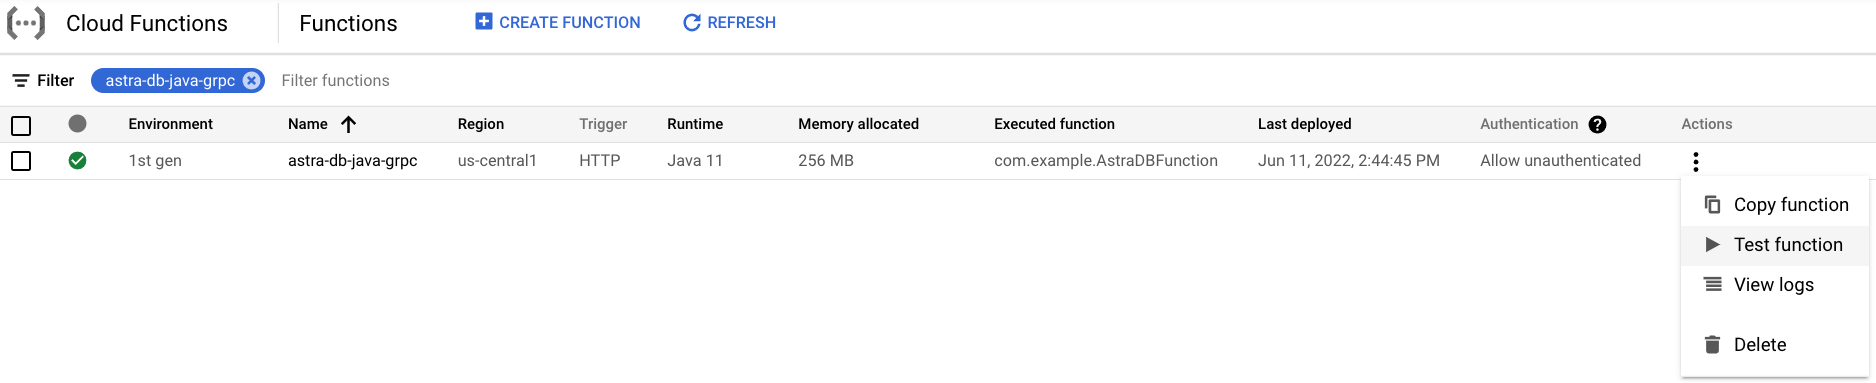
On the Cloud Functions Overview page, find the newly deployed function.

✅ 3. Test the function.
-
Under Actions, select Test function.
-
On the testing page, click Test the function and observe the output.

Notice the CQL version output 3.4.5 and status code 200.
✅ 4. View logs.
You can further explore the log history by either clicking on the Logs tab or the View all logs link that opens Logs Explorer.