AWS Lambda Functions
Overview
AWS Lambda is AWS' function-as-a-service offering that provides a serverless execution environment for your code. AWS Lambda functions are commonly used to:
- Extend Astra DB with additional data processing capabilities, such as aggregating, summarizing and validating data periodically;
- Connect Astra DB with other cloud services into data pipelines that move, process and analyze data.
Prerequisites
- You should have an Astra account
- You should Create an Astra Database
- You should Have an Astra Token
- You should Download your Secure Connect Bundle
- Optionally, if you are new to AWS Lambda, practice creating a simpler function first.
Using Python Driver
✅ 1. Create a deployment package.
A deployment package is a .zip file with a function source code and dependencies. To access Astra DB from a function using Python Driver, we must add cassandra-driver, a Python client library for Apache Cassandra, DataStax Astra DB and DataStax Enterprise, as a dependency. In addition, as part of the deployment package, we need to include a secure connect bundle for a database in Astra DB that we want to query.
-
Open a command prompt and create a project directory:
-
Create file
lambda_function.pywith the function source code:You can learn more about the code above by reading the cassandra-driver documentation.from cassandra.cluster import Cluster from cassandra.auth import PlainTextAuthProvider import os ASTRA_DB_CLIENT_ID = os.environ.get('ASTRA_DB_CLIENT_ID') ASTRA_DB_CLIENT_SECRET = os.environ.get('ASTRA_DB_CLIENT_SECRET') cloud_config= { 'secure_connect_bundle': 'secure-connect-bundle-for-your-database.zip', 'use_default_tempdir': True } auth_provider = PlainTextAuthProvider(ASTRA_DB_CLIENT_ID, ASTRA_DB_CLIENT_SECRET) cluster = Cluster(cloud=cloud_config, auth_provider=auth_provider, protocol_version=4) session = cluster.connect() def lambda_handler(event, context): row = session.execute("SELECT cql_version FROM system.local WHERE key = 'local';").one() cql_version = row[0] print(cql_version) print('Success') return cql_version -
Install the cassandra-driver library:
-
Download the Secure Connect Bundle for your database and copy it into the project directory.
-
Create a deployment package with
lambda_function.py,cassandra-driver, and secure connect bundle:
✅ 2. Create a function.
-
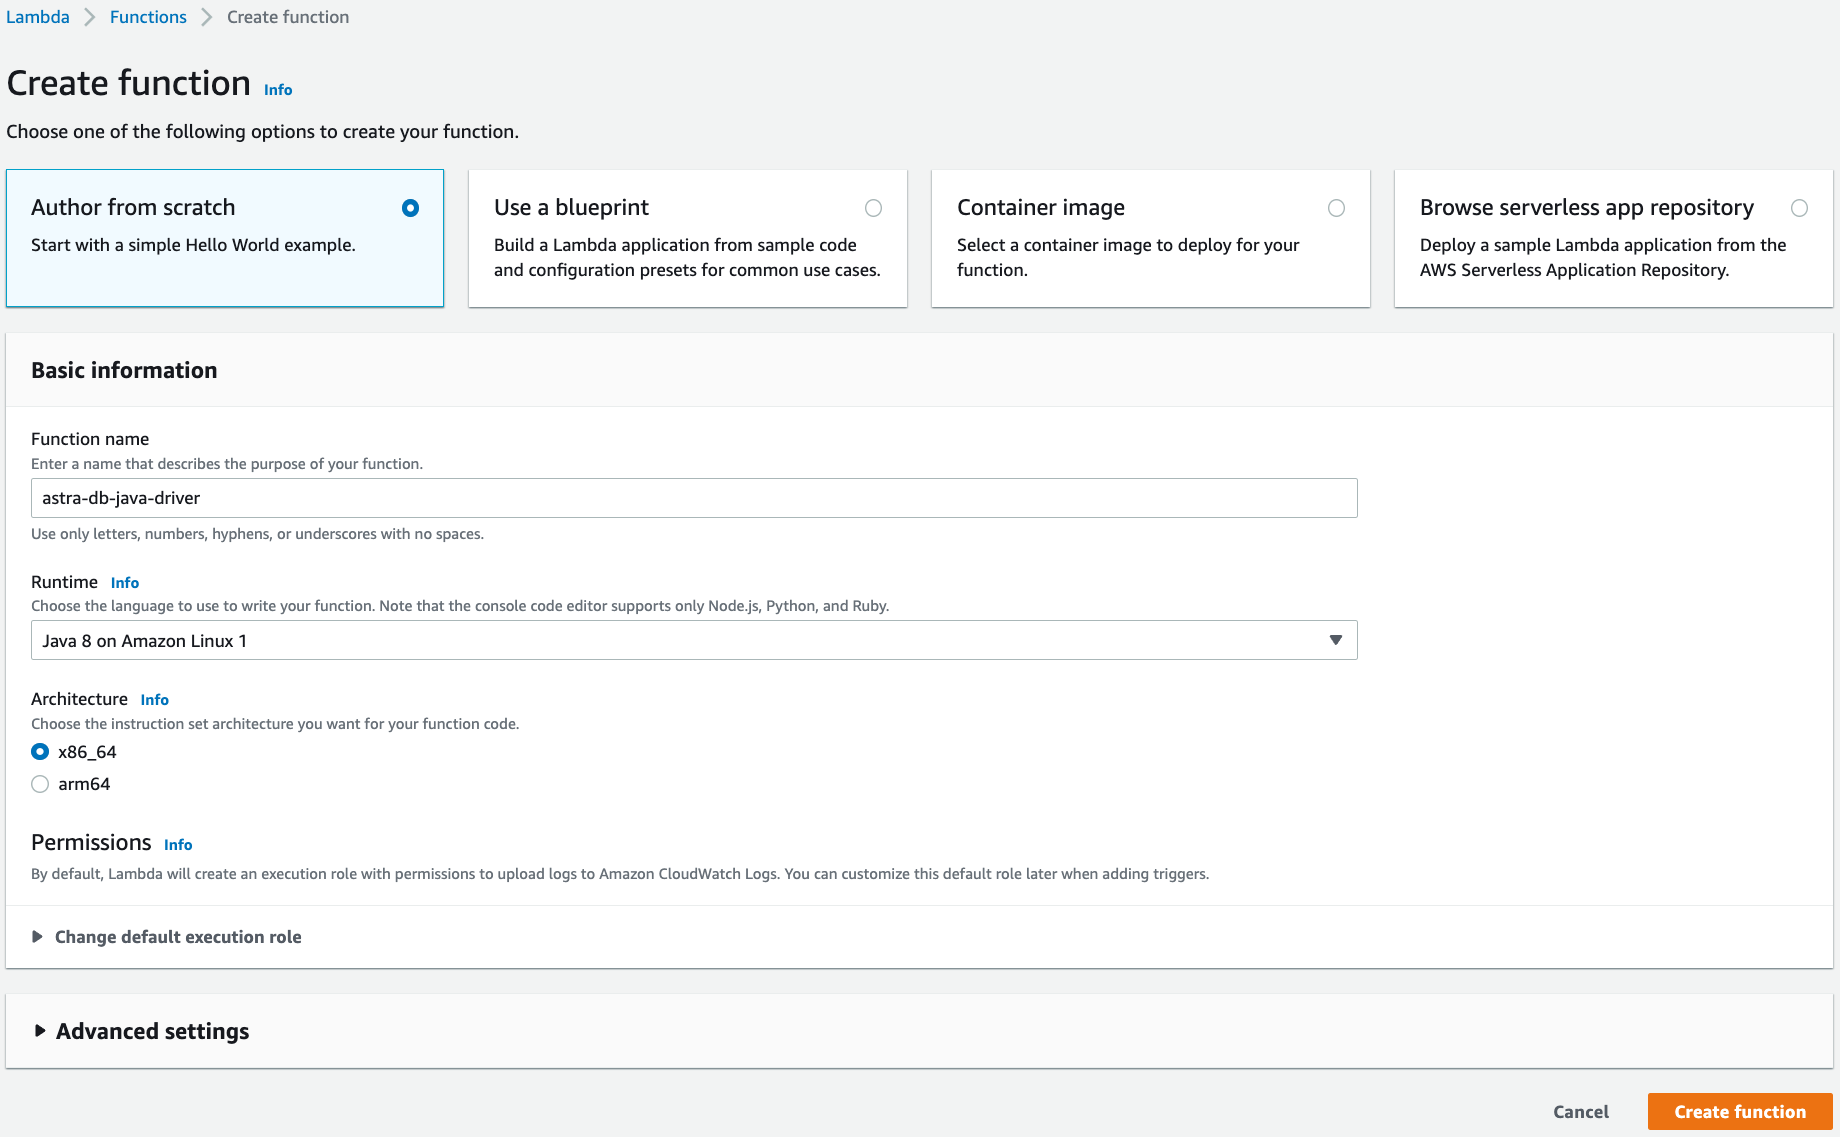
Go to the Functions page of the Lambda console and click Create function.

-
Choose Author from scratch.
-
Under the Basic information section, specify preferred Function name, Runtime, and Architecture.

-
Click Create function.
-
Under the Code tab and the Code source section, select Upload from and upload the deployment package created in the previous steps.

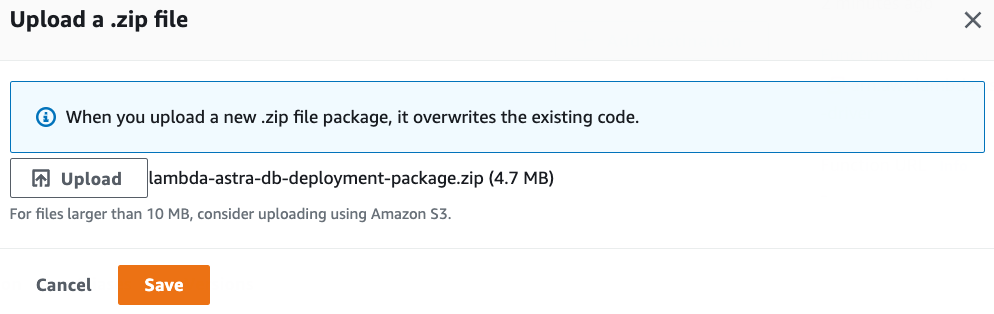
Since the deployment package exceeds 3 MBs, the Console Editor may not be available to view the source code:
-
Under the Configuration tab, select and create these Environment variables:
ASTRA_DB_CLIENT_ID: A Client ID is generated together with an application token (see the Prerequisites section above).ASTRA_DB_CLIENT_SECRET: A Client secret is generated together with an application token (see the Prerequisites section above).
Note that, for better security, you can alternatively use the AWS Secret Manager service to store and manage client id and secret, and then retrieve them programmatically.
-
Optionally, to optimize function performance, consider configuring reserved and provisioned concurrency under the Configuration tab.
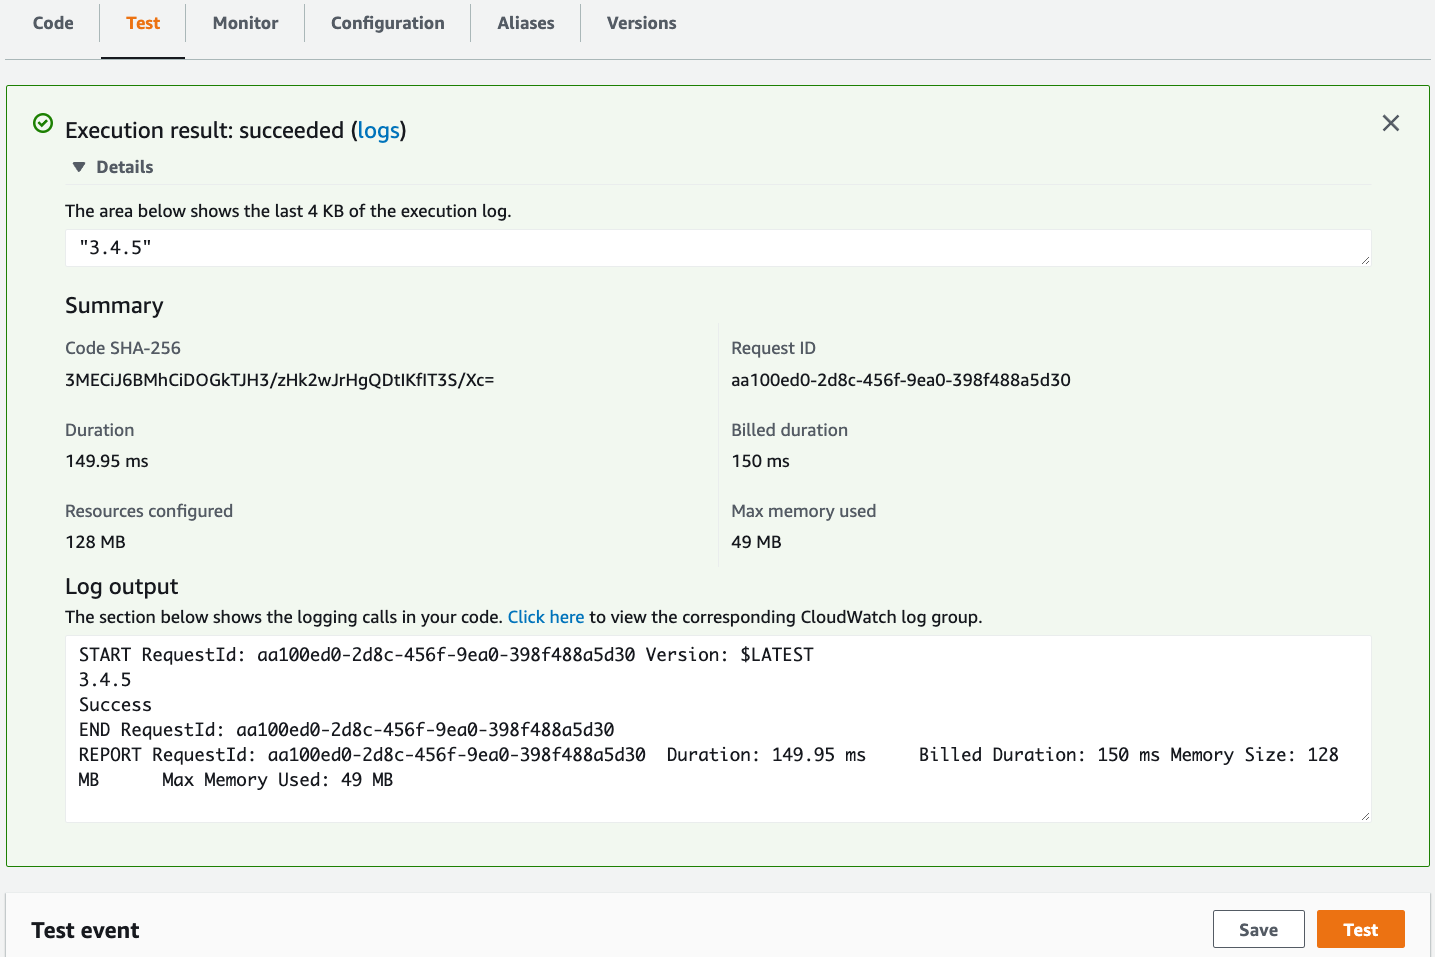
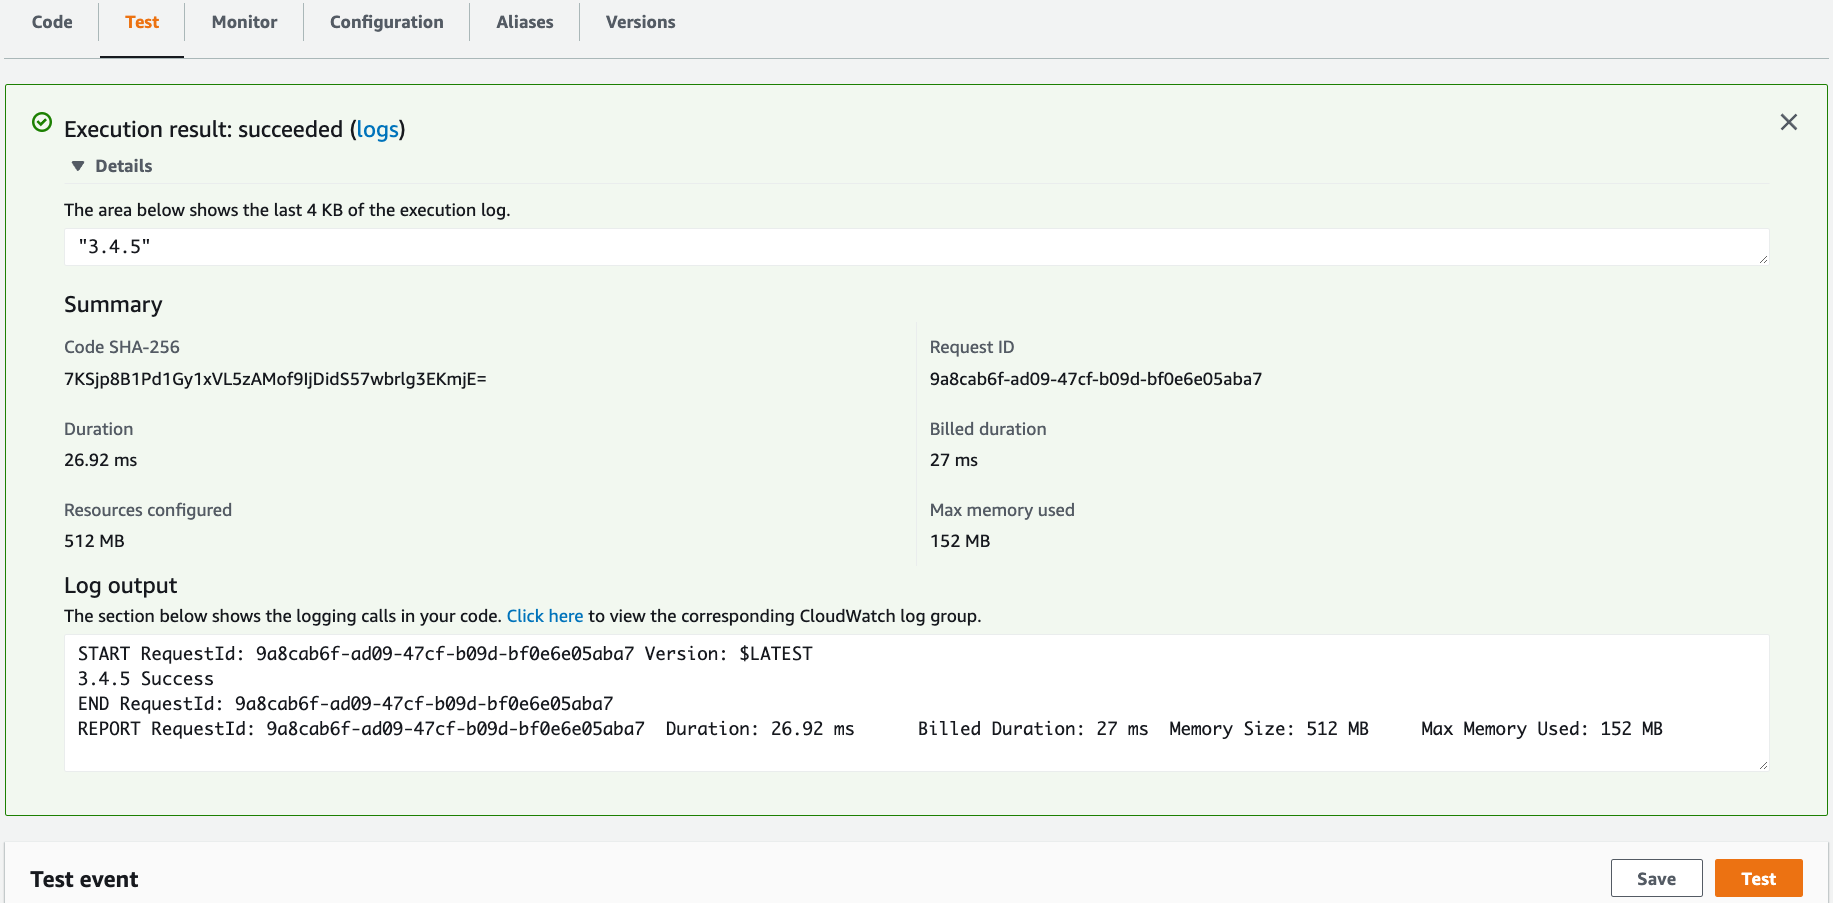
✅ 3. Test the function.
Under the Test tab, click the Test button and observe the output.

Notice the CQL version output and return value of 3.4.5.
Using Python SDK
✅ 1. Create a deployment package.
A deployment package is a .zip file with a function source code and dependencies. To access Astra DB from a function using REST API, we must add AstraPy, a Pythonic SDK for DataStax Astra and Stargate, as a dependency.
-
Open a command prompt and create a project directory:
-
Create file
lambda_function.pywith the function source code:You can learn more about the code above by reading the AstraPy documentation.from astrapy.rest import create_client, http_methods import os ASTRA_DB_ID = os.environ.get('ASTRA_DB_ID') ASTRA_DB_REGION = os.environ.get('ASTRA_DB_REGION') ASTRA_DB_APPLICATION_TOKEN = os.environ.get('ASTRA_DB_APPLICATION_TOKEN') astra_http_client = create_client(astra_database_id=ASTRA_DB_ID, astra_database_region=ASTRA_DB_REGION, astra_application_token=ASTRA_DB_APPLICATION_TOKEN) def lambda_handler(event, context): res = astra_http_client.request( method=http_methods.GET, path=f"/api/rest/v2/keyspaces/system/local/local" ) cql_version = res["data"][0]['cql_version'] print(cql_version) print('Success') return cql_version -
Install the AstraPy library:
-
Create a deployment package with
lambda_function.pyandastrapy:
✅ 2. Create a function.
-
Go to the Functions page of the Lambda console and click Create function.

-
Choose Author from scratch.
-
Under the Basic information section, specify preferred Function name, Runtime, and Architecture.

-
Click Create function.
-
Under the Code tab and the Code source section, select Upload from and upload the deployment package created in the previous steps.

-
Verify that the uploaded function has the correct
lambda_function.pyand dependencies: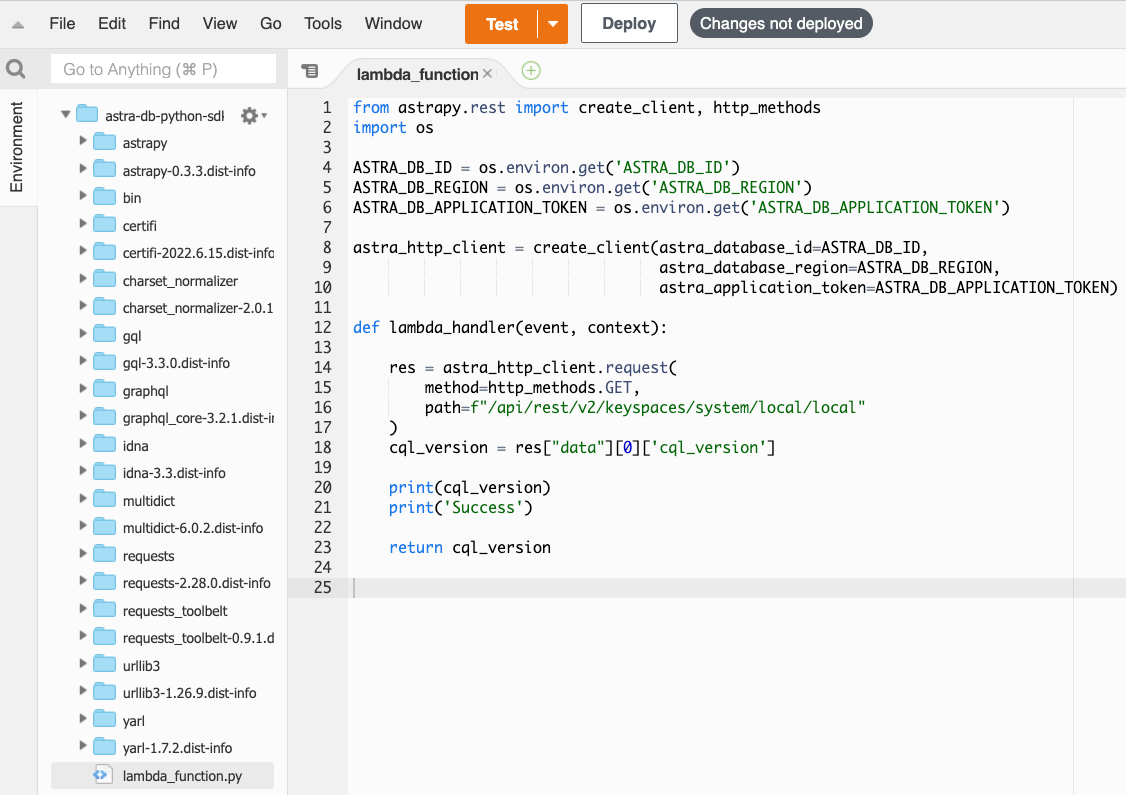
You can learn more about the code above by reading the AstraPy documentation. -
Click Deploy to deploy the function.
-
Under the Configuration tab, select and create these Environment variables:
ASTRA_DB_ID: A Database ID value can be found on the Astra DB dashboard.ASTRA_DB_REGION: A Region name can be found on the overview page for a specific Astra DB database.ASTRA_DB_APPLICATION_TOKEN: An Application Token can be generated for a specific Astra DB database (see the Prerequisites section above).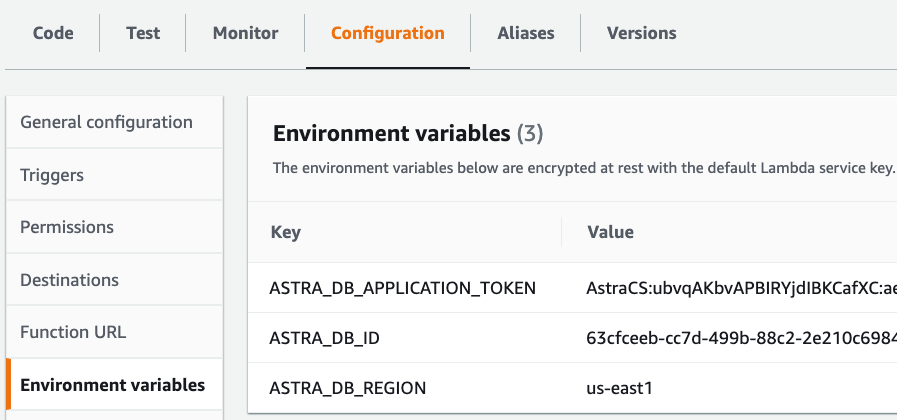
Note that, for better security, you can alternatively use the AWS Secret Manager service to store and manage an application token as a secret. A secret can then be retrieved programmatically.
-
Optionally, to optimize function performance, consider configuring reserved and provisioned concurrency under the Configuration tab.
✅ 3. Test the function.
Under the Test tab, click the Test button and observe the output.
Notice the CQL version output and return value of 3.4.5.
Using Java Driver
✅ 1. Create a deployment package.
A deployment package is a .zip or .jar file archive with compiled function code and dependencies. In this tutorial, we use Apache Maven™ to create, compile and package a function into a .jar file. We need to include the following pieces into a deployment package to access Astra DB from an AWS Lambda function: a) aws-lambda-java-core that defines necessary interfaces and classes to create functions; b) java-driver that enables connectivity to Apache Cassandra, DataStax Astra DB and DataStax Enterprise; and c) secure connect bundle for a database in Astra DB that we want to query.
-
Open a command prompt and create a new project using Apache Maven™:
-
Rename file
App.javatoAstraDBFunction.javaand replace its content with the function source code:You can learn more about the code above by reading the java-driver documentation.package com.example; import com.amazonaws.services.lambda.runtime.Context; import com.amazonaws.services.lambda.runtime.RequestHandler; import com.amazonaws.services.lambda.runtime.LambdaLogger; import com.datastax.oss.driver.api.core.CqlSession; import com.datastax.oss.driver.api.core.cql.ResultSet; import com.datastax.oss.driver.api.core.cql.Row; import java.nio.file.Paths; import java.util.Map; public class AstraDBFunction implements RequestHandler<Map<String,String>, String>{ private static final String ASTRA_DB_CLIENT_ID = System.getenv("ASTRA_DB_CLIENT_ID"); private static final String ASTRA_DB_CLIENT_SECRET = System.getenv("ASTRA_DB_CLIENT_SECRET"); private static CqlSession session = CqlSession.builder() .withCloudSecureConnectBundle(Paths.get("secure-connect-bundle-for-your-database.zip")) .withAuthCredentials(ASTRA_DB_CLIENT_ID,ASTRA_DB_CLIENT_SECRET) .build(); public String handleRequest(Map<String,String> event, Context context) { LambdaLogger logger = context.getLogger(); ResultSet rs = session.execute("SELECT cql_version FROM system.local WHERE key = 'local';"); Row row = rs.one(); String response = row.getString("cql_version"); logger.log(response + " Success \n"); return response; } } -
In the project directory, under
/src/main, create directoryresources. -
Download the Secure Connect Bundle for your database and copy it into the
resourcesdirectory. The project directory structure should look like this: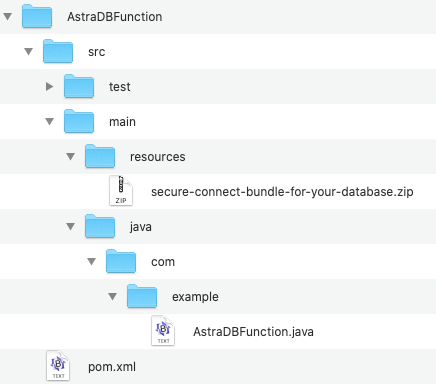
-
Add AWS Lambda and Java Driver dependencies to the
pom.xmlfile:<dependency> <groupId>com.amazonaws</groupId> <artifactId>aws-lambda-java-core</artifactId> <!-- Use the latest version from https://central.sonatype.dev/artifact/com.amazonaws/aws-lambda-java-core/1.2.2/versions --> <version>1.2.2</version> </dependency> <dependency> <groupId>com.amazonaws</groupId> <artifactId>aws-lambda-java-events</artifactId> <!-- Use the latest version from https://central.sonatype.dev/artifact/com.amazonaws/aws-lambda-java-events/3.11.0/versions --> <version>3.11.0</version> </dependency> <dependency> <groupId>com.amazonaws</groupId> <artifactId>aws-lambda-java-log4j2</artifactId> <!-- Use the latest version from https://central.sonatype.dev/artifact/com.amazonaws/aws-lambda-java-log4j2/1.5.1/versions --> <version>1.5.1</version> </dependency> <dependency> <groupId>com.datastax.oss</groupId> <artifactId>java-driver-core</artifactId> <!--Use the latest version from https://search.maven.org/artifact/com.datastax.oss/java-driver-core --> <version>4.15.0</version> </dependency> -
Add or replace an existing
buildsection in thepom.xmlfile with the following:<build> <plugins> <plugin> <artifactId>maven-surefire-plugin</artifactId> <version>2.22.2</version> </plugin> <plugin> <groupId>org.apache.maven.plugins</groupId> <artifactId>maven-shade-plugin</artifactId> <version>3.2.2</version> <configuration> <createDependencyReducedPom>false</createDependencyReducedPom> <filters> <filter> <artifact>*:*</artifact> <excludes> <exclude>**/Log4j2Plugins.dat</exclude> </excludes> </filter> </filters> </configuration> <executions> <execution> <phase>package</phase> <goals> <goal>shade</goal> </goals> </execution> </executions> </plugin> <plugin> <groupId>org.apache.maven.plugins</groupId> <artifactId>maven-compiler-plugin</artifactId> <version>3.8.1</version> <configuration> <source>11</source> <target>11</target> </configuration> </plugin> </plugins> </build> -
Run the Maven command in the project directory to compile code and create a
Find the deployment package file.jarfile:AstraDBFunction-1.0-SNAPSHOT.jarunder thetargetdirectory: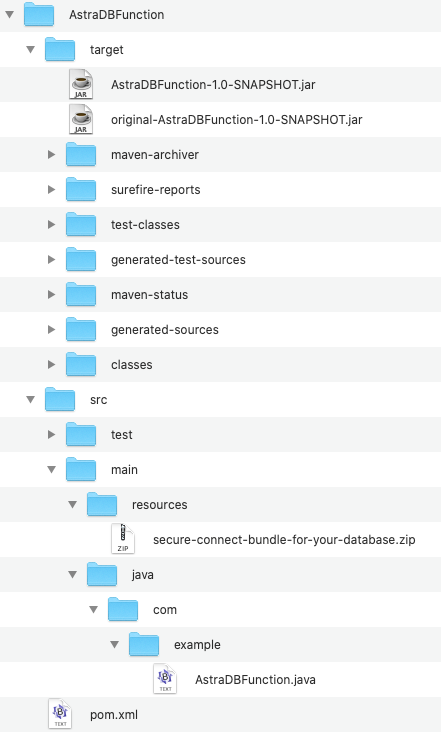
✅ 2. Create a function.
-
Go to the Functions page of the Lambda console and click Create function.
-
Choose Author from scratch.
-
Under the Basic information section, specify preferred Function name, Runtime, and Architecture.
-
Click Create function.
-
Under the Code tab and the Code source section, select Upload from and upload the deployment package created in the previous steps.

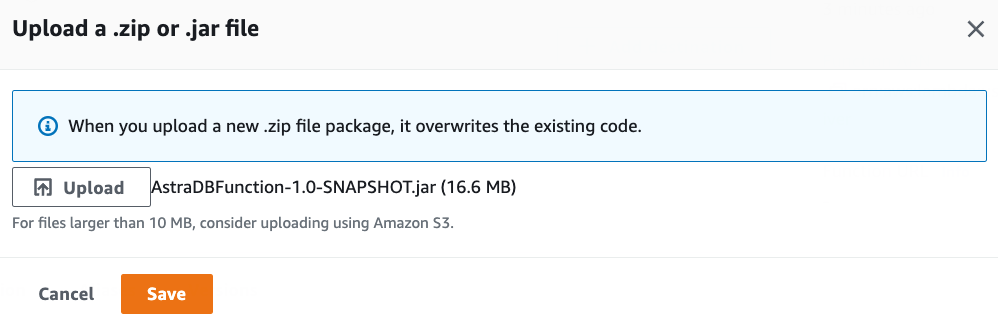
Since the deployment package exceeds 3 MBs, the Console Editor may not be available to view the source code:
-
Under the Code tab, change Handler in section Runtime settings to
com.example.AstraDBFunction::handleRequest:
-
Under the Configuration tab, select and create these Environment variables:
ASTRA_DB_CLIENT_ID: A Client ID is generated together with an application token (see the Prerequisites section above).ASTRA_DB_CLIENT_SECRET: A Client secret is generated together with an application token (see the Prerequisites section above).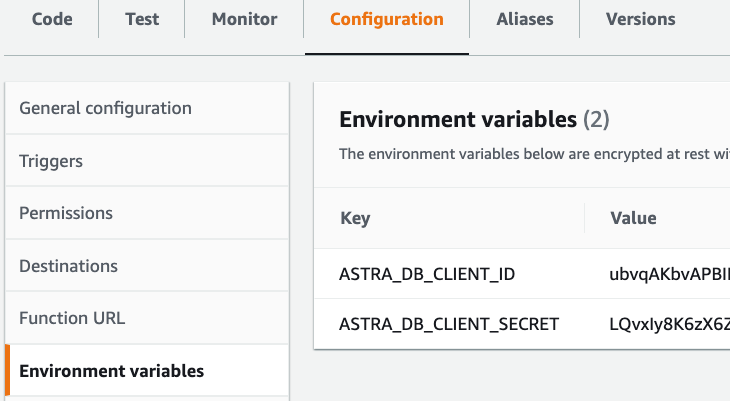
Note that, for better security, you can alternatively use the AWS Secret Manager service to store and manage client id and secret, and then retrieve them programmatically.
-
Optionally, to optimize function performance, consider configuring reserved and provisioned concurrency under the Configuration tab. For optimized cold start performance, use provisioned concurrency instead of Lambda SnapStart. In case of Lambda SnapStart, database session connections have to be re-initialized after a snapshot is restored, resulting in a substantial performance hit.
✅ 3. Test the function.
Under the Test tab, click the Test button and observe the output.
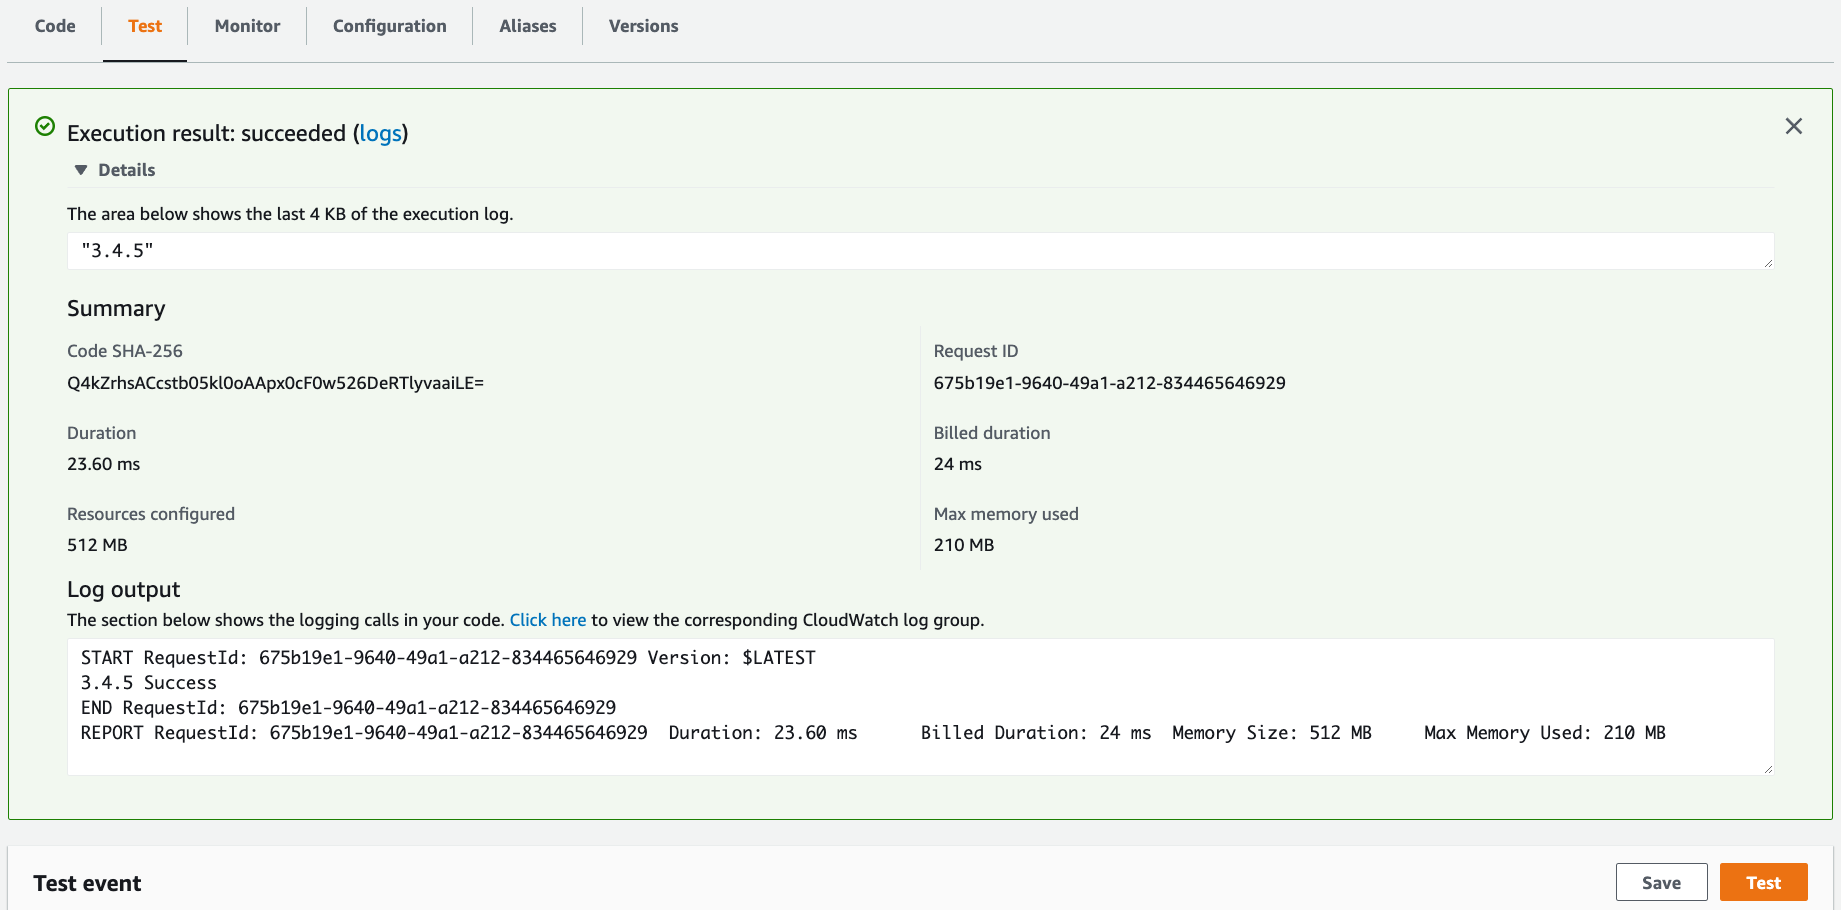
Notice the CQL version output and return value of 3.4.5.
Using Java gRPC
✅ 1. Create a deployment package.
A deployment package is a .zip or .jar file archive with compiled function code and dependencies. In this tutorial, we use Apache Maven™ to create, compile and package a function into a .jar file. We need to include the following pieces into a deployment package to access Astra DB from an AWS Lambda function:
- aws-lambda-java-core that defines necessary interfaces and classes to create functions;
- Stargate that enables connectivity to Apache Cassandra, DataStax Astra DB and DataStax Enterprise; and
- gRPC that works as a high performance Remote Procedure Call (RPC) framework.
-
Open a command prompt and create a new project using Apache Maven™:
The project directory structure should look like this: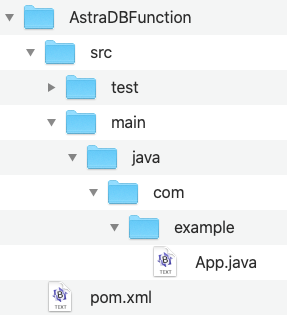
-
Rename file
App.javatoAstraDBFunction.javaand replace its content with the function source code:You can learn more about the code above by reading the Stargate documentation.package com.example; import com.amazonaws.services.lambda.runtime.Context; import com.amazonaws.services.lambda.runtime.RequestHandler; import com.amazonaws.services.lambda.runtime.LambdaLogger; import java.util.Map; import io.grpc.ManagedChannel; import io.grpc.ManagedChannelBuilder; import io.stargate.grpc.StargateBearerToken; import io.stargate.proto.QueryOuterClass; import io.stargate.proto.QueryOuterClass.Row; import io.stargate.proto.StargateGrpc; public class AstraDBFunction implements RequestHandler<Map<String,String>, String>{ private static final String ASTRA_DB_TOKEN = System.getenv("ASTRA_DB_APPLICATION_TOKEN"); private static final String ASTRA_DB_ID = System.getenv("ASTRA_DB_ID"); private static final String ASTRA_DB_REGION = System.getenv("ASTRA_DB_REGION"); public static ManagedChannel channel = ManagedChannelBuilder .forAddress(ASTRA_DB_ID + "-" + ASTRA_DB_REGION + ".apps.astra.datastax.com", 443) .useTransportSecurity() .build(); public static StargateGrpc.StargateBlockingStub blockingStub = StargateGrpc.newBlockingStub(channel).withCallCredentials(new StargateBearerToken(ASTRA_DB_TOKEN)); public String handleRequest(Map<String,String> event, Context context) { LambdaLogger logger = context.getLogger(); QueryOuterClass.Response queryString = blockingStub.executeQuery(QueryOuterClass .Query.newBuilder() .setCql("SELECT cql_version FROM system.local WHERE key = 'local';") .build()); QueryOuterClass.ResultSet rs = queryString.getResultSet(); String response = rs.getRows(0).getValues(0).getString(); logger.log(response + " Success \n"); return response; } } -
Add AWS Lambda, Stargate and gRPC dependencies to the
pom.xmlfile:<dependency> <groupId>com.amazonaws</groupId> <artifactId>aws-lambda-java-core</artifactId> <!-- Use the latest version from https://central.sonatype.dev/artifact/com.amazonaws/aws-lambda-java-core/1.2.2/versions --> <version>1.2.1</version> </dependency> <dependency> <groupId>com.amazonaws</groupId> <artifactId>aws-lambda-java-events</artifactId> <!-- Use the latest version from https://central.sonatype.dev/artifact/com.amazonaws/aws-lambda-java-events/3.11.0/versions --> <version>3.11.0</version> </dependency> <dependency> <groupId>com.amazonaws</groupId> <artifactId>aws-lambda-java-log4j2</artifactId> <!-- Use the latest version from https://central.sonatype.dev/artifact/com.amazonaws/aws-lambda-java-log4j2/1.5.1/versions --> <version>1.5.1</version> </dependency> <dependency> <groupId>io.stargate.grpc</groupId> <artifactId>grpc-proto</artifactId> <!-- Use the latest version from https://central.sonatype.dev/artifact/io.stargate.grpc/grpc-proto/2.0.4/versions --> <version>1.0.41</version> </dependency> <dependency> <groupId>io.grpc</groupId> <artifactId>grpc-netty-shaded</artifactId> <!-- Use the latest version from https://central.sonatype.dev/artifact/io.grpc/grpc-netty-shaded/1.51.1/versions --> <version>1.41.0</version> </dependency> -
Add or replace an existing
buildsection in thepom.xmlfile with the following:<build> <plugins> <plugin> <artifactId>maven-surefire-plugin</artifactId> <version>2.22.2</version> </plugin> <plugin> <groupId>org.apache.maven.plugins</groupId> <artifactId>maven-shade-plugin</artifactId> <version>3.2.2</version> <configuration> <createDependencyReducedPom>false</createDependencyReducedPom> </configuration> <executions> <execution> <phase>package</phase> <goals> <goal>shade</goal> </goals> </execution> </executions> </plugin> <plugin> <groupId>org.apache.maven.plugins</groupId> <artifactId>maven-compiler-plugin</artifactId> <version>3.8.1</version> <configuration> <source>1.8</source> <target>1.8</target> </configuration> </plugin> </plugins> </build> -
Run the Maven command in the project directory to compile code and create a
Find the deployment package file.jarfile:AstraDBFunction-1.0-SNAPSHOT.jarunder thetargetdirectory: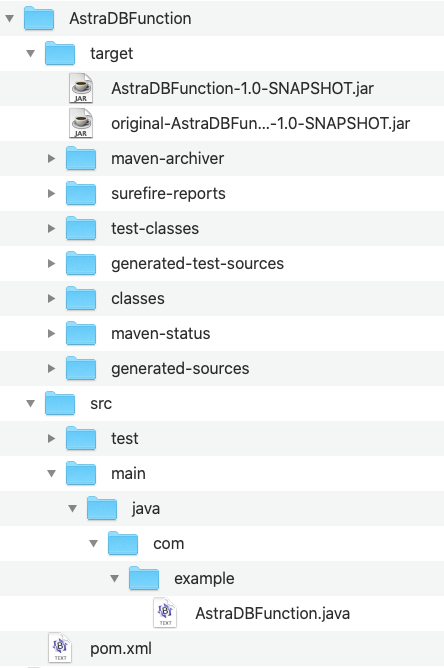
✅ 2. Create a function.
-
Go to the Functions page of the Lambda console and click Create function.

-
Choose Author from scratch.
-
Under the Basic information section, specify preferred Function name, Runtime, and Architecture.

-
Click Create function.
-
Under the Code tab and the Code source section, select Upload from and upload the deployment package created in the previous steps.

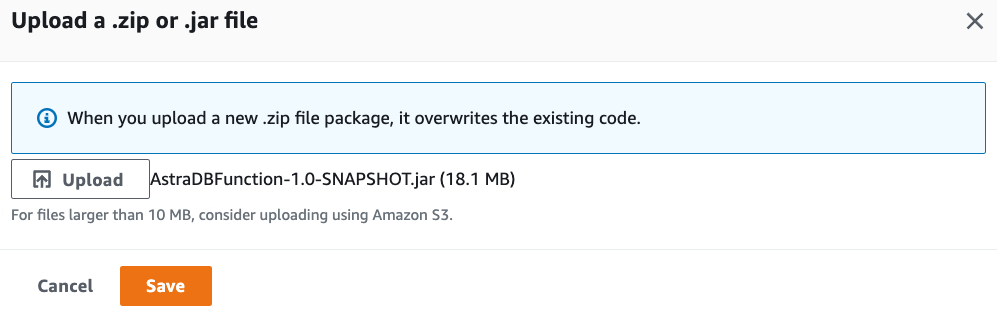
Since the deployment package exceeds 3 MBs, the Console Editor may not be available to view the source code:
-
Under the Code tab, change Handler in section Runtime settings to
com.example.AstraDBFunction::handleRequest:
-
Under the Configuration tab, select and create these Environment variables:
ASTRA_DB_ID: A Database ID value can be found on the Astra DB dashboard.ASTRA_DB_REGION: A Region name can be found on the overview page for a specific Astra DB database.ASTRA_DB_APPLICATION_TOKEN: An Application Token can be generated for a specific Astra DB database (see the Prerequisites section above).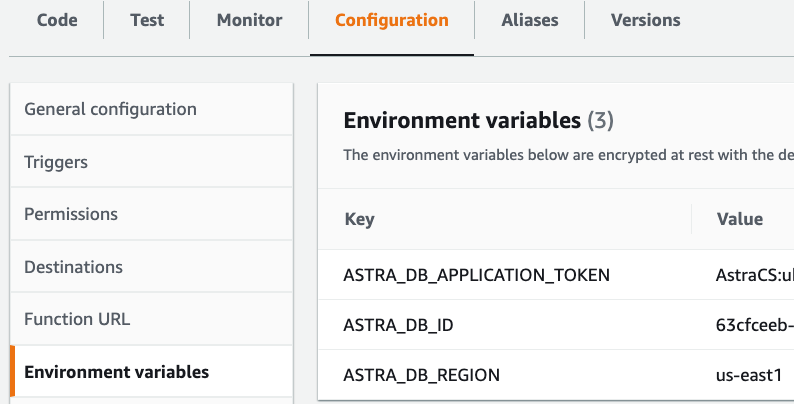
Note that, for better security, you can alternatively use the AWS Secret Manager service to store and manage an application token as a secret. A secret can then be retrieved programmatically.
-
Optionally, to optimize function performance, consider configuring reserved and provisioned concurrency under the Configuration tab. For optimized cold start performance, prefer provisioned concurrency to Lambda SnapStart. For Lambda SnapStart to result in meaningful performance savings, a function needs to have substantial initiatization costs.
✅ 3. Test the function.
Under the Test tab, click the Test button and observe the output.
Notice the CQL version output and return value of 3.4.5.