‣ Astra CLI
Overview
CLI Latest version :

Astra CLI is a command-line interface (CLI) tool that enables users to interact with and manage the Astra database-as-a-service platform. It provides developers with a streamlined way to create, configure, and manipulate databases, making it easier to integrate Astra into their applications and workflows.
Astra CLI goes beyond basic database management by facilitating the seamless integration of external tools like dsbulk, cqlsh, and pulshar-shell or by providing useful shortcuts like dotenv file generation.
1. Installation
This software has been developed and packaged as a Java application. As such, it can be installed on any machine with a JVM.
But it has also been compiled as native executables with GraalVM and
native executables for Linux and osx are available.
1.1. Prerequisites
Setup Datastax Astra DB
- Create your DataStax Astra account:
- Create an Astra Token
An astra token acts as your credentials, it holds the different permissions. The scope of a token is the whole organization (tenant) but permissions can be edited to limit usage to a single database.
To create a token, please follow this guide
The Token is in fact three separate strings: a Client ID, a Client Secret and the token proper. You will need some of these strings to access the database, depending on the type of access you plan. Although the Client ID, strictly speaking, is not a secret, you should regard this whole object as a secret and make sure not to share it inadvertently (e.g. committing it to a Git repository) as it grants access to your databases.
Third-party tools Requirements
- To run the vast majority of the commands you do not need special software but some commands
require external tools like
dsbulk,cqlsh, orpulsar-shell. If you want to use those commands, you need to install relevant dependencies:
| Command | Tools | Dependencies |
|---|---|---|
db cqlsh |
cqlsh |
Python version 3.6+ |
db load,unload,count |
dsbulk |
Java version 8+ |
streaming pulsar-shell |
pulsar-shell |
Java version 8+ |
1.2. Installation on Linux
Installation or update
- Installation and update use the same procedure.
-
The CLI is installed in
~/.astraand the binary is in~/.astra/bin/astra. -
The
~/.astra/binfolder is added to thePATHenvironment variable. The folder contains the script allowing bash auto-completion. -
The configuration of the CLI is stored in
~/.astrarc- It is not lost on updates.
Uninstall
- Remove folder where the files are installed.
- Remove the configuration file.
- Edit
~/.bash_profileor~/.zhrcto remove reference to CLI
1.3. Installation on MAC osx
Installation or update
Homebrew is the recommended solution to manage Astra CLI on osX. It provides convenient
ways to install, update, and uninstall. It will install tools required for external
components as well like proper Java and python versions.
- Install with
-
osxis based on a linux kernel and can run shell scripts. The Linux installation procedure also work on mac machines. -
Files are installed in
/usr/local/Cellar/astra-cli/<version>and linked with a symbolic link to/usr/local/bin/astra. -
The configuration of the CLI is stored in
~/.astrarc- **It is not lost on updates -
 LinuxBrew is not supported: The binary installed by the brew fomulae is a native executable for
 osxand will not work onLinux. To install on linux please use the Linux installation procedure.
Uninstall
- Remove CLI files with:
- Remove the configuration file.
1.4. Installation on Windows
Installation
To install the CLI on Windows you will leverage the WSL or Windows Subsystem for Linux.
Enable the windows subsystem for Linux option in settings.
-
Go to Start. Search for "Turn Windows features on or off.
-
Check the option Windows Subsystem for Linux.
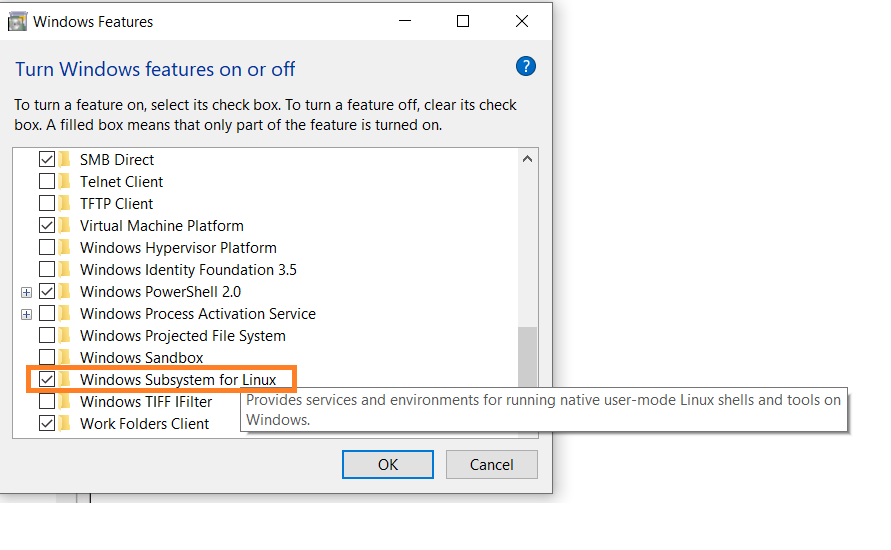
- Open a terminal and run the linux command
1.5. Installation with Java
Installation
-
Download the latest version of the CLI from the release page. For example for the version
0.4you can download the fileastra-cli-0.4.zipfrom: -
Validate that Java 17 is installed.If not, download and install it from Oracle
- Unzip the archive in destination folder.
You should find a file called astra-cli.jar. It is a fat jar with all the dependencies.
- Run the CLI with the following command.
- You can use all options as suffix on this command.
1.6. Docker Image
Execution
Prerequisite: you need to have docker installed on your machine. If not, please follow the instructions on docker website
- Run the CLI with the command
docker runand the imageclunven/astra-cli.
- Run a command to a organization: As the container is stateless you need to provide a token as an input
- You can also mount a volume to store the configuration file.
2. Getting Started
2.1. Setup
Make sur to have astra in your path
After installation you need to open a new terminal for astra to be in your path.
✅ Issue setup command and provide your token as an input. It must start by AstraCS:.... Make sure to have the Organization Administrator role to avoid any permission limitations later on.
Interactive mode
An interactive command astra setup is also available but latest version of the JDK have some issues with the interactive mode. As of today use the command providing your token.
✅ Display your local configuration list, validating setup is complete.
🖥️ Sample output
You can work with multiple organizations and swap from one to another. Creating and managing extra configurations is covered in Advanced Configuration chapter.
Scope of Astra security tokens
The security tokens are created for an organization only. If you need to work with multiple organizations then multiple tokens are required. You limit the scope of a token to a single database.
2.2. Autocompletion
The cli provides bash autocompletion for bash and zsh shells. Use TAB key twice to get a list of available options.
✅ Autocomplete
2.3. Documentation
The better documentation of the code is the code itself. This page will provide you samples but where you are not sure use the astra help <my_command>
✅ Display main help
🖥️ Sample output
usage: astra <command> [ <args> ]

Commands are:
    ?           Display this help version
    help        Display help information
    setup       Initialize configuration file
    config      Manage configuration file
    db          Manage databases
    org         Display Organization Info
    role        Manage roles
    streaming   Manage Streaming tenants
    token       Manage tokens
    user        Manage users

See 'astra help <command>' for more information on a specific command.
✅ Display help for a command group astra db
✅ Display help for unitary command astra db list
🖥️ Sample output
NAME
        astra db list - Display the list of Databases in an organization

SYNOPSIS
        astra db list [ {-conf | --config} <CONFIG_SECTION> ]
                [ --config-file <CONFIG_FILE> ] [ --log <LOG_FILE> ]
                [ --no-color ] [ {-o | --output} <FORMAT> ]
                [ --token <AUTH_TOKEN> ] [ {-v | --verbose} ]

OPTIONS
        -conf <CONFIG_SECTION>, --config <CONFIG_SECTION>
            Section in configuration file (default = ~/.astrarc)

        --config-file <CONFIG_FILE>
            Configuration file (default = ~/.astrarc)

        --log <LOG_FILE>
            Logs will go in the file plus on console

        --no-color
            Remove all colors in output

        -o <FORMAT>, --output <FORMAT>
            Output format, valid values are: human,json,csv

        --token <AUTH_TOKEN>
            Key to use authenticate each call.

        -v, --verbose
            Verbose mode with log in console
2.4. Important Options
Each commands has some specific parameters but all commands share have the following options.
| Name | Option | Description |
|---|---|---|
| verbose | -v |
Make the output more verbose, debug |
| remove colors | --no-color |
Remove colors, ease parsing and display |
| json output | -o json |
To ease parsing output can be json |
| csv output | -o csv |
To ease export output can be CSV |
| override token | --token ... |
Enforce token for this command |
| override config | --config ... |
Change section use in ~/.astrarc for the command |
| override config-file | --config-file ... |
Do not use ~/.astrarc for the command |
2.5 Configuration
If you work with multiple organizations, it could be useful to switch from one configuration to another, one token to another. The CLI provides a configuration management solution to handle this use case.
✅ 2.6.a - List available configuration
✅ 2.6.b - Create a new section
✅ 2.6.c - Use your section config anywhere
You can use any organization anytime with --config <onfig_name>.
✅ 2.6.d - Select a section as defaul
- Change the current org
- See your new list
✅ 1e - Delete a section
You can delete any organization. If you delete the selected organization you will have to pick a new one.
-
Delete you config
-
See the new list
3. Astra DB
Synchronous/Asynchronous
Some commands can take a while like a DB creation or the creation of a new region and data replication. Default behaviour is to be synchronous and wait until the operation is done. You can change this behaviour by using the option --no-wait
3.1. DB commands glossary
✅ Display available commands for DB
The documentation is the tool itself with the following command:
Still, for ease of use here is a glossary of the commands:3.2. List
✅ 3.2.a - list
To get the list of non-terminated databases in your organization, use the command list in the group db.
🖥️ Sample output
+---------------------+--------------------------------------+---------------------+----------------+
| Name                | id                                   | Default Region      | Status         |
+---------------------+--------------------------------------+---------------------+----------------+
| mtg                 | dde308f5-a8b0-474d-afd6-81e5689e3e25 | eu-central-1        | ACTIVE         |
| workshops           | 3ed83de7-d97f-4fb6-bf9f-82e9f7eafa23 | eu-west-1           | ACTIVE         |
| sdk_tests           | 06a9675a-ca62-4cd0-9b94-aefaf395922b | us-east-1           | ACTIVE         |
| test                | 7677a789-bd57-455d-ab2c-a3bdfa35ba68 | eu-central-1        | ACTIVE         |
| demo                | 071d7059-d55b-4cdb-90c6-41c26da1a029 | us-east-1           | ACTIVE         |
| ac201               | 48c7178c-58cb-4657-b3d2-8a9e3cc89461 | us-east-1           | ACTIVE         |
+---------------------+--------------------------------------+---------------------+----------------+
✅ 3.2.b - Get Help
To get help on a command, always prefix with astra help XXX
🖥️ Sample output
NAME
        astra db list - Display the list of Databases in an organization

SYNOPSIS
        astra db list [ {-conf | --config} <CONFIG_SECTION> ]
                [ --config-file <CONFIG_FILE> ] [ --log <LOG_FILE> ]
                [ --no-color ] [ {-o | --output} <FORMAT> ]
                [ --token <AUTH_TOKEN> ] [ {-v | --verbose} ]

OPTIONS
        -conf <CONFIG_SECTION>, --config <CONFIG_SECTION>
            Section in configuration file (default = ~/.astrarc)

        --config-file <CONFIG_FILE>
            Configuration file (default = ~/.astrarc)

        --log <LOG_FILE>
            Logs will go in the file plus on console

        --no-color
            Remove all colors in output

        -o <FORMAT>, --output <FORMAT>
            Output format, valid values are: human,json,csv

        --token <AUTH_TOKEN>
            Key to use authenticate each call.

        -v, --verbose
            Verbose mode with log in console
✅ 3.2.c - Change output
🖥️ Sample output
Name,id,Default Region,Status
mtg,dde308f5-a8b0-474d-afd6-81e5689e3e25,eu-central-1,ACTIVE
workshops,3ed83de7-d97f-4fb6-bf9f-82e9f7eafa23,eu-west-1,ACTIVE
sdk_tests,06a9675a-ca62-4cd0-9b94-aefaf395922b,us-east-1,ACTIVE
test,7677a789-bd57-455d-ab2c-a3bdfa35ba68,eu-central-1,ACTIVE
demo,071d7059-d55b-4cdb-90c6-41c26da1a029,us-east-1,ACTIVE
ac201,48c7178c-58cb-4657-b3d2-8a9e3cc89461,us-east-1,ACTIVE
🖥️ Sample output
  {
    "code" : 0,
    "message" : "astra db list -o json",
    "data" : [ {
      "Status" : "ACTIVE",
      "Default Region" : "eu-central-1",
      "id" : "dde308f5-a8b0-474d-afd6-81e5689e3e25",
      "Name" : "mtg"
    }, {
      "Status" : "ACTIVE",
      "Default Region" : "eu-west-1",
      "id" : "3ed83de7-d97f-4fb6-bf9f-82e9f7eafa23",
      "Name" : "workshops"
    }, {
      "Status" : "ACTIVE",
      "Default Region" : "us-east-1",
      "id" : "06a9675a-ca62-4cd0-9b94-aefaf395922b",
      "Name" : "sdk_tests"
    }, {
      "Status" : "ACTIVE",
      "Default Region" : "eu-central-1",
      "id" : "7677a789-bd57-455d-ab2c-a3bdfa35ba68",
      "Name" : "test"
    }, {
      "Status" : "ACTIVE",
      "Default Region" : "us-east-1",
      "id" : "071d7059-d55b-4cdb-90c6-41c26da1a029",
      "Name" : "demo"
    }, {
      "Status" : "ACTIVE",
      "Default Region" : "us-east-1",
      "id" : "48c7178c-58cb-4657-b3d2-8a9e3cc89461",
      "Name" : "ac201"
    } ]
  }
3.3. Create database
✅ 3.3.a - Create Database
If not provided, the region will be the default free region, and the keyspace will be the database name, but you can change them with the -r and -k flags, respectively.
✅ 3.3.b - Options --if-not-exist and --wait
-
The database name does not ensure unicity (the database id does). As such, if you issue the command multiple times, you will end up with multiple instances. To change this behavior, you can use
--if-not-exist -
Database creation is an asynchronous operation. In some situations, such as during your CI/CD, you will most likely want the db to be
ACTIVEbefore moving forward. The option--waitwill trigger a blocking command until the db is ready -
On the free tier, after a period of inactivity, the database moves to a
HIBERNATEDstate. The creation command will resume the db when needed.
✅ 3.3.c - Get help
To show help, enter the following command:
🖥️ Sample output
NAME
        astra db create - Create a database with cli

SYNOPSIS
        astra db create [ {-cf | --config-file} <CONFIG_FILE> ]
                [ {-conf | --config} <CONFIG_SECTION> ]
                [ {--if-not-exist | --if-not-exists} ]
                [ {-k | --keyspace} <KEYSPACE> ] [ --no-color ]
                [ {-o | --output} <FORMAT> ] [ {-r | --region} <DB_REGION> ]
                [ --timeout <timeout> ] [ --token <AUTH_TOKEN> ]
                [ {-v | --verbose} ] [ --wait ] [--] <DB>

OPTIONS
        -cf <CONFIG_FILE>, --config-file <CONFIG_FILE>
            Configuration file (default = ~/.astrarc)

        -conf <CONFIG_SECTION>, --config <CONFIG_SECTION>
            Section in configuration file (default = ~/.astrarc)

        --if-not-exist, --if-not-exists
            will create a new DB only if none with same name

        -k <KEYSPACE>, --keyspace <KEYSPACE>
            Default keyspace created with the Db

        --no-color
            Remove all colors in output

        -o <FORMAT>, --output <FORMAT>
            Output format, valid values are: human,json,csv

        -r <DB_REGION>, --region <DB_REGION>
            Cloud provider region to provision

        --timeout <timeout>
            Provide a limit to the wait period in seconds, default is 300s.

        --token <AUTH_TOKEN>
            Key to use authenticate each call.

        -v, --verbose
            Verbose mode with log in console

        --wait
            Will wait until the database become ACTIVE

        --
            This option can be used to separate command-line options from the
            list of arguments (useful when arguments might be mistaken for
            command-line options)

        <DB>
            Database name (not unique)
3.4. Resume database
In the free tier, after 23H of inactivity, your database will be hibernated. To wake up the db, you can use the resume command.
✅ 3.4.a - Resuming
- Assuming you have an hibernating database.
+---------------------+--------------------------------------+---------------------+----------------+
| Name                | id                                   | Default Region      | Status         |
+---------------------+--------------------------------------+---------------------+----------------+
| hemidactylus        | 643c6bb8-2336-4649-97d5-39c33491f5c1 | eu-central-1        | HIBERNATED     |
+---------------------+--------------------------------------+---------------------+----------------+
- Trigger an explicit resuming with:
🖥️ Sample output
+---------------------+--------------------------------------+---------------------+----------------+
| Name                | id                                   | Default Region      | Status         |
+---------------------+--------------------------------------+---------------------+----------------+
| hemidactylus        | 643c6bb8-2336-4649-97d5-39c33491f5c1 | eu-central-1        | RESUMING       |
+---------------------+--------------------------------------+---------------------+----------------+

And after a few time
+---------------------+--------------------------------------+---------------------+----------------+
| Name                | id                                   | Default Region      | Status         |
+---------------------+--------------------------------------+---------------------+----------------+
| hemidactylus        | 643c6bb8-2336-4649-97d5-39c33491f5c1 | eu-central-1        | ACTIVE         |
+---------------------+--------------------------------------+---------------------+----------------+
3.5. Get database details
✅ 3.5.a. To get general information or details on an entity use the command get.
In the output, you specially see the list of keyspaces available and the different regions.
🖥️ Sample output
+------------------------+-----------------------------------------+
| Attribute              | Value                                   |
+------------------------+-----------------------------------------+
| Name                   | demo                                    |
| id                     | 071d7059-d55b-4cdb-90c6-41c26da1a029    |
| Status                 | ACTIVE                                  |
| Default Cloud Provider | AWS                                     |
| Default Region         | us-east-1                               |
| Default Keyspace       | demo                                    |
| Creation Time          | 2022-07-26T15:41:18Z                    |
|                        |                                         |
| Keyspaces              | [0] demo                                |
|                        |                                         |
| Regions                | [0] us-east-1                           |
+------------------------+-----------------------------------------+
✅ 3.5.b. To get a special property, you can add the option --key. Multiple keys are available: id, status, cloud, keyspace, keyspaces, region, regions. Notice that the output is raw. This command is expected to be used in scripts
✅ 3.5.c. To get database status in a human-readable form, use status command
3.6. Delete Database
✅ 3.6.a. To delete a db use the command delete.
3.7. Working with keyspaces
A keyspace is created when you create the database. The default CLI behaviour is to provide the same values for keyspace
and database names. You can also define your own keyspace name with the flag -k.
✅ 3.7.a. Create new keyspace
- To add a keyspace
ks2to an existing databasedemouse the following. The option--if-not-existis optional but could help you provide idempotent scripts.
- If the database is not found, you will get a warning message and a dedicated code returned. To see your new keyspace, you can display your database details.
✅ 3.7.b Get help
3.8. Cqlsh
Cqlsh is a standalone shell to work with Apache Cassandra™. It is compliant with Astra but requires a few extra steps of configuration. The purpose of the CLI is to integrate with cqlsh and do the integration for you.
Astra CLI will download, install, setup and wrap cqlsh for you to interact with Astra.
✅ 3.8.a - Interactive
If no options are provided, you enter cqlsh interactive mode
🖥️ Sample output
✅ 3.8.b - Execute CQL
To execute CQL Statements with cqlsh use the flag -e.
✅ 3.8.c - Execute CQL Files
To execute CQL Files with cqlsh use the flag -f. You could also use the CQL syntax SOURCE.
3.9. Load and Unload
✅ 3.9.a - Setup
DSBulk stands for DataStax Bulk Loader. It is a standalone program to load, unload, and count data in an efficient way with Apache Cassandra™. It is compliant with DataStax Astra DB.
Similar to cqlsh the CLI will download, install, setup and wrap the dsbulk command for you. All options are available. To give you an idea, let's take a simple example.
- Make sure we have a db
demowith a keyspacedemo
- Looking at a dataset of cities in the world. cities.csv. We can show here the first lines of the file.
id,name,state_id,state_code,state_name,country_id,country_code,country_name,latitude,longitude,wikiDataId
52,Ashkāsham,3901,BDS,Badakhshan,1,AF,Afghanistan,36.68333000,71.53333000,Q4805192
68,Fayzabad,3901,BDS,Badakhshan,1,AF,Afghanistan,37.11664000,70.58002000,Q156558
...
- Let's create a table to store those values. Connect to CQLSH
- Create the table
CREATE TABLE cities_by_country (
 country_name text,
 name       text,
 id         int,
 state_id   text,
 state_code text,
 state_name text,
 country_id text,
 country_code text,
 latitude double,
 longitude double,
 wikiDataId text,
 PRIMARY KEY ((country_name), name)
);

describe table cities_by_country;

quit
✅ 3.9.b - Load Data
astra db load demo \
  -url https://raw.githubusercontent.com/awesome-astra/docs/main/docs/assets/cities.csv \
  -k demo \
  -t cities_by_country \
  --schema.allowMissingFields true
The first time the line DSBulk is starting please wait can take a few seconds to appear. The reason is that the CLI is downloading dsbulk if it was not downloaded before.
🖥️ Sample output
DSBulk is starting please wait ...
Username and password provided but auth provider not specified, inferring PlainTextAuthProvider
A cloud secure connect bundle was provided: ignoring all explicit contact points.
A cloud secure connect bundle was provided and selected operation performs writes: changing default consistency level to LOCAL_QUORUM.
Operation directory: /Users/cedricklunven/Downloads/logs/LOAD_20220823-182343-074618
Setting executor.maxPerSecond not set when connecting to DataStax Astra: applying a limit of 9,000 ops/second based on the number of coordinators (3).
If your Astra database has higher limits, please define executor.maxPerSecond explicitly.
  total | failed | rows/s |  p50ms |  p99ms | p999ms | batches
148,266 |      0 |  8,361 | 663.86 | 767.56 | 817.89 |   30.91
Operation LOAD_20220823-182343-074618 completed successfully in 17 seconds.
Last processed positions can be found in positions.txt
✅ 3.9.c - Count
Check that the data has been imported with cqlsh.
🖥️ Sample output
Cqlsh is starting please wait for connection establishment...

country_name | name                | country_code | country_id | id   | latitude | longitude | state_code | state_id | state_name          | wikidataid
--------------+---------------------+--------------+------------+------+----------+-----------+------------+----------+---------------------+------------
  Bangladesh |             Azimpur |           BD |         19 | 8454 |  23.7298 |   90.3854 |         13 |      771 |      Dhaka District |       null
  Bangladesh |           Badarganj |           BD |         19 | 8455 | 25.67419 |  89.05377 |         55 |      759 |    Rangpur District |       null
  Bangladesh |            Bagerhat |           BD |         19 | 8456 |     22.4 |     89.75 |         27 |      811 |     Khulna District |       null
  Bangladesh |           Bandarban |           BD |         19 | 8457 |       22 |  92.33333 |          B |      803 | Chittagong Division |       null
  Bangladesh |          Baniachang |           BD |         19 | 8458 | 24.51863 |  91.35787 |         60 |      767 |     Sylhet District |       null
  Bangladesh |             Barguna |           BD |         19 | 8459 | 22.13333 |  90.13333 |         06 |      818 |    Barisal District |       null
  Bangladesh |             Barisal |           BD |         19 | 8460 |     22.8 |      90.5 |         06 |      818 |    Barisal District |       null
  Bangladesh |                Bera |           BD |         19 | 8462 | 24.07821 |  89.63262 |         54 |      813 |   Rajshahi District |       null
  Bangladesh |       Bhairab Bāzār |           BD |         19 | 8463 |  24.0524 |   90.9764 |         13 |      771 |      Dhaka District |       null
  Bangladesh |           Bherāmāra |           BD |         19 | 8464 | 24.02452 |  88.99234 |         27 |      811 |     Khulna District |       null
  Bangladesh |               Bhola |           BD |         19 | 8465 | 22.36667 |  90.81667 |         06 |      818 |    Barisal District |       null
  Bangladesh |           Bhāndāria |           BD |         19 | 8466 | 22.48898 |  90.06273 |         06 |      818 |    Barisal District |       null
  Bangladesh | Bhātpāra Abhaynagar |           BD |         19 | 8467 | 23.01472 |  89.43936 |         27 |      811 |     Khulna District |       null
  Bangladesh |           Bibir Hat |           BD |         19 | 8468 | 22.68347 |  91.79058 |          B |      803 | Chittagong Division |       null
  Bangladesh |               Bogra |           BD |         19 | 8469 | 24.78333 |     89.35 |         54 |      813 |   Rajshahi District |       null
  Bangladesh |        Brahmanbaria |           BD |         19 | 8470 | 23.98333 |  91.16667 |          B |      803 | Chittagong Division |       null
  Bangladesh |         Burhānuddin |           BD |         19 | 8471 | 22.49518 |  90.72391 |         06 |      818 |    Barisal District |       null
  Bangladesh |            Bājitpur |           BD |         19 | 8472 | 24.21623 |  90.95002 |         13 |      771 |      Dhaka District |       null
  Bangladesh |            Chandpur |           BD |         19 | 8474 |    23.25 |  90.83333 |          B |      803 | Chittagong Division |       null
  Bangladesh |    Chapai Nababganj |           BD |         19 | 8475 | 24.68333 |     88.25 |         54 |      813 |   Rajshahi District |       null
- Count with ds bulkd
🖥️ Sample output
DSBulk is starting please wait ...
[INFO ] - RUNNING: /Users/cedricklunven/.astra/dsbulk-1.9.1/bin/dsbulk count -k demo -t cities_by_country -u token -p AstraCS:gdZaqzmFZszaBTOlLgeecuPs:edd25600df1c01506f5388340f138f277cece2c93cb70f4b5fa386490daa5d44 -b /Users/cedricklunven/.astra/scb/scb_071d7059-d55b-4cdb-90c6-41c26da1a029_us-east-1.zip
Username and password provided but auth provider not specified, inferring PlainTextAuthProvider
A cloud secure connect bundle was provided: ignoring all explicit contact points.
Operation directory: /Users/cedricklunven/Downloads/logs/COUNT_20220823-182833-197954
  total | failed | rows/s |  p50ms |  p99ms | p999ms
134,574 |      0 | 43,307 | 315.71 | 457.18 | 457.18
✅ 3.9.d - Unload Data
🖥️ Sample output
DSBulk is starting please wait ...
Username and password provided but auth provider not specified, inferring PlainTextAuthProvider
A cloud secure connect bundle was provided: ignoring all explicit contact points.
Operation directory: /Users/cedricklunven/Downloads/logs/UNLOAD_20220823-183054-208353
  total | failed | rows/s |  p50ms |    p99ms |   p999ms
134,574 |      0 | 14,103 | 927.51 | 1,853.88 | 1,853.88
Operation UNLOAD_20220823-183054-208353 completed successfully in 9 seconds.
3.10. Download Secure bundle
✅ 3.10.a - Default values
Download the different secure bundles (one per region) with the pattern scb_${dbid}-${dbregion}.zip in a current folder.
✅ 3.10.b - Download in target folder
Download the different secure bundles (one per region) with the pattern scb_${dbid}-${dbregion}.zip in the folder provided with option -d (--output-director).
✅ 3.10.c - Download in target folder
Provide the target filename with -f (--output-file). It will work only if you have a SINGLE REGION for your database (or you will have to use the flag -d)
3.11. Create .env file
To code your application against Astra, a set of metadata could be handy like the database name, database region, url of the APIs....
This command will create a file .env with a set of variables that are relevant to be defined as environment variables
🖥️ Sample output
ASTRA_DB_APPLICATION_TOKEN="AstraCS:QeUmROP..."
ASTRA_DB_GRAPHQL_URL="https://a6b5cb4c-3267-4414-8bba-6706086a943a-us-east-1.apps.astra.datastax.com/api/graphql/order_management_data"
ASTRA_DB_GRAPHQL_URL_ADMIN="https://a6b5cb4c-3267-4414-8bba-6706086a943a-us-east-1.apps.astra.datastax.com/api/graphql-admin"
ASTRA_DB_GRAPHQL_URL_PLAYGROUND="https://a6b5cb4c-3267-4414-8bba-6706086a943a-us-east-1.apps.astra.datastax.com/api/playground"
ASTRA_DB_GRAPHQL_URL_SCHEMA="https://a6b5cb4c-3267-4414-8bba-6706086a943a-us-east-1.apps.astra.datastax.com/api/graphql-schema"
ASTRA_DB_ID="a6b5cb4c-3267-4414-8bba-6706086a943a"
ASTRA_DB_KEYSPACE="order_management_data"
ASTRA_DB_REGION="us-east-1"
ASTRA_DB_REST_URL="https://a6b5cb4c-3267-4414-8bba-6706086a943a-us-east-1.apps.astra.datastax.com/api/rest"
ASTRA_DB_REST_URL_SWAGGER="https://a6b5cb4c-3267-4414-8bba-6706086a943a-us-east-1.apps.astra.datastax.com/api/rest/swagger-ui/"
ASTRA_DB_SECURE_BUNDLE_PATH="/Users/cedricklunven/.astra/scb/scb_a6b5cb4c-3267-4414-8bba-6706086a943a_us-east-1.zip"
ASTRA_DB_SECURE_BUNDLE_URL="https://datastax-cluster-config-prod.s3.us-east-2.amazonaws.com/a6b5cb4c-3267-4414-8bba-6706086....X-Amz-Algorithm=AWS4-HMAC-SHA256&X-Amz-Credential=AKIA2AI....."
ASTRA_ORG_ID="f9460f14-9879-...."
ASTRA_ORG_NAME="ced..."
ASTRA_ORG_TOKEN="AstraCS:QeUmROPLeNbd..."
3.12. List Regions
For database creation or regions management, the region name is expected. Depending on the cloud provider needed or even the Astra service, the region names are not exactly the same.
With Astra CLI, one can list every available regions per service.
✅ 3.12.a - List Serverless regions
🖥️ Sample output
+----------------+---------------------+-------------------------------+
| Cloud Provider | Region              | Full Name                     |
+----------------+---------------------+-------------------------------+
| aws            | ap-east-1           | Asia Pacific (Hong Kong)      |
| aws            | ap-south-1          | Asia Pacific (Mumbai)         |
| aws            | ap-southeast-1      | Asia Pacific (Singapore)      |
| aws            | ap-southeast-2      | Asia Pacific (Sydney)         |
| aws            | eu-central-1        | Europe (Frankfurt)            |
| aws            | eu-west-1           | Europe (Ireland)              |
| aws            | sa-east-1           | South America (Sao Paulo)     |
| aws            | us-east-1           | US East (N. Virginia)         |
| aws            | us-east-2           | US East (Ohio)                |
| aws            | us-west-2           | US West (Oregon)              |
+----------------+---------------------+-------------------------------+
-cor--cloudallows to select a cloud provider, the 3 accepted values will beaws,gcpandazure-for--filterallows to look for either a location of region (eg.-f France, -fus-oor--outputto change output from table (human) to csv or json-vfor verbose mode-tto provide token of organization if not default selected
✅ 3.12.b - List Serverless regions
4. Astra DB Vector
4.1. Shared Commands
Most of the commands are shared with Astra DB, AstraDB vector is a specialization with the support of type to use cassandra as a vector database
✅ 4.1.a - List Databases
The list command now returns a columns V checked if the database is a AstraDB Vector db
🖥️ Sample output
+---------------------------+--------------------------------------+-----------+-------+---+--------------+
| Name                      | id                                   | Regions   | Cloud | V | Status       |
+---------------------------+--------------------------------------+-----------+-------+---+--------------+
| workshop_rag              | 92fb9ab9-7121-4694-b1b9-32f742286509 | us-east1  | gcp   | ■ | ACTIVE       |
| test_java_astra_db_client | 37e6cc3c-b114-44f3-8153-b722d1c873db | us-east1  | gcp   | ■ | ACTIVE       |
| demo                      | d3b5d71c-3960-46b6-8054-7ce5816ffeef | us-east1  | gcp   |   | INITIALIZING |
+---------------------------+--------------------------------------+-----------+-------+---+--------------+
-
The
listcommand now returns a columnsVchecked if the database is a AstraDB Vector db -
A flag
--vectorfilter the list to only display vector databases.
🖥️ Sample output
+---------------------------+--------------------------------------+-----------+-------+---+--------------+
| Name                      | id                                   | Regions   | Cloud | V | Status       |
+---------------------------+--------------------------------------+-----------+-------+---+--------------+
| workshop_rag              | 92fb9ab9-7121-4694-b1b9-32f742286509 | us-east1  | gcp   | ■ | ACTIVE       |
| test_java_astra_db_client | 37e6cc3c-b114-44f3-8153-b722d1c873db | us-east1  | gcp   | ■ | ACTIVE       |
+---------------------------+--------------------------------------+-----------+-------+---+--------------+
✅ 4.1.b - Create Database
Create Database is a reuse of the db create command for AstraDB but the flag --vector is added to specify the type of database.
🖥️ Sample output
astra db create sample --vector
REGION OK
[INFO]  Database 'sample' does not exist. Creating database 'sample' with keyspace 'default_keyspace'
get CLoud provider
[INFO]  Enabling vector search for database sample
[INFO]  Database 'sample' and keyspace 'default_keyspace' are being created.
[INFO]  Database 'sample' has status 'PENDING' waiting to be 'ACTIVE' ...
[INFO]  Database 'sample' has status 'ACTIVE' (took 113658 millis)
[OK]    Database 'sample' is ready.
✅ 4.1.c - List Keyspaces/Namespaces
With AstraDB Vector keyspaces are renamed namespaces but it is the same entity.
When nothing is specified, the default namespace is default_keyspace.
- List keyspaces
🖥️ Sample output
✅ 4.1.d - Create Keyspace
Create a keyspace/namespaces with the command create-keyspace. The flag -k is used to specify the name of the keyspace.
✅ 4.1.e - Delete Keyspace
Delete a keyspace/namespaces with the command delete-keyspace. The flag -k is used to specify the name of the keyspace.
4.2. List vector regions
Astra provides a lot of regions to deploy your database. The vector enabled db can be deployed on a subset of them.
The command list-regions-vector will provide the list of regions available for AstraDB Vector.
🖥️ Sample output
+-----------------+---------------------+-------------------------------+
| Cloud Provider  | Region              | Full Name                     |
+-----------------+---------------------+-------------------------------+
| aws             | ap-south-1          | Asia Pacific (Mumbai)         |
| aws             | eu-west-1           | Europe (Ireland)              |
| aws             | us-east-1           | US East (N. Virginia)         |
| aws             | us-east-2           | US East (Ohio)                |
| azure           | centralindia        | Central India (Pune)          |
| azure           | westus3             | US West 3                     |
| gcp (free-tier) | us-east1            | Moncks Corner, South Carolina |
+-----------------+---------------------+-------------------------------+
4.3. Working with Collections
✅ 4.3.a. List Collections
🖥️ Sample output
✅ 4.3.b. Create a collection
To create a collection, you need to specify the name of the collection. - By adding a dimension you add a vector field - The vector field required is metric, if not provided cosine is pick.
Options to allow or deny index fields are not supported by the CLI
NAME
        astra db create-collection - Create a new collection

SYNOPSIS
        astra db create-collection {-c | --collection} <COLLECTION>
                [ {-cf | --config-file} <CONFIG_FILE> ]
                [ {-conf | --config} <CONFIG_SECTION> ]
                [ {-d | --dimension} <DIMENSION> ] [ --env <Environment> ]
                [ {-m | --metric} <METRIC> ] [ --no-color ]
                [ {-o | --output} <FORMAT> ] [ --token <AUTH_TOKEN> ]
                [ {-v | --verbose} ] [--] <DB>

OPTIONS
        -c <COLLECTION>, --collection <COLLECTION>
            Name of the collection to create

        -cf <CONFIG_FILE>, --config-file <CONFIG_FILE>
            Configuration file (default = ~/.astrarc)

        -conf <CONFIG_SECTION>, --config <CONFIG_SECTION>
            Section in configuration file (default = ~/.astrarc)

        -d <DIMENSION>, --dimension <DIMENSION>
            Name of the collection to create

        --env <Environment>
            Astra Environment to use

        -m <METRIC>, --metric <METRIC>
            Name of the collection to create

        --no-color
            Remove all colors in output

        -o <FORMAT>, --output <FORMAT>
            Output format, valid values are: human,json,csv

        --token <AUTH_TOKEN>
            Key to use authenticate each call.

        -v, --verbose
            Verbose mode with log in console

        --
            This option can be used to separate command-line options from the
            list of arguments (useful when arguments might be mistaken for
            command-line options)

        <DB>
            Database name (if unique) or Database identifier
Here are 3 sample commands:
astra db create-collection workshop_rag \
  --collection collection_simple

astra db create-collection workshop_rag \
  --collection collection_vector_openai \
  -d 1536 -m cosine

astra db create-collection workshop_rag \
  --collection collection_vector_vertexai \
  -d 768
will end up with 3 collections
🖥️ Sample output
+----------------------------+-----------+-----------+
| Name                       | Dimension | Metric    |
+----------------------------+-----------+-----------+
| collection_simple          |           |           |
| collection_vector_openai   | 1536      | cosine    |
| collection_vector_vertexai | 768       | cosine    |
+----------------------------+-----------+-----------+
✅ 4.3.c. Delete a collection
- To delete an existing collection use
delete-collection:
5. Astra STREAMING
5.1. List tenants
✅ 5.1.a - list
To get the list of tenants in your organization, use the command list in the group streaming.
🖥️ Sample output
+---------------------+-----------+----------------+----------------+
| name                | cloud     | region         | Status         |
+---------------------+-----------+----------------+----------------+
| cedrick-20220910    | aws       | useast2        | active         |
| trollsquad-2022     | aws       | useast2        | active         |
+---------------------+-----------+----------------+----------------+
✅ 5.1.b - Change output as csv amd json
🖥️ Sample output
🖥️ Sample output
5.2. Create tenant
✅ 4.2.a - Check tenant existence with exist
The tenant name needs to be unique for the cluster (Cloud provider / region). It may be useful to check if the name is already in use by somebody else.
✅ 5.2.b - Create tenant
To create a tenant with default cloud (aws), default region (useast2), plan (free) and namespace (default):
To view all supported options, please use:
5.3. Get tenant details
✅ 5.3.a - To get i nformation or details on an entity use the command get.
The pulsar token is not displayed in this view as it is too long, but there are dedicated commands to display it.
🖥️ Sample output
+------------------+-------------------------------------------------------------+
| Attribute        | Value                                                       |
+------------------+-------------------------------------------------------------+
| Name             | trollsquad-2022                                             |
| Status           | active                                                      |
| Cloud Provider   | aws                                                         |
| Cloud region     | useast2                                                     |
| Cluster Name     | pulsar-aws-useast2                                          |
| Pulsar Version   | 2.10                                                        |
| Jvm Version      | JDK11                                                       |
| Plan             | payg                                                        |
| WebServiceUrl    | https://pulsar-aws-useast2.api.streaming.datastax.com       |
| BrokerServiceUrl | pulsar+ssl://pulsar-aws-useast2.streaming.datastax.com:6651 |
| WebSocketUrl     | wss://pulsar-aws-useast2.streaming.datastax.com:8001/ws/v2  |
+------------------+-------------------------------------------------------------+
✅ 5.3.b. To get a special property you can add the option --key. Multiple keys are available: status, cloud, pulsar_token. Notice that the output is raw. This command is expected to be used in scripts
✅ 5.3.c. To get tenant pulsar-token please use pulsar-token command
🖥️ Sample output
eyJhbGciOiJSUzI1NiIsInR5cCI6IkpXVCJ9.eyJpYXQiOjE2NjI5NzcyNzksImlzcyI6ImRhdGFzdGF4Iiwic3ViIjoiY2xpZW50O2Y5NDYwZjE0LTk4NzktNGViZS04M2YyLTQ4ZDNmM2RjZTEzYztkSEp2Ykd4emNYVmhaQzB5TURJeTsxOTZlYjg0YTMzIiwidG9rZW5pZCI6IjE5NmViODRhMzMifQ.rjJYDG_nJu0YpgATfjeKeUUAqwJGyVlvzpA5iP-d5-bReQf1FPaDlGxo40ADHHn2kx2NOdgMsm-Ys4K...
✅ 5.3.d. To get tenant status in a human readble for use status command
5.4. Delete Tenant
✅ 5.4.a. To delete a tenant simply use the command delete
5.5. Pulsar-Shell
Pulsar-Shell is a standalone shell to work with Apache Pulsar. It is compliant with Astra but requires a few extra steps of configuration. The purpose of the CLI is to integrate with pulsar-shell and do the integration and setup for you.
Astra CLI will download, install, setup and wrap pulsar-shell for you to interact with Astra.
✅ 5.5.a - Interactive mode
If no options are provided, you enter pulsar-shell interactive mode
🖥️ Sample output
/Users/cedricklunven/.astra/lunastreaming-shell-2.10.1.1/conf/client-aws-useast2-trollsquad-2022.conf
Pulsar-shell is starting please wait for connection establishment...
Using directory: /Users/cedricklunven/.pulsar-shell
Welcome to Pulsar shell!
    Service URL: pulsar+ssl://pulsar-aws-useast2.streaming.datastax.com:6651
    Admin URL: https://pulsar-aws-useast2.api.streaming.datastax.com

Type help to get started or try the autocompletion (TAB button).
Type exit or quit to end the shell session.

default(pulsar-aws-useast2.streaming.datastax.com)>
You can quit with exit.
✅ 5.5.b - Execute Pulsar Shell command
To execute command with pushar-shell use the flag -e.
🖥️ Sample output
/Users/cedricklunven/.astra/lunastreaming-shell-2.10.1.1/conf/client-aws-useast2-trollsquad-2022.conf
Pulsar-shell is starting please wait for connection establishment...
Using directory: /Users/cedricklunven/.pulsar-shell
[1/1] Executing admin namespaces list trollsquad-2022
[1/1] ✔ admin namespaces list trollsquad-2022
✅ 5.5.c - Execute Pulsar Shell files
To execute CQL Files with pushar-shell use the flag -e.
5.6. Pulsar-client and Admin
Pulsar client and admin are provided within pulsar-shell. This section simply provides some examples to write and read in a topic with a client.
✅ 5.6.a - Create a topic demo.
- First start the pulsar-shell on 2 different terminals
- Then on first terminal create a topic
demoin the namespacedefault
- You can now list the different topics in the namespace
default
- Start a consumer on this topic
🖥️ Sample output
.. init ...
83 - R:pulsar-aws-useast2.streaming.datastax.com/3.16.119.226:6651]] Connected to server
2022-09-12T12:28:34,869+0200 [pulsar-client-io-1-1] INFO  org.apache.pulsar.client.impl.ClientCnx - [id: 0xc5ce3ec4, L:/192.168.82.1:53683 - R:pulsar-aws-useast2.streaming.datastax.com/3.16.119.226:6651] Connected through proxy to target broker at 192.168.7.141:6650
2022-09-12T12:28:35,460+0200 [pulsar-client-io-1-1] INFO  org.apache.pulsar.client.impl.ConsumerImpl - [persistent://trollsquad-2022/default/demo][astra_cli_tuto] Subscribing to topic on cnx [id: 0xc5ce3ec4, L:/192.168.82.1:53683 - R:pulsar-aws-useast2.streaming.datastax.com/3.16.119.226:6651], consumerId 0
2022-09-12T12:28:35,645+0200 [pulsar-client-io-1-1] INFO  org.apache.pulsar.client.impl.ConsumerImpl - [persistent://trollsquad-2022/default/demo][astra_cli_tuto] Subscribed to topic on pulsar-aws-useast2.streaming.datastax.com/3.16.119.226:6651 -- consumer: 0
- On the second terminal you can now start a producer
🖥️ Sample output
2022-09-12T12:36:28,684+0200 [pulsar-client-io-14-1] INFO  org.apache.pulsar.client.impl.ClientCnx - [id: 0x682890b5, L:/192.168.1.106:53796 ! R:pulsar-aws-useast2.streaming.datastax.com/3.138.177.230:6651] Disconnected
2022-09-12T12:36:30,756+0200 [main] INFO  org.apache.pulsar.client.cli.PulsarClientTool - 40 messages successfully produced


And on the client side
key:[null], properties:[], content:world
----- got message -----
key:[null], properties:[], content:hello
5.7. List Regions
-cor--cloudallows to select a cloud provider, the 3 accepted values will beaws,gcpandazure-for--filterallows to look for either a location of region (eg.-f France, -fus-oor--outputto change output from table (human) to csv or json-vfor verbose mode-tto provide token of organization if not default selected
5.8. Create .env file
5.9. Change Data Capture
- Create a DB
- Create a tenant in same region
- Creating a table for the test
- And insert
CREATE TABLE IF NOT EXISTS demo (foo text PRIMARY KEY, bar text);
CREATE TABLE IF NOT EXISTS table2 (foo text PRIMARY KEY, bar text);
INSERT INTO demo(foo,bar) VALUES('1','item1');
INSERT INTO demo(foo,bar) VALUES('1','item2');
quit;
- Create CDC
- List CDC (from Streaming)
- List CDC (from DB)
6. User and Roles
6.1. List users
🖥️ Sample output
+--------------------------------------+-----------------------------+---------------------+
| User Id                              | User Email                  | Status              |
+--------------------------------------+-----------------------------+---------------------+
| b665658a-ae6a-4f30-a740-2342a7fb469c | cedrick.lunven@datastax.com | active              |
+--------------------------------------+-----------------------------+---------------------+
6.2. Invite User
Check the list of users and notice the new user invited.
🖥️ Sample output
+--------------------------------------+-----------------------------+---------------------+
| User Id                              | User Email                  | Status              |
+--------------------------------------+-----------------------------+---------------------+
| 825bd3d3-82ae-404b-9aad-bbb4c53da315 | cedrick.lunven@gmail.com    | invited             |
| b665658a-ae6a-4f30-a740-2342a7fb469c | cedrick.lunven@datastax.com | active              |
+--------------------------------------+-----------------------------+---------------------+
6.3. Revoke User
🖥️ Sample output
+--------------------------------------+-----------------------------+---------------------+
| User Id                              | User Email                  | Status              |
+--------------------------------------+-----------------------------+---------------------+
| b665658a-ae6a-4f30-a740-2342a7fb469c | cedrick.lunven@datastax.com | active              |
+--------------------------------------+-----------------------------+---------------------+