Temporal
![]()
Overview
Temporal.io is an open source microservice orchestration platform that assists in tracking workflows in your application development. It provides the user with a plug-and-play persistence layer that lets the user choose and configure their Temporal Server with their preferred backend. Currently, Temporal is compatible with Postgres, MySQL, and Apache CassandraⓇ as backend dependencies.
Prerequisites
- You should have an Astra account
- You should Create an Astra Database
- You should Have an Astra Token
Note
This runbook was written using Mac OS Monterey but it will also work with Windows. Any Windows-specific instructions will be noted as such.
Installation and Setup
✅ Step 1: Setup Astra
- In your Astra database, create two new keyspaces called "temporal" and "temporal_visibility". You will be using both of these in the next steps.
- Make sure to create an Astra token with Admin Role
- Get your Database ID
Find your Database ID in one of two ways:
- Navigate to your your database and get the last ID in the URL:
https://astra.datastax.com/org/.../database/xxxxxxxx-xxxx-xxxx-xxxx-xxxxxxxxxxxx - Copy and paste the Datacenter ID without the trailing
-1from the Regions section of your Astra Dashboard.
✅ Step 2: Temporal Pre-setup
- Clone this GitHub repository
- Navigate to your cloned repository and using your preferred text editor (e.g. VisualStudio or Sublime), update the .env file with your Astra Token and Astra Database ID that you obtained above.
✅ Step 3: Temporal Schema Migration to Astra DB
For this step, you will set up the keyspaces you created earlier in the Astra prerequisites (temporal and temporal_visibility). You will be using temporal-cassandra-tool which is part of the Temporal repo and it relies on schema definition.
- Navigate to your cloned
temporal-astra-cql-proxydirectory - Run the following commands to initialize the keyspaces that we created through Astra. Note that there are two sets of commands, one for
temporalkeyspace and one fortemporal_visibilitykeyspace:
docker-compose -f docker-compose-schema.yaml run temporal-admin-tools \
  -ep cql-proxy -k temporal setup-schema -v 0.0
docker-compose -f docker-compose-schema.yaml run temporal-admin-tools \
  -ep cql-proxy -k temporal update-schema -d schema/cassandra/temporal/versioned/

docker-compose -f docker-compose-schema.yaml run temporal-admin-tools \
  -ep cql-proxy -k temporal_visibility setup-schema -v 0.0
docker-compose -f docker-compose-schema.yaml run temporal-admin-tools \
  -ep cql-proxy -k temporal_visibility update-schema -d schema/cassandra/visibility/versioned/
Once the process is completed, you should see a message similar to this:
2022-03-02T22:23:27.618Z    INFO    Validating connection to cassandra cluster. {"logging-call-at": "cqlclient.go:112"}
2022-03-02T22:42:53.526Z    INFO    Connection validation succeeded.    {"logging-call-at": "cqlclient.go:118"}
2022-03-02T22:42:53.526Z    INFO    Starting schema setup   {"config": {"SchemaFilePath":"","InitialVersion":"0.0","Overwrite":false,"DisableVersioning":false}, "logging-call-at": "setuptask.go:57"}
2022-03-02T22:42:53.526Z    DEBUG   Setting up version tables   {"logging-call-at": "setuptask.go:67"}
2022-03-02T22:42:54.120Z    DEBUG   Current database schema version 1.6 is greater than initial schema version 0.0. Skip version upgrade    {"logging-call-at": "setuptask.go:116"}
2022-03-02T22:42:54.120Z    INFO    Schema setup complete   {"logging-call-at": "setuptask.go:131"}
Great! Your schemas have been migrated with Astra DB.
Confirm your tables exist in Astra
- You can double-check to make sure the correct tables have been created by querying your database in Astra DB’s CQL Console.
- Run
DESC tables;in both yourtemporalandtemporal_visibilitykeyspaces. You should see there are tables loaded in that were created by the schema migration withtemporal-cassandra-tool.
token@cqlsh> use temporal;
token@cqlsh:temporal> desc tables;

history_node        tasks             cluster_metadata_info
cluster_membership  namespaces        cluster_metadata
schema_version      namespaces_by_id  schema_update_history
executions          queue_metadata
queue               history_tree

token@cqlsh:temporal> use temporal_visibility;
token@cqlsh:temporal_visibility> desc tables;

open_executions  schema_update_history  schema_version  closed_executions
✅ Step 4: Run Docker Compose
In this step, the docker-compose.yaml file is already provided for you in the temporal-astra-cql-proxy repo. This file creates different docker containers to run Temporal server. The persistence layer is configured for you to connect with cql-proxy, and it should pull your Astra credentials from when you set it earlier:
services:
 cql-proxy:
   container_name: cqlproxy
   image: datastax/cql-proxy:v${CQL_PROXY_VERSION}
   ...
   environment:
     - ASTRA_TOKEN=${ASTRA_TOKEN}
     - ASTRA_DATABASE_ID=${ASTRA_DATABASE_ID}
     - HEALTH_CHECK=true
Now you can run the docker-compose command to start up Temporal:
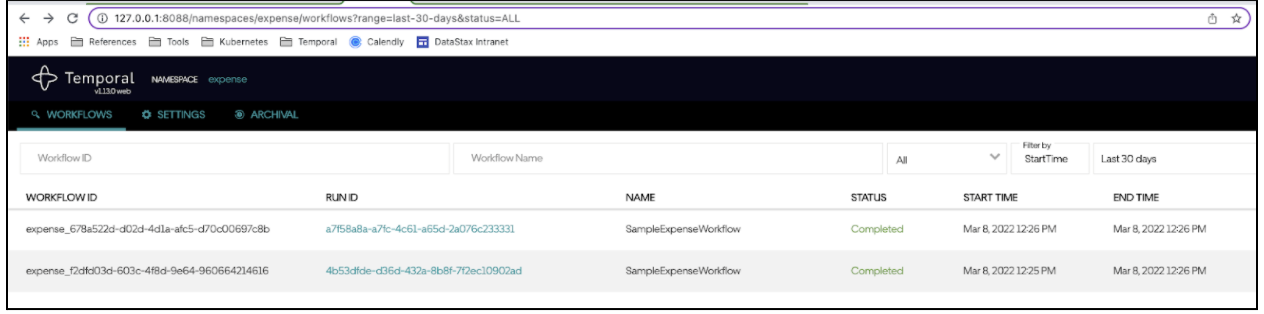
✅ Step 5: Test and Validate
You can test your connection and play with your Temporal cluster with these instructions.
- Make sure to use tctl to create namespaces dedicated to certain workflows:
- When using the sample apps, keep in mind that you want to modify the starter and worker code so that it points to this specific Temporal deployment. For example:
Once you have this all running, you should be able to see your workflows reflect on both the Temporal UI and Astra UI.