Celery
![]()
Overview
Celery is a (BSD-licensed) open source, simple and flexible distributed task queue for asynchronous processing of messages. With Celery one can define units of work called "tasks" and dispatch them for execution, in a distributed way if desired. Celery is a Python package and as such is easily integrated in any Python project.
Typical use cases might be: a queue of uploaded images to resize in the background, long-running tasks initiated by a Web application's API, a batch of emails scheduled for sending, ...
Celery is composed of two parts: on one side, one or more clients define the tasks to be run and enqueue/schedule them for execution; on the other side, one or more workers pick up these tasks, execute them and optionally store the resulting values. Communication between these two parts happens through a message bus (such as RabbitMQ) acting as broker, while the return value of a task is made available back to the caller through a backend (de/serialization is transparently handled by the Celery infrastructure).
Celery supports several backends for storing and exposing task results.
Among the supported backends are Cassandra and (starting with v5.3) Astra DB.
In the following we assume familiarity with the celeryconfig configuration object for Celery and with the usage of Cassandra
as backend. See the Celery documentation for more details:
- ℹ️ Celery documentation
- ℹ️ The
celeryconfigobject - ℹ️ Cassandra/AstraDB backend configuration guide (which covers the instructions on this page as well)
- 📥 Celery installation instructions
Prerequisites
- Create an Astra Database. In the following example, a keyspace called
celeryksis created in the database. - Create an Astra Token with the role "Database Administrator" (it is desirable to leave table creation to Celery). You should have received your token while creating the database in the previous step.
- Download your secure connect bundle ZIP.
- Install Celery with the Cassandra backend in your local Python environment, e.g.
pip install celery[cassandra]. See the backend-settings page for additional info.
Keep the token information and the bundle file location ready: these will be soon provided in the Celery configuration.
Installation and Setup
Here a minimal Celery setup that makes use of the Astra DB backend is described start-to-end.
A task will be defined and executed through Celery: afterwards, its return value will be retrieved on the client side. For this example to work, a message bus is needed - here, in line with a quickstart on Celery's documentation, a dockerized RabbitMQ is used.
1. Start a message broker
Make sure you have a RabbitMQ instance running in Docker with docker run -d -p 5672:5672 rabbitmq (it might take a while for the image to be downloaded and complete startup).
2. Define a task
Create a tasks.py module with the definition of a task, to be later executed through Celery:
from celery import Celery

app = Celery('tasks')
app.config_from_object('celeryconfig')

@app.task
def sortWords(text, capitalize):
    # Rearrange the text so that words are in alphabetical order.
    words = text.split(' ')
    sortedWords = sorted(words, key=str.upper)
    return ' '.join([
        w if not capitalize else w.upper()
        for w in sortedWords
    ])
3. Configure Celery
Create a module celeryconfig.py in the same directory, providing (among other things) the broker and backend configuration:
broker_url = 'pyamqp://guest@localhost//'

broker_connection_retry_on_startup = True

task_serializer = 'json'
result_serializer = 'json'
accept_content = ['json']
enable_utc = True

result_backend = 'cassandra://'
cassandra_keyspace = 'celeryks'                       # REPLACE_ME
cassandra_table = 'celery_tasks'                      # REPLACE_ME
cassandra_read_consistency = 'quorum'
cassandra_write_consistency = 'quorum'
cassandra_auth_provider = 'PlainTextAuthProvider'
cassandra_auth_kwargs = {
  'username': 'client-id-from-astra-token',           # REPLACE_ME
  'password': 'client-secret-from-astra-token',       # REPLACE_ME
}
cassandra_secure_bundle_path = '/path/to/secure-connect-database.zip'   # REPLACE_ME
In the above, take care of inserting your values for:
- the keyspace name you created earlier in Astra DB;
- the table name you want Celery to store results in (no need to create it beforehand);
- the Client ID and Client Secret generated in your Astra DB token earlier (resp. as username and password in
cassandra_auth_kwargs); - the path to the Secure Connect Bundle you downloaded earlier.
4. Start the worker
Start a Celery worker with:
5. Run and check a task
In a different shell, open a Python REPL and type the following commands to run a couple of tasks and retrieve their result:
from tasks import sortWords
sorted1 = sortWords.delay('storage yay my DB is powerful results Astra', False)
sorted1.ready()
# Returns:     True
# (as soon as the function completes, which here is almost immediately)

sorted1.get()
# Returns:     'Astra DB is my powerful results storage yay'

sorted2 = sortWords.delay('In the land of another wizards day', capitalize=True)
sorted2.get()
# Returns:     'ANOTHER DAY IN LAND OF THE WIZARDS'
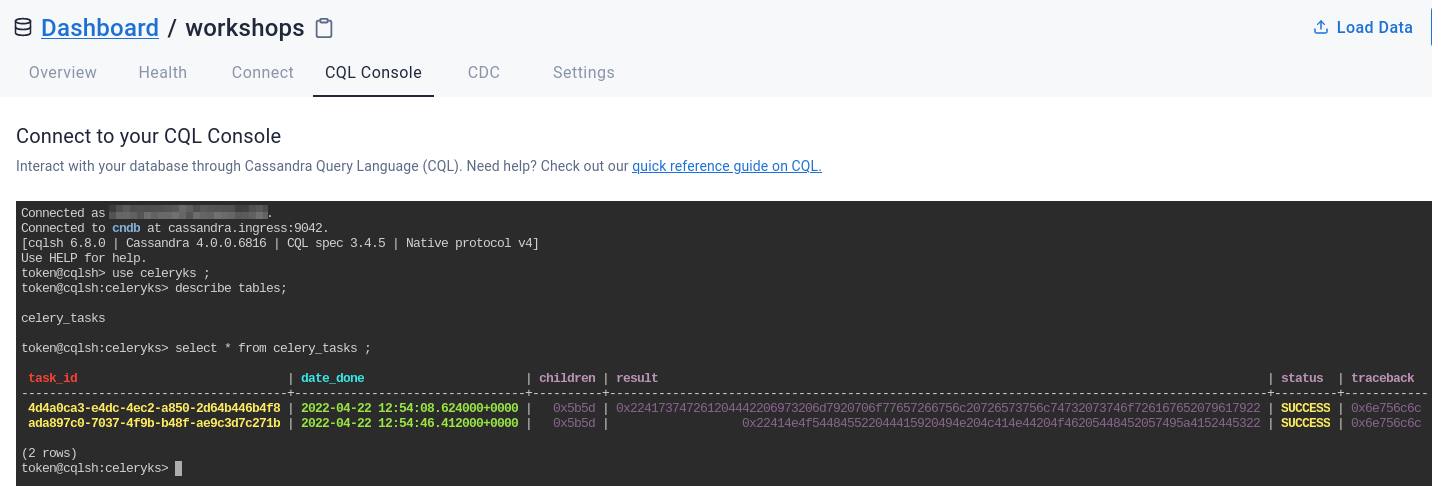
6. (Optional) Look at the database
Check the corresponding data stored on Astra DB. Navigate to the CQL Console for the database you created and enter the following commands:
USE celeryks;               // <== enter your keyspace name here

DESCRIBE TABLES;            // the output, e.g. "celery_tasks", lists the tables

SELECT * FROM celery_tasks; // <== enter your table name here
Additional configuration
Celery uses the DataStax Python driver for Cassandra; hence, the choice of connection parameters is that for the generic driver-based usage of Cassandra in Python.
In particular, one may want to specify additional parameters through the celeryconfig such as
protocol level, load-balancing policy and so on. Refer to the
"Additional configuration"
section in the Celery documentation for a more comprehensive setup.