Apache Airflow
Overview
Apache Airflow is an open source workflow management system. It provides components which allow engineers to build data pipelines between different systems. These instructions will step through tasks/adjustments to be done in each product (Astra DB, cql-proxy, Apache Airflow), ultimately resulting in Airflow being able to work with AstraDB in its directed acyclic graphs (DAG).
Prerequisites
- You should have an Astra account
- You should Create an Astra Database
- You should Have an Astra Token
- You should Download your Secure Connect Bundle
- You should install `python3` and `pip3` (local deployment of Airflow) or Docker (docker)
This article was written for Apache Airflow version 2.2.3 on MacOS with Python 3.9.
Installation
✅ Download and install
Following the Apache Airflow reference documentation download and install the software.
✅ Create the keyspace airflow
From the Astra DB dashboard, click on your database name. Scroll down to where the keyspaces are listed, and click the Add Keyspace button to create a new keyspace. Name this keyspace airflow.
✅ Start Cql Proxy
DataStax’s cql-proxy is designed to function as an intermediate connection point to allow legacy Apache Cassandra applications to connect to DataStax Astra DB using its new Secure Connect Bundle. There are a few ways to install and run DataStax’s cql-proxy, as outlined in cql-proxy.
Be sure to start cql-proxy with the following settings:
- Using the Secure Connect Bundle downloaded in the previous section
- Binding it to the listen IP of the server instance
- Specifying the username of “token”
- Specifying the Astra Token created for the user in Astra DB as the password
You can run cql-proxy (in the foreground) from the command line in this way, like this:
./cql-proxy --bundle ~/local/astraCreds/secure-connect.zip \
    --bind 127.0.0.1 \
    --username token \
    --password AstraCS:rtFckUZblahblahblahblahblahblaha3953d799a525
Important to note that the command shown above binds cql-proxy to localhost (127.0.0.1), meaning it is not reachable (by Airflow) from outside the server instance.
✅ Create a new connection in Apache Airflow
Inside Apache Airflow, click Connections from underneath the Admin drop-down menu. Then click on the blue button labeled with the plus sign (+) to add a new connection. Fill out the form as shown in Figure 2:
- Connection Id: A unique identifier for the connection in Apache Airflow, which will be referenced inside the DAG code. We will use “cassandra_cqlproxy.”
- Connection Type: Select “Cassandra” from the drop-down. If it is not present, you will have to install Airflow’s Cassandra provider.
- Host: The listen address that cql-proxy is bound to. In this case, that is “127.0.0.1.”
- Schema: The Cassandra keyspace which we created in Astra DB. We’ll set that to “airflow” in this case.
- Login: Your Astra DB client id.
- Password: Your Astra DB client secret.
- Port: The port that cql-proxy is listening on for the CQL native binary protocol, most likely 9042.
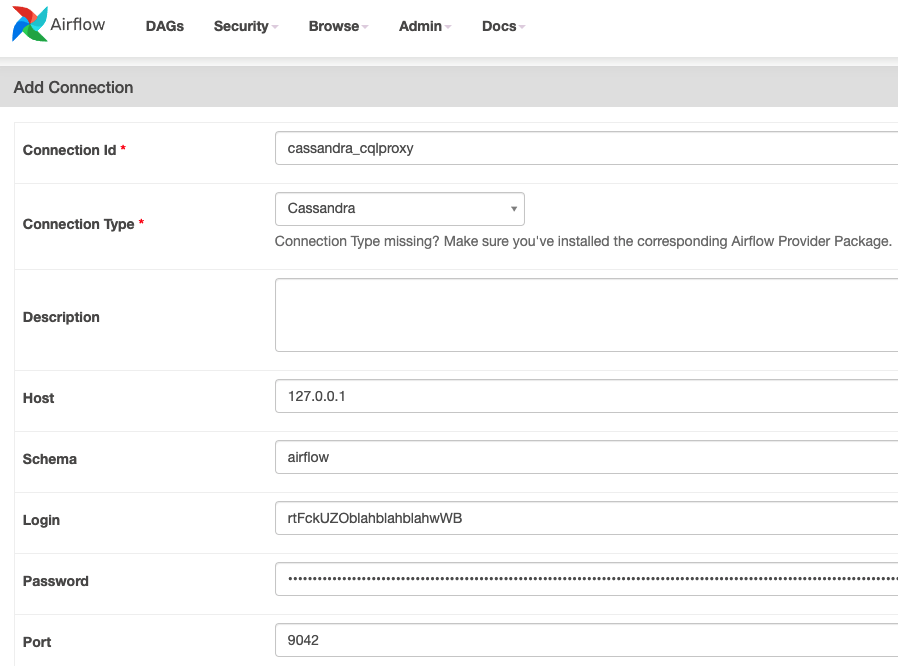
Figure 2 - Create a new Cassandra connection for Apache Airflow.
Click the blue Save button to persist the new connection.
✅ Create a new DAG in Apache Airflow
A directed acyclic graph (DAG) is essentially a Python script which imports one or more libraries specific to Airflow. To create a new DAG, first locate your DAG directory. By default, Airflow looks for custom DAGs in the ~/airflow/dags/ directory.
For testing, there is a sample DAG out in the following GitHub repository: https://github.com/aar0np/DS_Python_stuff/blob/main/cassandra_test_dag.py
This DAG uses the following line to reference the Cassandra connection we created in the above step:
The other important aspect is that this DAG sets its unique identifier as cass_hooks_tutorial:
It also specifically creates two unique tasks:
check_table_existsquery_system_local
✅ Final Test
To test the connection, copy the DAG mentioned above into the /dags/ directory. Then we will invoke Airflow’s task testing functionality, by running airflow tasks test and specifying:
- The DAG’s unique identifier
- The name of the task to be run
- The execution date
If today’s date is 2022-02-08, the command looks like this:
Many messages will go by quickly. If it worked, the final messages should look something like this:
INFO - Done. Returned value was: True
INFO - Marking task as SUCCESS. dag_id=cass_hooks_tutorial, task_id=check_table_exists, execution_date=20220208T000000, start_date=20220208T195333, end_date=20220208T195334
Acknowledgements
Special thanks goes out to Obioma Anomnachi of Anant. Obi’s video and GitHub repo proved quite helpful in building out this tutorial.